HP Pavilion d4000 Upgrading and Servicing Guide - Page 12
Removing a Memory Module, Installing a Memory Module
 |
View all HP Pavilion d4000 manuals
Add to My Manuals
Save this manual to your list of manuals |
Page 12 highlights
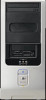
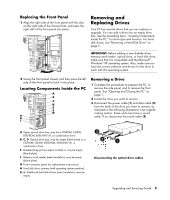
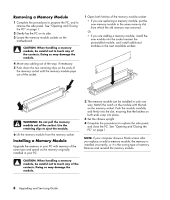
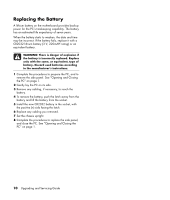
Removing a Memory Module 1 Complete the procedures to prepare the PC, and to remove the side panel. See "Opening and Closing the PC" on page 1. 2 Gently lay the PC on its side. 3 Locate the memory module sockets on the motherboard. CAUTION: When handling a memory module, be careful not to touch any of the contacts. Doing so may damage the module. 4 Move any cabling out of the way, if necessary. 5 Push down the two retaining clips on the ends of the memory socket until the memory module pops out of the socket. 1 Open both latches of the memory module socket: • If you are replacing a memory module, put the new memory module in the same memory slot from which the old memory was removed. Or • If you are adding a memory module, install the new module into the socket nearest the preinstalled module, and install additional modules in the next available sockets. WARNING: Do not pull the memory module out of the socket. Use the retaining clips to eject the module. 6 Lift the memory module from the memory socket. Installing a Memory Module Upgrade the memory in your PC with memory of the same type and speed as the memory originally installed in your PC. 2 The memory module can be installed in only one way. Match the notch on the module with the tab on the memory socket. Push the module carefully and firmly into the slot, ensuring that the latches on both ends snap into place. 3 Set the chassis upright. 4 Complete the procedures to replace the side panel, and close the PC. See "Opening and Closing the PC" on page 1. NOTE: If your computer shows a blank screen after you replace or add a memory module, the memory is installed incorrectly, or it is the wrong type of memory. Remove and reinstall the memory module. CAUTION: When handling a memory module, be careful not to touch any of the contacts. Doing so may damage the module. 8 Upgrading and Servicing Guide
-
 1
1 -
2
-
3
-
4
-
5
-
6
-
 7
7 -
 8
8 -
 9
9 -
 10
10 -
 11
11 -
 12
12 -
 13
13 -
 14
14 -
 15
15 -
 16
16
 |
 |