HP Pavilion dv4-2100 Notebook PC User Guide - Windows 7 - Page 127
Removing an eSATA device, Using the expansion port
 |
View all HP Pavilion dv4-2100 manuals
Add to My Manuals
Save this manual to your list of manuals |
Page 127 highlights
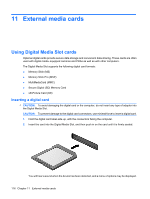
Removing an eSATA device CAUTION: To prevent loss of information or an unresponsive system, use the following procedure to safely remove an eSATA device. CAUTION: To prevent damage to an eSATA connector, do not pull on the cable to remove the eSATA device. To remove an eSATA device: 1. Click the Safely Remove Hardware and Eject Media icon in the notification area, at the far right of the taskbar. NOTE: To display the Safely Remove Hardware and Eject Media icon, click the Show hidden icons icon (the arrow at the left of the notification area). 2. Click the name of the device in the list. NOTE: You are prompted that it is safe to remove the device. 3. Remove the device. Using the expansion port The expansion port connects the computer to an optional docking device or optional expansion product, so that additional ports and connectors can be used with the computer. NOTE: The computer has only one expansion port. The term expansion port 3 describes the type of expansion port. Using the expansion port 115
-
 1
1 -
2
-
3
-
4
-
5
-
6
-
7
-
8
-
9
-
10
-
11
-
12
-
13
-
14
-
15
-
16
-
17
-
18
-
19
-
20
-
21
-
22
-
23
-
24
-
25
-
26
-
27
-
28
-
29
-
30
-
31
-
32
-
33
-
34
-
35
-
36
-
37
-
38
-
39
-
40
-
41
-
42
-
43
-
44
-
45
-
46
-
47
-
48
-
49
-
50
-
51
-
52
-
53
-
54
-
55
-
56
-
57
-
58
-
59
-
60
-
61
-
62
-
63
-
64
-
65
-
66
-
67
-
68
-
69
-
70
-
71
-
72
-
73
-
74
-
75
-
76
-
77
-
78
-
79
-
80
-
81
-
82
-
83
-
84
-
85
-
86
-
87
-
88
-
89
-
90
-
91
-
92
-
93
-
94
-
95
-
96
-
97
-
98
-
99
-
100
-
101
-
102
-
103
-
104
-
105
-
106
-
107
-
108
-
109
-
110
-
111
-
112
-
113
-
114
-
115
-
116
-
117
-
118
-
119
-
120
-
121
-
 122
122 -
 123
123 -
 124
124 -
 125
125 -
 126
126 -
 127
127 -
 128
128 -
 129
129 -
 130
130 -
 131
131 -
 132
132 -
133
-
134
-
135
-
136
-
137
-
138
-
139
-
140
-
141
-
142
-
143
-
144
-
145
-
146
-
147
-
148
-
149
-
150
-
151
-
152
-
153
-
154
-
155
-
156
-
157
-
158
-
159
-
160
-
161
-
162
-
163
-
164
-
165
-
166
-
167
 |
 |
