HP Photosmart 620 HP Photosmart 620 series digital camera - (English) User Gui - Page 16
Choosing the language, Setting the date and time - camera manual
 |
View all HP Photosmart 620 manuals
Add to My Manuals
Save this manual to your list of manuals |
Page 16 highlights
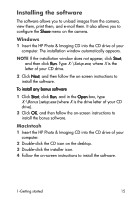
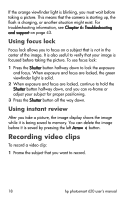
Choosing the language The first time you turn the camera on, the following screen appears and prompts you to choose a language. 1 Scroll to the language that you want by using the Arrow buttons. 2 Press to select the highlighted language. Setting the date and time 1 Press repeatedly until your preferred date format appears (M = month, D = day, Y = year). Press the right Arrow button to highlight the date. 2 Press to select the first value, and then use the buttons to change it. Press to confirm. Set the remaining values in the same way. 3 Press the button to highlight the time format, and then press if you want to change it. 4 Press the button to highlight the time. Set the time values in the same way you set the date values in step 2. 5 When finished setting the date and time, press the button to highlight Exit, and then press . If the batteries are removed from the camera for longer than ten minutes, you might need to reset the date and time. For more information about batteries, see Appendix A: Batteries and accessories on page 61. 14 hp photosmart 620 user's manual
-
 1
1 -
2
-
3
-
4
-
5
-
6
-
7
-
8
-
9
-
10
-
 11
11 -
 12
12 -
 13
13 -
 14
14 -
 15
15 -
 16
16 -
 17
17 -
 18
18 -
 19
19 -
 20
20 -
 21
21 -
22
-
23
-
24
-
25
-
26
-
27
-
28
-
29
-
30
-
31
-
32
-
33
-
34
-
35
-
36
-
37
-
38
-
39
-
40
-
41
-
42
-
43
-
44
-
45
-
46
-
47
-
48
-
49
-
50
-
51
-
52
-
53
-
54
-
55
-
56
-
57
-
58
-
59
-
60
-
61
-
62
-
63
-
64
-
65
-
66
-
67
-
68
-
69
-
70
-
71
-
72
-
73
-
74
-
75
-
76
-
77
-
78
-
79
-
80
 |
 |
