HP Photosmart C4100 Setup Guide - Page 5
Windows
 |
View all HP Photosmart C4100 manuals
Add to My Manuals
Save this manual to your list of manuals |
Page 5 highlights
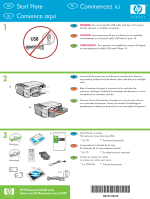
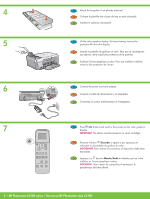
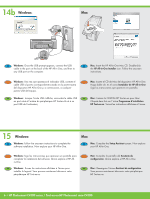
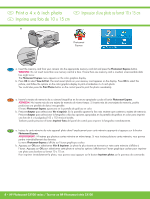
13 Windows: EN Select the green Windows CD. ES Seleccione el CD de Windows verde. FR Munissez-vous du CD-ROM vert pour Windows. 14a Windows: Mac: EN Select the gray Mac CD. ES Seleccione el CD de Mac gris. FR Munissez-vous du CD-ROM gris pour Mac. Mac: EN Windows: Turn on your computer, login if necessary, and then wait for the desktop to appear. Insert the green Windows CD and follow the onscreen instructions. IMPORTANT: If the startup screen does not appear, double-click My Computer, double-click the CD-ROM icon with the HP logo, and then double-click setup.exe. ES Windows: Encienda el equipo, inicie la sesión si es necesario y, a continuación, espere a que aparezca el escritorio. Introduzca el CD de Windows verde y siga las instrucciones que aparecen en pantalla. IMPORTANTE: Si no aparece la pantalla de inicio, haga doble clic en Mi PC, haga doble clic en el icono CD-ROM con el logotipo de HP y, a continuación, haga doble clic en setup.exe. EN Mac: Connect the USB cable to the port on the back of the HP All-in-One, and then to any USB port on the computer. ES Mac: Conecte el cable USB al puerto ubicado en la parte posterior del dispositivo HP All-in-One y, a continuación, a cualquier puerto USB del equipo. FR Mac : Connectez le câble USB au port situé à l'arrière de l'appareil HP Tout-en-un, puis à n'importe quel port USB de l'ordinateur. FR Windows : Allumez l'ordinateur, connectez-vous si nécessaire et attendez que le bureau s'affiche. Insérez le CD-ROM vert pour Windows et suivez les instructions à l'écran. IMPORTANT : Si l'écran de démarrage ne s'affiche pas, cliquez deux fois sur l'icône Poste de travail, puis sur l'icône du CD-ROM ayant le logo HP, puis cliquez deux fois sur le fichier setup.exe. HP Photosmart C4100 series / Tout-en-un HP Photosmart série C4100 • 5
-
 1
1 -
 2
2 -
 3
3 -
 4
4 -
 5
5 -
 6
6 -
 7
7 -
 8
8 -
 9
9 -
 10
10 -
 11
11 -
12
 |
 |