HP Photosmart C4390 Setup Guide
HP Photosmart C4390 - All-in-One Printer Manual
 |
View all HP Photosmart C4390 manuals
Add to My Manuals
Save this manual to your list of manuals |
HP Photosmart C4390 manual content summary:
- HP Photosmart C4390 | Setup Guide - Page 1
the USB cable EN Wireless (802.11) network users: you must follow until Section A2. the instructions in this Setup Guide to be successful adding the HP All-in-One to your network. d'accès aux cartouches d'impression. HP Photosmart C4380 All-in-One series /HP Photosmart C4380 Tout-en-un série - HP Photosmart C4390 | Setup Guide - Page 2
HP All-in-One. NOTE: Pay attention to the helpful messages and animations in the display during the setup install print cartridges, go to the next step in this guide installer des cartouches d'impression, passez à l'étape suivante de ce guide. 2 • HP Photosmart C4380 All-in-One series /HP Photosmart - HP Photosmart C4390 | Setup Guide - Page 3
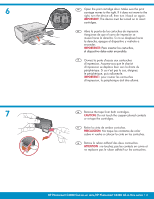
off, then turn it back on again. IMPORTANT: The device must be turned on to insert cartridges. ES Abra la puerta de los cartuchos de impresión. Asegúrese de que el carro de pas le ruban adhésif sur les cartouches. HP Photosmart C4380 Tout-en-un série/HP Photosmart C4380 All-in-One series • 3 - HP Photosmart C4390 | Setup Guide - Page 4
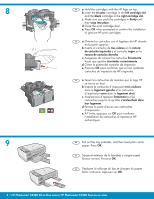
the print cartridge door. e. Press OK when prompted to confirm the installation of genuine HP print cartridges. ES a. Oriente los cartuchos con el logotipo de HP situado en la papier blanc ordinaire. Appuyez sur OK. 4 • HP Photosmart C4380 All-in-One series /HP Photosmart C4380 Tout-en-un série - HP Photosmart C4390 | Setup Guide - Page 5
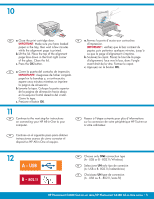
B - 802.11 EN Choose only ONE connection type (A - USB or B - 802.11/Wireless) ES Seleccione UN solo tipo de conexión (A: USB o B: 802.11/inalámbrica) FR Choisissez UN type de connexion (A - USB ou B - 802.11/sans fil) HP Photosmart C4380 Tout-en-un série/HP Photosmart C4380 All-in-One series • 5 - HP Photosmart C4390 | Setup Guide - Page 6
ône Poste de travail, puis sur l'icône du CD-ROM ayant le logo HP, puis sur le fichier setup.exe. FR a. Connectez le câble USB au port situé à l'arrière du HP Tout-en-un, puis à n'importe quel port USB de l'ordinateur. 6 • HP Photosmart C4380 All-in-One series /HP Photosmart C4380 Tout-en-un série - HP Photosmart C4390 | Setup Guide - Page 7
onscreen instructions to complete the software installation. d. Go to page 12 to explore your HP All-in-One. EN b. Insert the green CD. c. Double-click the HP Photosmart CD icon on the desktop. d. Double-click the HP Installer icon. Follow the onscreen instructions. e. Complete the Setup Assistant - HP Photosmart C4390 | Setup Guide - Page 8
que le bureau s'affiche. c. Insérez le CD-ROM. d. Double-cliquez sur l'icône CD HP Photosmart. e. Double-cliquez sur l'icône HP Installer. f. Suivez les instructions affichées à l'écran, puis passez à la section B2. 8 • HP Photosmart C4380 All-in-One series /HP Photosmart C4380 Tout-en-un série - HP Photosmart C4390 | Setup Guide - Page 9
B2 - 802.11 Windows: Mac: EN d. On the Connection Type screen, make sure to select through the network. e. When asked, connect your HP All-in-One to your computer using the supplied USB cable. This connection is temporary while wireless network settings are sent to your printer. f. Continue to - HP Photosmart C4390 | Setup Guide - Page 10
B3 - 802.11 Windows: Mac: EN g. On the Wireless Network Setup screen, select your wireless network and click Next. If your network uses security, a ît, vous pouvez débrancher le câble USB. n. Passez à la section B4. 10 • HP Photosmart C4380 All-in-One series /HP Photosmart C4380 Tout-en-un série - HP Photosmart C4390 | Setup Guide - Page 11
B4 - 802.11 Windows/Mac: EN a. If you have additional computers on your network, install the HP All-in-One software on each computer. Follow the onscreen instructions. Make sure that you choose the connection types between the network and your HP All-in-One (not between your computer and the - HP Photosmart C4390 | Setup Guide - Page 12
és EN Now that your HP Photosmart software FR Une fois le logiciel HP Photosmart installé sur votre program is installed on your computer, you can ordinateur, vous pouvez tester une des fonctionnalités try out one of the features on the HP All-in-One. du périphérique HP Tout-en-un. ES - HP Photosmart C4390 | Setup Guide - Page 13
mostrar la fotografía seleccionada. e. Presione Imprimir para imprimir la fotografía. EN USB Troubleshooting ES Dépannage de la connexion USB FR Solución de problemas de USB www.hp.com/support EN Problem: (Windows) The Microsoft Add Hardware screen appears. Action: Cancel all screens. Unplug the - HP Photosmart C4390 | Setup Guide - Page 14
www.hp.com/support EN Problem: (Windows only) You did not see the screen prompting you to connect the USB cable. Action: Cancel all screens. Remove, and then re-insert the green HP All-in-One CD. Refer to Section A. ES Problema: (Sólo en Windows) No ha visto la pantalla que indica que debe conectar - HP Photosmart C4390 | Setup Guide - Page 15
Network Troubleshooting ES Dépannage du réseau FR Solución de problemas de red www.hp.com/support EN Problem: During software installation, you see the error message Printer Not Found. Action: • Print the Wireless Network Test Report. This report has useful information about your wireless device - HP Photosmart C4390 | Setup Guide - Page 16
hp.com/support EN Problem: The HP All-in-One cannot connect to the network. Action: • The signal between your HP All-in-One and your wireless router may be weak. Try moving the HP All-in-One closer to your wireless ne soit en cours d'utilisation pendant l'installation du HP Tout-en-un. • Il peut ê
-
 1
1 -
 2
2 -
 3
3 -
 4
4 -
 5
5 -
 6
6 -
 7
7 -
8
-
9
-
10
-
11
-
12
-
13
-
14
-
15
-
16
 |
 |
HP Photosmart C4380 All-in-One series
2
1
USB
802.11
/HP Photosmart C4380 Tout-en-un série
Abaissez le bac d’alimentation du papier
et ouvrez la porte d’accès aux cartouches
d’impression.
Retirez tout le matériel d’emballage et le
fi
lm
protecteur du périphérique. Si un autocollant est
apposé sur l’écran graphique couleur, retirez-le.
Fermez la porte d’accès aux cartouches
d’impression.
a.
b.
c.
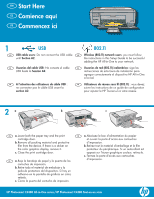
Commencez ici
Utilisateurs de réseau sans
fi
l (802.11)
: vous devez
suivre les instructions de ce guide de con
fi
guration
pour ajouter le HP Tout-en-un à votre réseau.
A l’attention des utilisateurs de câble USB
:
ne connectez pas le câble USB avant la
section A2
.
Comience aquí
Baje la bandeja de papel y la puerta de los
cartuchos de impresión.
Retire todo el material de embalaje y la
película protectora del dispositivo. Si hay un
adhesivo en la pantalla de grá
fi
cos en color,
retírelo.
Cierre la puerta del cartucho de impresión.
a.
b.
c.
Usuarios del cable USB
: No conecte el cable
USB hasta la
Sección A2
.
Usuarios de red (802.11) inalámbrica
: siga las
instrucciones de esta Guía de instalación para
agregar correctamente el dispositivo HP All-in-One
a la red.
Start Here
Lower both the paper tray and the print
cartridge door.
Remove all packing material and protective
fi
lm from the device. If there is a sticker on
the color graphics display, remove it.
Close the print cartridge door.
a.
b.
c.
USB cable users
: Do not connect the USB cable
until
Section A2
.
Wireless (802.11) network users
: you must follow
the instructions in this Setup Guide to be successful
adding the HP All-in-One to your network.
a
b
c
FR
FR
FR
FR
EN
EN
ES
ES
ES
ES
EN
EN