HP Photosmart C4390 Setup Guide - Page 1
HP Photosmart C4390 - All-in-One Printer Manual
 |
View all HP Photosmart C4390 manuals
Add to My Manuals
Save this manual to your list of manuals |
Page 1 highlights
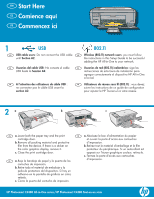
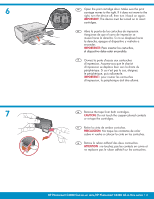
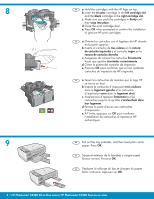
EN Start Here ES Comience aquí FR Commencez ici 1 USB 802.11 EN USB cable users: Do not connect the USB cable EN Wireless (802.11) network users: you must follow until Section A2. the instructions in this Setup Guide to be successful adding the HP All-in-One to your network. ES Usuarios del cable USB: No conecte el cable USB hasta la Sección A2. ES Usuarios de red (802.11) inalámbrica: siga las instrucciones de esta Guía de instalación para agregar correctamente el dispositivo HP All-in-One a la red. FR A l'attention des utilisateurs de câble USB : ne connectez pas le câble USB avant la section A2. FR Utilisateurs de réseau sans fil (802.11) : vous devez suivre les instructions de ce guide de configuration pour ajouter le HP Tout-en-un à votre réseau. 2a b c EN a. Lower both the paper tray and the print cartridge door. b. Remove all packing material and protective film from the device. If there is a sticker on the color graphics display, remove it. c. Close the print cartridge door. ES a. Baje la bandeja de papel y la puerta de los cartuchos de impresión. b. Retire todo el material de embalaje y la película protectora del dispositivo. Si hay un adhesivo en la pantalla de gráficos en color, retírelo. c. Cierre la puerta del cartucho de impresión. FR a. Abaissez le bac d'alimentation du papier et ouvrez la porte d'accès aux cartouches d'impression. b. Retirez tout le matériel d'emballage et le film protecteur du périphérique. Si un autocollant est apposé sur l'écran graphique couleur, retirez-le. c. Fermez la porte d'accès aux cartouches d'impression. HP Photosmart C4380 All-in-One series /HP Photosmart C4380 Tout-en-un série
-
 1
1 -
 2
2 -
 3
3 -
 4
4 -
 5
5 -
 6
6 -
 7
7 -
8
-
9
-
10
-
11
-
12
-
13
-
14
-
15
-
16
 |
 |