HP Point of Sale rp5000 Hardware Reference Guide (2nd Edition) - Page 23
the socket. Lift the card straight up, then pull it in toward
 |
View all HP Point of Sale rp5000 manuals
Add to My Manuals
Save this manual to your list of manuals |
Page 23 highlights
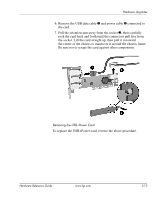
Hardware Upgrades 6. Remove the USB data cable 1 and power cable 2 connected to the card. 7. Pull the retention arm away from the socket 3, then carefully rock the card back and forth until the connectors pull free from the socket. Lift the card straight up, then pull it in toward the center of the chassis to maneuver it around the chassis frame. Be sure not to scrape the card against other components. Removing the USB+Power Card To replace the USB+Power card, reverse the above procedure. Hardware Reference Guide www.hp.com 2-13
-
 1
1 -
2
-
3
-
4
-
5
-
6
-
7
-
8
-
9
-
10
-
11
-
12
-
13
-
14
-
15
-
16
-
17
-
 18
18 -
 19
19 -
 20
20 -
 21
21 -
 22
22 -
 23
23 -
 24
24 -
 25
25 -
 26
26 -
 27
27 -
 28
28 -
29
-
30
-
31
-
32
-
33
-
34
-
35
-
36
-
37
-
38
-
39
-
40
-
41
-
42
-
43
-
44
-
45
-
46
-
47
-
48
-
49
-
50
-
51
-
52
-
53
-
54
-
55
-
56
-
57
-
58
-
59
-
60
-
61
-
62
-
63
 |
 |

Hardware Reference Guide
www.hp.com
2-13
Hardware Upgrades
6. Remove the USB data cable
1
and power cable
2
connected to
the card.
7. Pull the retention arm away from the socket
3
, then carefully
rock the card back and forth until the connectors pull free from
the socket. Lift the card straight up, then pull it in toward
the center of the chassis to maneuver it around the chassis frame.
Be sure not to scrape the card against other components.
Removing the USB+Power Card
To replace the USB+Power card, reverse the above procedure.