HP Point of Sale rp5000 Hardware Reference Guide (2nd Edition) - Page 29
Installing an Optional Optical Drive, Removing the Computer Access Panel and Front Bezel
 |
View all HP Point of Sale rp5000 manuals
Add to My Manuals
Save this manual to your list of manuals |
Page 29 highlights
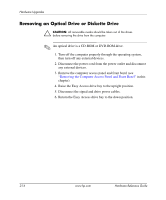
Hardware Upgrades Installing an Optional Optical Drive Ä CAUTION: If an optical drive is installed, you cannot install a secondary hard drive. There are not enough power supply connectors to support this configuration. Doing so could result in damage to the computer. To install an optional optical drive: 1. Turn off the computer properly through the operating system, then turn off any external devices. 2. Disconnect the power cord from the power outlet and disconnect any external devices. 3. Remove the computer access panel and front bezel (see "Removing the Computer Access Panel and Front Bezel" in this chapter). 4. Remove the optical drive if present (see "Removing an Optical Drive or Diskette Drive" in this chapter). 5. Install two M3 metric guide screws in the lower holes on each side of the drive. Ä CAUTION: Use only 3/16-inch or 5-mm long screws as guide screws. Longer screws can damage the internal components of the drive. Hardware Reference Guide www.hp.com 2-19
-
 1
1 -
2
-
3
-
4
-
5
-
6
-
7
-
8
-
9
-
10
-
11
-
12
-
13
-
14
-
15
-
16
-
17
-
18
-
19
-
20
-
21
-
22
-
23
-
 24
24 -
 25
25 -
 26
26 -
 27
27 -
 28
28 -
 29
29 -
 30
30 -
 31
31 -
 32
32 -
 33
33 -
 34
34 -
35
-
36
-
37
-
38
-
39
-
40
-
41
-
42
-
43
-
44
-
45
-
46
-
47
-
48
-
49
-
50
-
51
-
52
-
53
-
54
-
55
-
56
-
57
-
58
-
59
-
60
-
61
-
62
-
63
 |
 |
