HP Point of Sale rp5000 Hardware Reference Guide (2nd Edition) - Page 26
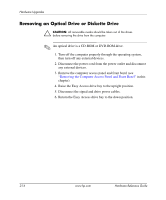
Removing an Optical Drive or Diskette Drive, Raise the Easy Access drive bay to the upright position.
 |
View all HP Point of Sale rp5000 manuals
Add to My Manuals
Save this manual to your list of manuals |
Page 26 highlights
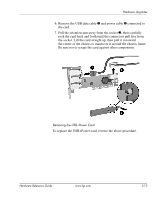
Hardware Upgrades Removing an Optical Drive or Diskette Drive Ä CAUTION: All removable media should be taken out of the drives before removing the drive from the computer. ✎ An optical drive is a CD-ROM or DVD-ROM drive. 1. Turn off the computer properly through the operating system, then turn off any external devices. 2. Disconnect the power cord from the power outlet and disconnect any external devices. 3. Remove the computer access panel and front bezel (see "Removing the Computer Access Panel and Front Bezel" in this chapter). 4. Raise the Easy Access drive bay to the upright position. 5. Disconnect the signal and drive power cables. 6. Return the Easy Access drive bay to the down position. 2-16 www.hp.com Hardware Reference Guide
-
 1
1 -
2
-
3
-
4
-
5
-
6
-
7
-
8
-
9
-
10
-
11
-
12
-
13
-
14
-
15
-
16
-
17
-
18
-
19
-
20
-
 21
21 -
 22
22 -
 23
23 -
 24
24 -
 25
25 -
 26
26 -
 27
27 -
 28
28 -
 29
29 -
 30
30 -
 31
31 -
32
-
33
-
34
-
35
-
36
-
37
-
38
-
39
-
40
-
41
-
42
-
43
-
44
-
45
-
46
-
47
-
48
-
49
-
50
-
51
-
52
-
53
-
54
-
55
-
56
-
57
-
58
-
59
-
60
-
61
-
62
-
63
 |
 |

2-16
www.hp.com
Hardware Reference Guide
Hardware Upgrades
Removing an Optical Drive or Diskette Drive
Ä
CAUTION:
All removable media should be taken out of the drives
before removing the drive from the computer.
✎
An optical drive is a CD-ROM or DVD-ROM drive.
1. Turn off the computer properly through the operating system,
then turn off any external devices.
2. Disconnect the power cord from the power outlet and disconnect
any external devices.
3. Remove the computer access panel and front bezel (see
“Removing the Computer Access Panel and Front Bezel”
in this
chapter).
4. Raise the Easy Access drive bay to the upright position.
5. Disconnect the signal and drive power cables.
6. Return the Easy Access drive bay to the down position.