HP Surestore L10 Service and User Manual (Short- and Long-Wave) - Page 60
Verifying and Setting SNMP Values
 |
View all HP Surestore L10 manuals
Add to My Manuals
Save this manual to your list of manuals |
Page 60 highlights
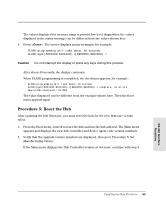
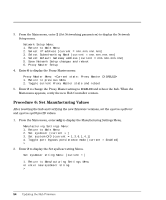
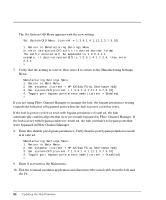
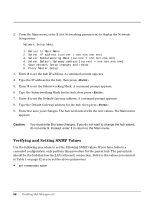
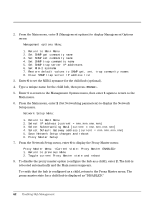
2. From the Main menu, enter 2 (Set Networking parameters) to display the Network Setup menu: Network Setup Menu: 1. Return to Main Menu 2. Select IP address [current = nnn.nnn.nnn.nnn] 3. Select Subnetworking Mask [current = nnn.nnn.nnn.nnn] 4. Select Default Gateway address [current = nnn.nnn.nnn.nnn] 5. Save Network Setup changes and reboot 6. Proxy Master Setup 3. Enter 2 to set the hub IP address. A command prompt appears. 4. Type the IP address for the hub, then press . 5. Enter 3 to set the Subnetworking Mask. A command prompt appears. 6. Type the Subnetworking Mask for the hub, then press . 7. Enter 4 to set the Default Gateway address. A command prompt appears. 8. Type the Default Gateway address for the hub, then press . 9. Enter 5 to save your changes. The hub is rebooted with the new values. The Main menu appears. Caution You must enter 5 to save changes. If you do not want to change the hub values, do not enter 5. Instead, enter 1 to return to the Main menu. Verifying and Setting SNMP Values Use the following procedure to set the following SNMP values. If you have hubs in a cascaded configuration, only perform this procedure for the parent hub. The parent hub should be the hub that has the LAN (ethernet) connection. Refer to the values you entered in Table 1 on page 42 as you set the above parameters. • get community name 58 Enabling Hub Management
-
 1
1 -
2
-
3
-
4
-
5
-
6
-
7
-
8
-
9
-
10
-
11
-
12
-
13
-
14
-
15
-
16
-
17
-
18
-
19
-
20
-
21
-
22
-
23
-
24
-
25
-
26
-
27
-
28
-
29
-
30
-
31
-
32
-
33
-
34
-
35
-
36
-
37
-
38
-
39
-
40
-
41
-
42
-
43
-
44
-
45
-
46
-
47
-
48
-
49
-
50
-
51
-
52
-
53
-
54
-
 55
55 -
 56
56 -
 57
57 -
 58
58 -
 59
59 -
 60
60 -
 61
61 -
 62
62 -
 63
63 -
 64
64 -
 65
65 -
66
-
67
-
68
-
69
-
70
-
71
-
72
-
73
-
74
-
75
-
76
-
77
-
78
-
79
-
80
-
81
-
82
-
83
-
84
-
85
-
86
-
87
-
88
-
89
-
90
-
91
-
92
-
93
-
94
-
95
-
96
-
97
-
98
-
99
-
100
-
101
-
102
-
103
-
104
-
105
-
106
-
107
-
108
-
109
-
110
-
111
-
112
-
113
-
114
-
115
-
116
-
117
-
118
-
119
-
120
-
121
-
122
-
123
-
124
-
125
-
126
-
127
-
128
-
129
-
130
-
131
-
132
-
133
-
134
 |
 |
