HP Surestore L10 Service and User Manual (Short- and Long-Wave) - Page 63
Configuring the Parent Hub, Configuring the Child Hub
 |
View all HP Surestore L10 manuals
Add to My Manuals
Save this manual to your list of manuals |
Page 63 highlights
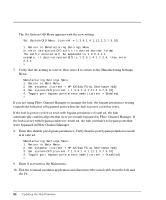
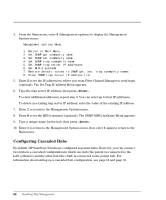
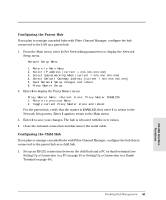
Configuring the Parent Hub If you plan to manage cascaded hubs with Fibre Channel Manager, configure the hub connected to the LAN as a parent hub. 1. From the Main menu, enter 2 (Set Networking parameters) to display the Network Setup menu. Network Setup Menu: 1. Return to Main Menu 2. Select IP address [current = nnn.nnn.nnn.nnn] 3. Select Subnetworking Mask [current = nnn.nnn.nnn.nnn] 4. Select Default Gateway address [current = nnn.nnn.nnn.nnn] 5. Save Network Setup changes and reboot 6. Proxy Master Setup 2. Enter 6 to display the Proxy Master menu: Proxy Master Menu: 1. Return to previous Menu 2. Toggle current Proxy Master state and reboot For the parent hub, verify that the master is ENABLED, then enter 1 to return to the Network Setup menu. Enter 1 again to return to the Main menu. 3. Enter 5 to save your changes. The hub is rebooted with the new values. 4. Close the terminal connection and disconnect the serial cable. Configuring the Child Hub If you plan to manage cascaded hubs with Fibre Channel Manager, configure the hub that is connected to the parent hub as a child hub. 1. Set up an RS-232 connection between the child hub and a PC or dumb terminal (see Setting Up a Connection to a PC on page 45 or Setting Up a Connection to a Dumb Terminal on page 46). Enabling Hub Management 61 RS-232 Interface Functions
-
 1
1 -
2
-
3
-
4
-
5
-
6
-
7
-
8
-
9
-
10
-
11
-
12
-
13
-
14
-
15
-
16
-
17
-
18
-
19
-
20
-
21
-
22
-
23
-
24
-
25
-
26
-
27
-
28
-
29
-
30
-
31
-
32
-
33
-
34
-
35
-
36
-
37
-
38
-
39
-
40
-
41
-
42
-
43
-
44
-
45
-
46
-
47
-
48
-
49
-
50
-
51
-
52
-
53
-
54
-
55
-
56
-
57
-
 58
58 -
 59
59 -
 60
60 -
 61
61 -
 62
62 -
 63
63 -
 64
64 -
 65
65 -
 66
66 -
 67
67 -
 68
68 -
69
-
70
-
71
-
72
-
73
-
74
-
75
-
76
-
77
-
78
-
79
-
80
-
81
-
82
-
83
-
84
-
85
-
86
-
87
-
88
-
89
-
90
-
91
-
92
-
93
-
94
-
95
-
96
-
97
-
98
-
99
-
100
-
101
-
102
-
103
-
104
-
105
-
106
-
107
-
108
-
109
-
110
-
111
-
112
-
113
-
114
-
115
-
116
-
117
-
118
-
119
-
120
-
121
-
122
-
123
-
124
-
125
-
126
-
127
-
128
-
129
-
130
-
131
-
132
-
133
-
134
 |
 |
