HP TouchSmart 9100 Preparing Your Computer for Wall-Mounting
HP TouchSmart 9100 - Business PC Manual
 |
View all HP TouchSmart 9100 manuals
Add to My Manuals
Save this manual to your list of manuals |
HP TouchSmart 9100 manual content summary:
- HP TouchSmart 9100 | Preparing Your Computer for Wall-Mounting - Page 1
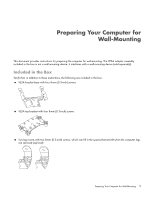
Preparing Your Computer for Wall-Mounting - HP TouchSmart 9100 | Preparing Your Computer for Wall-Mounting - Page 2
- HP TouchSmart 9100 | Preparing Your Computer for Wall-Mounting - Page 3
-mounting. The VESA adapter assembly included in the box is not a wall-mounting device; it interfaces with a wall-mounting device (sold separately). Included in the Box Verify that, in addition to these instructions, the following are included in the box: VESA bracket base with four 8-mm (0.3-inch - HP TouchSmart 9100 | Preparing Your Computer for Wall-Mounting - Page 4
. WARNING: Always disconnect the HP TouchSmart PC from the power source before removing the memory cover or the back cover. Failure to do so before you open the HP TouchSmart PC or perform any procedures can result in personal injury or equipment damage. 2 Preparing Your Computer for Wall-Mounting - HP TouchSmart 9100 | Preparing Your Computer for Wall-Mounting - Page 5
completely shut down, disconnect the power adapter (A) from the back of the HP TouchSmart PC. A 4 Remove the connector cover by inserting your finger under the gap on the bottom-left side of the cover (B) to open it slightly, and then lift the cover off. B Preparing Your Computer for Wall-Mounting 3 - HP TouchSmart 9100 | Preparing Your Computer for Wall-Mounting - Page 6
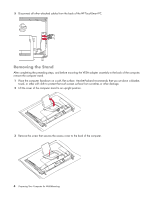
all other attached cables from the back of the HP TouchSmart PC. Removing the Stand After completing the preceding steps, and before mounting the VESA adapter assembly to the back of the computer, remove the computer stand. 1 Place the computer facedown on a soft, flat surface. Hewlett-Packard - HP TouchSmart 9100 | Preparing Your Computer for Wall-Mounting - Page 7
4 Slide the access cover away from the computer, releasing the tabs. 5 Slide the access cover out toward you to remove it, and then set it aside. 6 Using a Torx screwdriver (magnetic-tipped recommended), remove the four screws from the computer stand. Preparing Your Computer for Wall-Mounting 5 - HP TouchSmart 9100 | Preparing Your Computer for Wall-Mounting - Page 8
no gap between the parts. Insert the four 8-mm (0.3-inch) screws provided in the same four holes that had attached the computer stand. A A B B 2 Reattach the access cover by sliding the cover slots into the VESA base and replacing the access cover screw. 6 Preparing Your Computer for Wall-Mounting - HP TouchSmart 9100 | Preparing Your Computer for Wall-Mounting - Page 9
bracket base using the four 8-mm (0.3-inch) screws provided. B A D C The computer now has the VESA adapter configuration required for attaching to wall-mounting hardware (sold separately). If you wish to remove the computer legs prior to wall-mounting the computer, see "Removing the Legs (Optional - HP TouchSmart 9100 | Preparing Your Computer for Wall-Mounting - Page 10
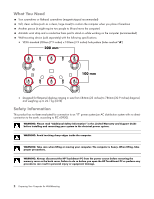
Computer Orientation Your HP TouchSmart PC is designed to be operated in a landscape orientation (A). When wall-mounted, the PC should remain with the display in landscape orientation, not portrait (B), or laid horizontal (C). CAUTION: Placing your PC in portrait orientation (B) or horizontal - HP TouchSmart 9100 | Preparing Your Computer for Wall-Mounting - Page 11
, covering the holes that were left when the legs were removed. Insert the two 8-mm (0.3-inch) screws provided. The computer is now ready to be wall-mounted. Follow the wall-mounting hardware manufacturer's instructions on how to wall-mount the computer. Preparing Your Computer for Wall-Mounting 9 - HP TouchSmart 9100 | Preparing Your Computer for Wall-Mounting - Page 12
© Copyright 2009 Hewlett-Packard Development Company, L.P. The information contained herein is subject to change without notice. Printed in xxxxx
-
 1
1 -
 2
2 -
 3
3 -
 4
4 -
 5
5 -
 6
6 -
 7
7 -
8
-
9
-
10
-
11
-
12
 |
 |

Preparing Your Computer for Wall-Mounting