HP TouchSmart 9100 Preparing Your Computer for Wall-Mounting - Page 9
AA BB CC DD, separately. If you wish to remove the computer legs prior to wall-mounting the computer - wall bracket
 |
View all HP TouchSmart 9100 manuals
Add to My Manuals
Save this manual to your list of manuals |
Page 9 highlights
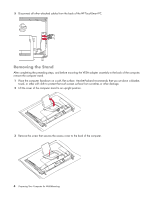
3 Align the two tabs (A, B) in the VESA top bracket with the holes (C, D) in the VESA bracket base. Secure the VESA top bracket to the VESA bracket base using the four 8-mm (0.3-inch) screws provided. B A D C The computer now has the VESA adapter configuration required for attaching to wall-mounting hardware (sold separately). If you wish to remove the computer legs prior to wall-mounting the computer, see "Removing the Legs (Optional)" on page 8. Follow the wall-mounting hardware manufacturer's instructions on how to wall-mount the computer. For wall-mounting hardware specifications, see "What You Need" on page 2. Preparing Your Computer for Wall-Mounting 7
-
 1
1 -
2
-
3
-
 4
4 -
 5
5 -
 6
6 -
 7
7 -
 8
8 -
 9
9 -
 10
10 -
 11
11 -
 12
12
 |
 |

Preparing Your Computer for Wall-Mounting
7
3
Align the two tabs (
A
,
B
) in the VESA top bracket with the holes (
C
,
D
) in the VESA bracket base. Secure the
VESA top bracket to the VESA bracket base using the four 8-mm (0.3-inch) screws provided.
The computer now has the VESA adapter configuration required for attaching to wall-mounting hardware (sold
separately). If you wish to remove the computer legs prior to wall-mounting the computer, see “Removing the Legs
(Optional)” on page 8.
Follow the wall-mounting hardware manufacturer’s instructions on how to wall-mount the computer. For wall-mounting
hardware specifications, see “What You Need” on page 2.
A
B
C
D