HP TouchSmart 9100 Preparing Your Computer for Wall-Mounting - Page 11
The computer is now ready to be wall-mounted. Follow the wall-mounting hardware manufacturer's instructions
 |
View all HP TouchSmart 9100 manuals
Add to My Manuals
Save this manual to your list of manuals |
Page 11 highlights
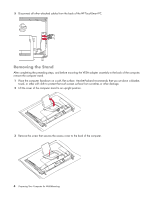
2 Remove the legs from the computer. 3 Install the leg inserts, covering the holes that were left when the legs were removed. Insert the two 8-mm (0.3-inch) screws provided. The computer is now ready to be wall-mounted. Follow the wall-mounting hardware manufacturer's instructions on how to wall-mount the computer. Preparing Your Computer for Wall-Mounting 9
-
 1
1 -
2
-
3
-
4
-
5
-
 6
6 -
 7
7 -
 8
8 -
 9
9 -
 10
10 -
 11
11 -
 12
12
 |
 |

Preparing Your Computer for Wall-Mounting
9
2
Remove the legs from the computer.
3
Install the leg inserts, covering the holes that were left when the legs were removed. Insert the two
8-mm (0.3-inch) screws provided.
The computer is now ready to be wall-mounted. Follow the wall-mounting hardware manufacturer’s instructions on
how to wall-mount the computer.