HP TouchSmart 9100 Preparing Your Computer for Wall-Mounting - Page 8
Installing the VESA Adapter Assembly, had attached the computer stand.
 |
View all HP TouchSmart 9100 manuals
Add to My Manuals
Save this manual to your list of manuals |
Page 8 highlights
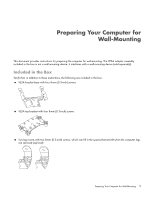
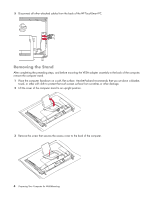
7 Lift off the computer stand and set it aside. Installing the VESA Adapter Assembly 1 Attach the VESA bracket base to the computer rear shield, aligning the tabs (A, B) to the holes in the shield so there is no gap between the parts. Insert the four 8-mm (0.3-inch) screws provided in the same four holes that had attached the computer stand. A A B B 2 Reattach the access cover by sliding the cover slots into the VESA base and replacing the access cover screw. 6 Preparing Your Computer for Wall-Mounting
-
 1
1 -
2
-
 3
3 -
 4
4 -
 5
5 -
 6
6 -
 7
7 -
 8
8 -
 9
9 -
 10
10 -
 11
11 -
 12
12
 |
 |

6
Preparing Your Computer for Wall-Mounting
7
Lift off the computer stand and set it aside.
Installing the VESA Adapter Assembly
1
Attach the VESA bracket base to the computer rear shield, aligning the tabs (
A
,
B
) to the holes in the shield so
there is no gap between the parts. Insert the four 8-mm (0.3-inch) screws provided in the same four holes that
had attached the computer stand.
2
Reattach the access cover by sliding the cover slots into the VESA base and replacing the access cover screw.
A
B
A
B