HP Tx1220us HP Pavilion tx1000 Entertainment PC - Maintenance and Service Guid - Page 49
WLAN module, computer on, and then shut it down through the operating system.
 |
View all HP Tx1220us manuals
Add to My Manuals
Save this manual to your list of manuals |
Page 49 highlights
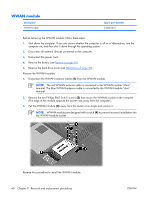
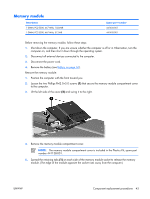
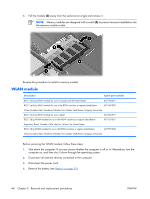
6. Pull the module (2) away from the socket at an angle and remove it. NOTE: Memory modules are designed with a notch (3) to prevent incorrect installation into the memory module socket. Reverse this procedure to install a memory module. WLAN module Description Spare part number 802.11a/b/g WLAN module for use in Canada and the United States 407160-001 802.11a/b/g WLAN module for use in the ROW countries or regions listed below: 407160-002 China, Ecuador, Haiti, Honduras, Pakistan, Peru, Qatar, South Korea, Uruguay, Venezuela 802.11a/b/g WLAN module for use in Japan 407160-291 802.11b/g WLAN module for use in the MOW countries or regions listed below: 407159-001 Argentina, Brazil, Canada, Chile, Mexico, Taiwan, the United States 802.11b/g WLAN module for use in the ROW countries or regions listed below: 407159-002 China, Ecuador, Haiti, Honduras, Pakistan, Peru, Qatar, South Korea, Uruguay, Venezuela Before removing the WLAN module, follow these steps: 1. Shut down the computer. If you are unsure whether the computer is off or in Hibernation, turn the computer on, and then shut it down through the operating system. 2. Disconnect all external devices connected to the computer. 3. Disconnect the power cord. 4. Remove the battery (see Battery on page 36). 44 Chapter 5 Removal and replacement procedures ENWW
-
 1
1 -
2
-
3
-
4
-
5
-
6
-
7
-
8
-
9
-
10
-
11
-
12
-
13
-
14
-
15
-
16
-
17
-
18
-
19
-
20
-
21
-
22
-
23
-
24
-
25
-
26
-
27
-
28
-
29
-
30
-
31
-
32
-
33
-
34
-
35
-
36
-
37
-
38
-
39
-
40
-
41
-
42
-
43
-
 44
44 -
 45
45 -
 46
46 -
 47
47 -
 48
48 -
 49
49 -
 50
50 -
 51
51 -
 52
52 -
 53
53 -
 54
54 -
55
-
56
-
57
-
58
-
59
-
60
-
61
-
62
-
63
-
64
-
65
-
66
-
67
-
68
-
69
-
70
-
71
-
72
-
73
-
74
-
75
-
76
-
77
-
78
-
79
-
80
-
81
-
82
-
83
-
84
-
85
-
86
-
87
-
88
-
89
-
90
-
91
-
92
-
93
-
94
-
95
-
96
-
97
-
98
-
99
-
100
-
101
-
102
-
103
-
104
-
105
-
106
-
107
-
108
-
109
-
110
-
111
-
112
-
113
-
114
-
115
-
116
-
117
-
118
-
119
-
120
-
121
-
122
-
123
-
124
-
125
-
126
-
127
-
128
-
129
-
130
-
131
 |
 |
