HP Vectra XA 5/xxx HP Vectra XA 5/XXX Series 5 PC Minitower User’s Gu - Page 39
Installing the Board
 |
View all HP Vectra XA 5/xxx manuals
Add to My Manuals
Save this manual to your list of manuals |
Page 39 highlights
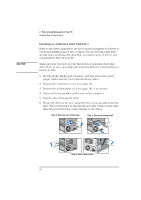
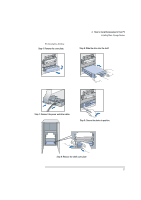
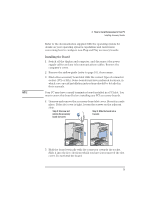
NOTE 2 How to Install Accessories In Your PC Installing Accessory Boards Refer to the documentation supplied with the operating system for details on your operating system's capabilities and restrictions concerning how to configure non-Plug and Play accessory boards. Installing the Board 1 Switch off the display and computer, and disconnect the power supply cables and any telecommunications cables. Remove the computer's cover. 2 Remove the airflow guide (refer to page 16), if necessary. 3 Find a free accessory board slot with the correct type of connector socket (PCI or ISA). Some boards may have preferred locations, in which case special installation instructions should be detailed in their manuals. Your PC may have a small terminator board installed in a PCI slot. You must remove this board before installing any PCI accessory boards. 4 Unscrew and remove the accessory board slot cover. Store it in a safe place. If the slot cover is tight, loosen the screws on the adjacent slots. Step 4: Unscrew and remove the accessory board slot cover. Step 5: Slide the board into a free slot. 5 Hold the board vertically with the connector towards the socket. Slide it into the free slot from which you have just removed the slot cover. Do not bend the board. English 29
-
 1
1 -
2
-
3
-
4
-
5
-
6
-
7
-
8
-
9
-
10
-
11
-
12
-
13
-
14
-
15
-
16
-
17
-
18
-
19
-
20
-
21
-
22
-
23
-
24
-
25
-
26
-
27
-
28
-
29
-
30
-
31
-
32
-
33
-
 34
34 -
 35
35 -
 36
36 -
 37
37 -
 38
38 -
 39
39 -
 40
40 -
 41
41 -
 42
42 -
 43
43 -
 44
44 -
45
-
46
-
47
-
48
-
49
-
50
-
51
-
52
-
53
-
54
-
55
-
56
-
57
-
58
-
59
-
60
-
61
-
62
-
63
-
64
-
65
-
66
-
67
-
68
-
69
-
70
-
71
-
72
-
73
-
74
-
75
-
76
-
77
-
78
-
79
-
80
-
81
-
82
-
83
-
84
-
85
-
86
-
87
-
88
-
89
-
90
-
91
-
92
-
93
-
94
-
95
-
96
 |
 |
