HP ap5000 Quick Setup & Getting Started HP ap5000 All-In-One Point of Sale - Page 12
Replacing the Rear Cover - power button
 |
View all HP ap5000 manuals
Add to My Manuals
Save this manual to your list of manuals |
Page 12 highlights
e. Connect the peripherals to the bottom I/O connectors. Figure 10 Bottom I/O Connectors 1 Kensington Lock Slot 7 PS/2 Keyboard Connector 2 Serial Connector (COM2, 8 Serial Connector (COM1, 5V) 5V) 3 Parallel Connector 9 Serial Connector (COM3, 12V) 4 RJ-45 Network Connector 10 VGA Connector 5 24V USB+POWER Connector 11 Universal Serial Bus (USB) Connectors 6 Power Button 12 Power Cord Connector f. Replace the rear cover by inserting the bottom of the cover (1) and rotating the top of the cover on so that it snaps in place (2). Be sure that the cables are routed out of the opening on the cover. Figure 11 Replacing the Rear Cover 6 Quick Setup & Getting Started ENWW
-
 1
1 -
2
-
3
-
4
-
5
-
6
-
 7
7 -
 8
8 -
 9
9 -
 10
10 -
 11
11 -
 12
12 -
 13
13 -
 14
14 -
 15
15 -
 16
16 -
 17
17 -
18
-
19
-
20
-
21
-
22
-
23
-
24
-
25
 |
 |

e.
Connect the peripherals to the bottom I/O connectors.
Figure 10
Bottom I/O Connectors
1
Kensington Lock Slot
7
PS/2 Keyboard Connector
2
Serial Connector (COM2,
5V)
8
Serial Connector (COM1,
5V)
3
Parallel Connector
9
Serial Connector (COM3,
12V)
4
RJ-45 Network Connector
10
VGA Connector
5
24V USB+POWER
Connector
11
Universal Serial Bus
(USB) Connectors
6
Power Button
12
Power Cord Connector
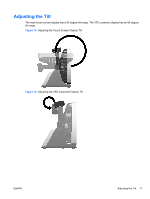
f.
Replace the rear cover by inserting the bottom of the cover (1) and rotating the top of the cover
on so that it snaps in place (2). Be sure that the cables are routed out of the opening on the
cover.
Figure 11
Replacing the Rear Cover
6
Quick Setup & Getting Started
ENWW