Hitachi 55HDT51 Owners Guide - Page 17
Connecting S-video Vcr Or Laserdisc Player, Notes
 |
View all Hitachi 55HDT51 manuals
Add to My Manuals
Save this manual to your list of manuals |
Page 17 highlights
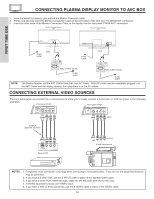
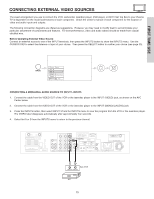
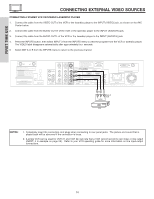
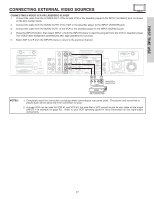
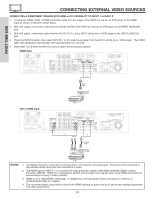
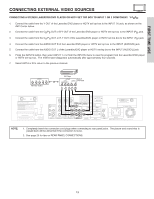
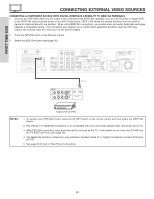
FIRST TIME USE CONNECTING EXTERNAL VIDEO SOURCES CONNECTING S-VIDEO VCR OR LASERDISC PLAYER 1. Connect the cable from the S-VIDEO OUT of the S-VHS VCR or the laserdisc player to the INPUT (S-VIDEO) jack, as shown on the AVC Center below. 2. Connect the cable from the AUDIO OUT R of the VCR or the laserdisc player to the INPUT (AUDIO/R) jack. 3. Connect the cable from the AUDIO OUT L of the VCR or the laserdisc player to the INPUT (AUDIO/L) jack. 4. Press the INPUTS button, then select INPUT 4 from the INPUTS menu to view the program from the VCR or laserdisc player. The VIDEO label disappears automatically after approximately four seconds. 5. Select ANT A or B from the INPUTS menu to return to the previous channel. Back of VCR or R L V S-VIDEO Laserdisc Player OUTPUT VCR or Laserdisc Player NOTES: 1. Completely insert the connection cord plugs when connecting to rear panel jacks. The picture and sound that is played back will be abnormal if the connection is loose. 2. A single VCR can be used for VCR #1 and VCR #2, but note that a VCR cannot record its own video or line output (INPUT: 4 in example on page 25). Refer to your VCR operating guide for more information on line input-output connections. 17
-
 1
1 -
2
-
3
-
4
-
5
-
6
-
7
-
8
-
9
-
10
-
11
-
 12
12 -
 13
13 -
 14
14 -
 15
15 -
 16
16 -
 17
17 -
 18
18 -
 19
19 -
 20
20 -
 21
21 -
 22
22 -
23
-
24
-
25
-
26
-
27
-
28
-
29
-
30
-
31
-
32
-
33
-
34
-
35
-
36
-
37
-
38
-
39
-
40
-
41
-
42
-
43
-
44
-
45
-
46
-
47
-
48
-
49
-
50
-
51
-
52
-
53
-
54
-
55
-
56
-
57
-
58
-
59
-
60
-
61
-
62
-
63
-
64
-
65
-
66
-
67
-
68
-
69
-
70
-
71
-
72
-
73
-
74
-
75
-
76
-
77
-
78
-
79
-
80
-
81
-
82
-
83
-
84
-
85
-
86
-
87
-
88
-
89
-
90
-
91
-
92
-
93
-
94
-
95
-
96
-
97
-
98
-
99
-
100
 |
 |
