Hitachi 55HDT51 Owners Guide - Page 70
Set Timer, Recording
 |
View all Hitachi 55HDT51 manuals
Add to My Manuals
Save this manual to your list of manuals |
Page 70 highlights
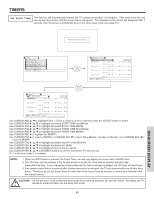
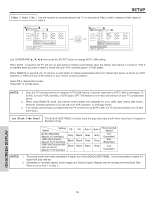
TIMERS Set Timer Recording Select this feature to set and record digital channels using your device connected to the IEEE 1394 jacks (ex. D-VHS). Timers Set The Clock Set Sleep Timer Set Day/Night Timer Set Event Timer Set Timer Recording Move SEL Select Timers Set Timer Recording Record1 --:--AM --:--AM Jan.01, 2003 Ant A ------- DVHS1 Record2 --:--AM --:--AM Jan.01, 2003 Ant A ------- DVHS1 Record3 --:--AM --:--AM Jan.01, 2003 Ant A ------- DVHS1 Record4 --:--AM --:--AM Jan.01, 2003 Ant A ------Move SEL Return DVHS1 Use CURSOR PAD ̆, ̄ to highlight Record 1, Record 2, Record 3 and then press CURSOR PAD to select. Use CURSOR PAD ̈, ̆, ̄ to highlight and select START TIME Hour/Minute. Use CURSOR PAD ̈, ̆, ̄ to highlight and select START TIME AM/PM. Use CURSOR PAD ̈, ̆, ̄ to highlight and select FINISH TIME Hour/Minute. Use CURSOR PAD ̈, ̆, ̄ to highlight and select FINISH TIME AM/PM. Use CURSOR PAD ̈ to highlight the MONTH. Use CURSOR PAD ̆ to select a MONTH or CURSOR PAD ̄ to select Daily, Weekly - Sunday to Monday. Use CURSOR PAD ̆ to return to MONTH. Use CURSOR PAD ̈, ̆, ̄ to highlight and select the DAY of the MONTH. Use CURSOR PAD ̈, ̆, ̄ to highlight and select the YEAR. Use CURSOR PAD ̈, ̆, ̄ to highlight and select ANT C channel # to be recorded. Use CURSOR PAD ̈, ̆, ̄ to highlight and select 1394 Device to be used. Press the SELECT button to return and highlight Record 1. A "√" in the box means it is enabled. NOTES: 1. Set the Time and connect the IEEE1394 devices before using this feature. 2. The Timer Recording has priority over the Event Timer. If the Timer Recording is set at the same time as the Event Timer or overlaps with each other, the TV will only perform the function of the Timer Recording. ON-SCREEN DISPLAY 70
-
 1
1 -
2
-
3
-
4
-
5
-
6
-
7
-
8
-
9
-
10
-
11
-
12
-
13
-
14
-
15
-
16
-
17
-
18
-
19
-
20
-
21
-
22
-
23
-
24
-
25
-
26
-
27
-
28
-
29
-
30
-
31
-
32
-
33
-
34
-
35
-
36
-
37
-
38
-
39
-
40
-
41
-
42
-
43
-
44
-
45
-
46
-
47
-
48
-
49
-
50
-
51
-
52
-
53
-
54
-
55
-
56
-
57
-
58
-
59
-
60
-
61
-
62
-
63
-
64
-
 65
65 -
 66
66 -
 67
67 -
 68
68 -
 69
69 -
 70
70 -
 71
71 -
 72
72 -
 73
73 -
 74
74 -
 75
75 -
76
-
77
-
78
-
79
-
80
-
81
-
82
-
83
-
84
-
85
-
86
-
87
-
88
-
89
-
90
-
91
-
92
-
93
-
94
-
95
-
96
-
97
-
98
-
99
-
100
 |
 |
