Hitachi DZ-MV200A Owners Guide - Page 107
Miscellaneous
 |
View all Hitachi DZ-MV200A manuals
Add to My Manuals
Save this manual to your list of manuals |
Page 107 highlights
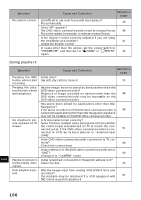
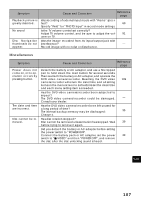
Symptom Playback picture is greatly distorted. No sound Disc Navigation thumbnails do not appear. Cause and Correction Reference page Was recording of external input made with "Frame" speci- fied? 60 Specify "Field" for "PHOTO Input" in record mode settings. Is the TV volume control set correctly? Adjust TV volume control, and be sure to adjust the vol- 91 ume on TV. Was the image recorded from AV input/output jack with interference? - Record image with no noise or disturbance. Miscellaneous Symptom Power does not come on, or no operation occurs by pressing button. The date and time are incorrect. Disc cannot be removed. Cause and Correction Reference page Detach the battery or AC adapter, and use a fine tipped pen to hold down the reset button for several seconds. Then reattach the battery or AC adapter, and operate the DVD video camera/recorder. Resetting the DVD video 109 camera/recorder will return the date/time and all setting items on the menu screen to defaults: Reset the date/time and each menu setting item as needed. Has the DVD video camera/recorder been subjected to impact? The DVD video camera/recorder could be damaged. - Consult your dealer. Has the DVD video camera/recorder been left unused for a long period of time? The internal backup memory may be discharged: 35 Charge it. Has disc rotation stopped? Disc cannot be removed unless rotation has stopped. Wait 39 before trying to remove it again. Did you detach the battery or AC adapter before setting the power switch to "POWER OFF". Connect the battery pack or AC adapter, set the power 39 switch to " VIDEO" and then "POWER OFF", and remove the disc after the disc unlocking sound is heard. English 107
-
 1
1 -
2
-
3
-
4
-
5
-
6
-
7
-
8
-
9
-
10
-
11
-
12
-
13
-
14
-
15
-
16
-
17
-
18
-
19
-
20
-
21
-
22
-
23
-
24
-
25
-
26
-
27
-
28
-
29
-
30
-
31
-
32
-
33
-
34
-
35
-
36
-
37
-
38
-
39
-
40
-
41
-
42
-
43
-
44
-
45
-
46
-
47
-
48
-
49
-
50
-
51
-
52
-
53
-
54
-
55
-
56
-
57
-
58
-
59
-
60
-
61
-
62
-
63
-
64
-
65
-
66
-
67
-
68
-
69
-
70
-
71
-
72
-
73
-
74
-
75
-
76
-
77
-
78
-
79
-
80
-
81
-
82
-
83
-
84
-
85
-
86
-
87
-
88
-
89
-
90
-
91
-
92
-
93
-
94
-
95
-
96
-
97
-
98
-
99
-
100
-
101
-
 102
102 -
 103
103 -
 104
104 -
 105
105 -
 106
106 -
 107
107 -
 108
108 -
 109
109 -
 110
110 -
 111
111 -
 112
112 -
113
-
114
 |
 |