Hitachi P50X902 Owners Guide - Page 33
On-Screen Display - contrast ratio
 |
View all Hitachi P50X902 manuals
Add to My Manuals
Save this manual to your list of manuals |
Page 33 highlights
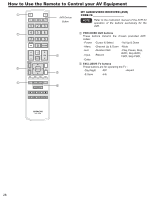
On-Screen Display 1. Press MENU on the remote control to display the different features on your Hitachi Plasma TV. 2. Use the CURSOR PAD (buttons, , , and ) and highlight a different feature of the On-Screen Display menu. Press the SELECT button to select. 3. Press EXIT on the remote control to quickly exit from a menu. This part of the screen shows which selections are available. Video Audio TV Guide On Screen Channel Manager Locks Timers Setup Power Swivel Move SEL Select This part of the screen shows which Remote Control buttons to use. ON-SCREEN DISPLAY NOTE The On Screen Display (OSD) for the different submenus shown in next pages are for illustration purposes only, therefore; doesn't reflect the actual appearance of the OSD of your Hitachi Plasma TV. Video Picture Mode White Level Black Level Color Tint Sharpness ColorTemperature Light Sensor Black Enhancement Contrast Mode Noise Reduction Cross Color NR MPEG NR Auto Movie Mode Color Space Gamma LTI CTI Color Management Color Decoding White Balance Cinema48™ Lip Sync Black Side Panel Aspect Reset Video Settings Select between 3 pictures modes; Dynamic, Day and Night. Adjust picture white level. Adjust picture black level. Adjust color. Adjust tint. Adjust sharpness. Set this to High for less intense color with more blue, set to Medium for natural color, set to Standard for standard colors or D.Cinema for more cinema accurate colors. Adjust screen contrast setting automatically accordingly to the brigthness of the room. Enhances shadow detail in dark scenes. Use this function to choose between two Contrast Mode settings: Normal and Dynamic. Reduces conspicuous noise in the picture. Reduces cross color noise in the picture. Reduces mosquito noise in the picture. Select the Original 3:2 Pulldown detection or Smooth Motion feature. Choose VIBRANT to select highly saturated colors, or AUTO STD/xvColor™ for more natural colors. Changes the gamma ratio value to produce pictures of greater contrast. Select from three different levels to enhance image definition for crisp and clear images. Select from three different levels to reduce color smear luminance for true and brilliant color definition. Adjust and balance individual colors to make either deeper or more pure according to your preference. Adjust the percentage of Red, Green and Color according to your preference. Use this function to adjust the dark end (Cutoff) and bright end (drive) of the White background. Faithfully reproduces the movie theater effect of 24 frames per second with a 48 fps presentation. Synchronizes audio with video signal on digital and analog sources. Set the gray side bars On/Off when watching 4:3 signals in standard mode. Choose the picture format aspect ratio. Choose to Reset Video Settings to factory settings and to see the Smooth Motion Feature Demo. 33
-
 1
1 -
2
-
3
-
4
-
5
-
6
-
7
-
8
-
9
-
10
-
11
-
12
-
13
-
14
-
15
-
16
-
17
-
18
-
19
-
20
-
21
-
22
-
23
-
24
-
25
-
26
-
27
-
 28
28 -
 29
29 -
 30
30 -
 31
31 -
 32
32 -
 33
33 -
 34
34 -
 35
35 -
 36
36 -
 37
37 -
 38
38 -
39
-
40
-
41
-
42
-
43
-
44
-
45
-
46
-
47
-
48
-
49
-
50
-
51
-
52
-
53
-
54
-
55
-
56
-
57
-
58
-
59
-
60
-
61
-
62
-
63
-
64
-
65
-
66
-
67
-
68
-
69
-
70
 |
 |
