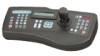
Honeywell HJZTP User Manual
Honeywell HJZTP Manual
 |
View all Honeywell HJZTP manuals
Add to My Manuals
Save this manual to your list of manuals |
Honeywell HJZTP manual content summary:
- Honeywell HJZTP | User Manual - Page 1
HJZTP/HJZTPX Joystick Controller for PTZ Cameras, DVRs, and Multiplexers User Manual 900.0570 - September 2005 - Rev. 1.01 - Honeywell HJZTP | User Manual - Page 2
ISSUE A B 1.00 1.01 DATE March 2005 July 2005 August 2005 September 2005 REVISIONS HJZMU001150 Initial Release. Revised Model # (ECI 2003) 900.0570 Revised Model # Revised cable qty. in package contents and added operation with KD6i/HD6i in Maxpro Mode (EC03566) Rev. 1.01 ii 900.0570 8-Sept-05 - Honeywell HJZTP | User Manual - Page 3
installed and used in accordance with the instruction manual, may cause harmful interference to radio monitoring and recording of video and audio signals. Honeywell Video Systems shall not be held responsible for the and maintenance (servicing) instruction in the literature accompanying the product. Rev. - Honeywell HJZTP | User Manual - Page 4
the unit and in the operating instructions should be adhered to. 4. FOLLOW INSTRUCTIONS - All operating and use instructions should be followed. 5. CLEANING to cords, plugs, and convenience receptacles. 13. SERVICING - Do not attempt to service this unit yourself as opening or removing covers may - Honeywell HJZTP | User Manual - Page 5
the operating instructions. Adjust only those controls that are covered by the operating instructions as an improper adjustment of other controls may result 16. SAFETY CHECK - Upon completion of any service or repairs to this unit, ask the service technician to perform safety checks to determine that - Honeywell HJZTP | User Manual - Page 6
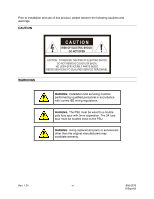
: TO REDUCE THE RISK OF ELECTRIC SHOCK, DO NOT REMOVE COVER (OR BACK). NO USER-SERVICEABLE PARTS INSIDE. REFER SERVICING TO QUALIFIED SERVICE PERSONNEL. WARNING: Installation and servicing must be performed by qualified personnel in accordance with current IEE wiring regulations. WARNING: The PSU - Honeywell HJZTP | User Manual - Page 7
LOCK ...11 3.2 LCD DISPLAY...12 3.3 SYSTEM SETUP...13 3.3.1 3.3.2 3.3.3 Keyboard Type ...13 DVR/Multiplexer/Camera Connection 14 Dome (PTZ) Protocol...16 SECTION 4: DVR CONTROL FUNCTIONS 17 4.1 DVR MODE...17 4.2 NUMBER ENTRY (FOR ENTERING PASSWORDS 17 4.3 DVR MENUS ...17 4.4 PICTURE - Honeywell HJZTP | User Manual - Page 8
FUNCTIONS WHEN USING HONEYWELL VCL (RAPIDDOME/ORBITER DOME) PROTOCOL...25 6.1 PTZ CAMERA SELECTION CONTROL 25 6.2 PTZ MODE ...25 6.3 PAN AND TILT...25 6.4 TURN 180°...25 6.5 ZOOM...26 6.6 FOCUS AND IRIS...26 6.7 WASH, WIPE AND AUXILIARY FUNCTIONS 26 6.8 MANUAL CHANGE OVER (CHANGE OVER - Honeywell HJZTP | User Manual - Page 9
37 7.10 FREEZE...37 7.11 FLASHBACK ...37 7.12 NIGHTSHOT...38 7.13 RETURN TO MANUAL ...38 7.14 MECHANICAL HOME ...38 7.15 ON SCREEN DISPLAY (OSD) MENUS 38 SECTION 8: PTZ CONTROL FUNCTIONS WHEN USING HONEYWELL MAXPRO MODE (KD6/HD6) PROTOCOL 41 8.1 INTRODUCTION ...41 8.2 RESET KD6I/HD6I...41 - Honeywell HJZTP | User Manual - Page 10
NAVIGATION ...47 APPENDIX B: DIAGNOSTICS ...49 B.1 JOYSTICK AUTO CALIBRATION 49 B.2 KEY TEST...49 APPENDIX C: VCL (ORBITER/RAPIDDOME) DATA INPUT 51 APPENDIX D: PASSWORDS...53 LIST OF FIGURES Figure 1: HJZTP Rear Panel ...3 Figure 2. KBD/AUX/CONTROL CONNECTORS 9 Figure 3. POWER CONNECTOR ...10 - Honeywell HJZTP | User Manual - Page 11
output along with dome data generated by the keyboards. Model HJZTP HJZTPX Description Joystick Controller for controlling PTZs, DVRs, and Multiplexers. Power supply requires 120 VAC. Joystick Controller for controlling PTZs, DVRs, and Multiplexers. Power supply requires 230 VAC. 1.2 COMPATIBLE - Honeywell HJZTP | User Manual - Page 12
1.3 PACKAGE CONTENTS Quantity Description 1 HJZTP or HJZTPX Joystick Controller 1 HJZMU001150 User Manual 1 120 VAC to 12VDC 300mA power supply (HJZTP) or 230 VAC to 12VDC 300mA power supply (HJZTPX) 2 Cable, 8-Way RJ45 Connector on both ends (connect between keyboards and DVRs/ - Honeywell HJZTP | User Manual - Page 13
of the unit. Connector KBD (RS485) AUX (RS485) CONTROL (RS485) POWER Figure 1: HJZTP Rear Panel Function Master keyboard - To connect to a number slave keyboard. RS485 telemetry output - for connection to PTZs (Honeywell domes) or RS485 distribution box. Connection to 12VDC 300mA power supply - Honeywell HJZTP | User Manual - Page 14
connection. The green wire is data +, and the blue wire is data -. This cable can also be used to input Orbiter / RapidDome RS485 data from a control device to the master keyboard, or last slave keyboard. Again the green wire is data +, and the blue wire is data -. Rev. 1.01 4 900.0570 - Honeywell HJZTP | User Manual - Page 15
2.3 DOME CONNECTIONS 2.3.1 Daisy chain Figure 4. DOME DAISY CHAIN CONFIGURATION Rev. 1.01 5 900.0570 8-Sept-05 - Honeywell HJZTP | User Manual - Page 16
2.3 DOME CONNECTIONS, CONTINUED 2.3.2 Star Wiring Configuration Note: Details on termination and dome installation are covered in the dome manual. Figure 5. DOME STAR WIRING CONFIGURATION Rev. 1.01 6 900.0570 8-Sept-05 - Honeywell HJZTP | User Manual - Page 17
The multiplexer address and communication settings must be correctly set using the menus on the multiplexer before it can be controlled using the HJZTP keyboard. Network Type - RS485 Baud Rate - 9600 Protocol - A Unit Address - 001 for multiplexer 1, 002 for multiplexer 2 etc Rev. 1.01 Figure - Honeywell HJZTP | User Manual - Page 18
a master keyboard. The system also has two multiplexers, and two DVRs connected. And VCL (Orbiter / Rapid ) dome data is being input into the system from a control device. Rev. 1.01 8 900.0570 8-Sept-05 - Honeywell HJZTP | User Manual - Page 19
1 From master D+ White / Orange 2 From master D- Orange 4 To DVR or master D- Blue 5 GND White / Blue 6 To DVR or master D+ Green CONTROL Pin Signal Usual colour 1 To / from dome D+ White / Orange 2 To / from dome D- Orange 3 GND White / Green Rev. 1.01 9 900.0570 - Honeywell HJZTP | User Manual - Page 20
2.6 CONNECTOR PIN ASSIGNMENTS, CONTINUED Viewed from wiring input side of plug Figure 3. POWER CONNECTOR POWER Pin Signal Usual colour 1 GND Green 4 +12 VOLTS Red Rev. 1.01 10 900.0570 8-Sept-05 - Honeywell HJZTP | User Manual - Page 21
keyboard is locked, the 'lock' key will be illuminated, and the LCD display will display: L OCKE D The keyboard can be unlocked with different user control levels. Pressing and holding the 'lock' key and entering the four digit unlock code will unlock the keyboard. XXXX is the user level 1 unlock - Honeywell HJZTP | User Manual - Page 22
3.2 LCD DISPLAY The LCD display shows information about the current operating state of the keyboard. If the keyboard is operating in DVR control mode, then the display will be as shown below: C A ME R A PRESET nnn nnn DVR nn Un 'CAMERA nnn' is the camera which the keyboard is - Honeywell HJZTP | User Manual - Page 23
3.3 SYSTEM SETUP Before using the HJZTP keyboard it must be set-up to meet the systems has not been set-up before 'MSTR' will be flashing, otherwise the keyboards current setting will be flashing. Use the joystick left and right or the 'F3' ('') and 'F4' ('') keys (or 'camera' and 'preset' keys) to - Honeywell HJZTP | User Manual - Page 24
configuration to the slave keyboards. By default the keyboard it is set to control eight 16-way DVRs, and eight 16-way multiplexers. With cameras 1 'aux' key. Use the joystick up and down or the 'F1' ('') and 'F2' ('') keys, to scroll through all 128 cameras. Use the joystick left and right or the - Honeywell HJZTP | User Manual - Page 25
3.3.2 DVR/Multiplexer/Camera Connection, Continued Example: If a system has 40 cameras with: DVR 1, a 4-way DVR connected to cameras 1 through 4 inclusive DVR 2, a 4-way DVR connected to cameras 5 through 8 inclusive DVR 3, a 16-way DVR connected to cameras 9 through 24 inclusive DVR 4, a 9-way DVR - Honeywell HJZTP | User Manual - Page 26
3.3.3 Dome (PTZ) Protocol The keyboard can be set up to control RapidDome/Orbiter type domes using Honeywell VCL protocol or KD6/HD6 type domes using Honeywell Diamond protocol. Note: The protocol can only be set from the master keyboard. The protocol menu can be viewed on a slave keyboard, but 'AUX - Honeywell HJZTP | User Manual - Page 27
SECTION 4: DVR CONTROL FUNCTIONS 4.1 DVR MODE Press the 'mode' key to toggle between multiplexer and DVR mode. 4.2 NUMBER ENTRY (FOR ENTERING PASSWORDS) To send numbers to the DVR, - Honeywell HJZTP | User Manual - Page 28
. When in PTZ mode the PTZ LED will be on 4.6 DVR SELECTION Pressing a number followed by the 'Fn' key selects a DVR to control. This also selects the last camera controlled on that DVR (or the first camera input on that DVR if it has not been selected previously). Rev. 1.01 18 900 - Honeywell HJZTP | User Manual - Page 29
is available to users logged in as user level 2 (U2 displayed on the LCD): Key search play rw ff stop rec counter Fn + Joystick Right/Left Fn + Joystick Up/Down Fn + rec Function Search Play/Pause Rewind Fast Forward Stop Record Counter Shuttle Forwards/Backwards Jog Forwards/Backwards Panic User - Honeywell HJZTP | User Manual - Page 30
4.8 ALARM FUNCTION If an alarm is active, press the 'alarm' key to reset the DVR's outputs (including internal buzzer). If the DVR is in the live monitoring mode (and no alarm is active), press the 'alarm' key to display the event log. (Once in the event log, it is navigated in the same way as the - Honeywell HJZTP | User Manual - Page 31
SECTION 5: MULTIPLEXER CONTROL FUNCTIONS 5.1 MULTIPLEXER MODE Press the 'mode' key to toggle between multiplexer and DVR mode. 5.2 MENUS Navigation around menus is achieved by using the function keys - Honeywell HJZTP | User Manual - Page 32
Cancel Use the 'F1' ('▲'), 'F2' ('▼') keys to select the required option, then press 'F5' ('enter'). 5.3 PICTURE CONTROL The following table indicates the keys used for picture control: Key display sequence freeze play search Function Display Sequence Freeze Toggle VCR input Digital Zoom Press - Honeywell HJZTP | User Manual - Page 33
by the keyboard (the spot monitor number will be displayed on the LCD). Pressing the 'monitor' key without first entering a number returns the keyboard control back to the main monitor (MAIN displayed on the LCD). Note: Pressing 'F6' ('menu'), 'display', 'alarm' and 'play' will also put the - Honeywell HJZTP | User Manual - Page 34
5.6 MULTIPLEXER SELECTION Pressing a number followed by the 'Fn' key selects a multiplexer to control. This also selects the last camera controlled on that multiplexer (or the first camera input on that multiplexer if it has not been selected previously). Rev. 1.01 24 900.0570 8-Sept-05 - Honeywell HJZTP | User Manual - Page 35
CONTROL FUNCTIONS WHEN USING HONEYWELL VCL (RAPIDDOME/ORBITER DOME) PROTOCOL 6.1 PTZ CAMERA SELECTION CONTROL The PTZ cameras can be controlled for control without changing what is displayed on the monitors. 6.3 PAN AND TILT Very precise control of pan and tilt can be achieved using the joystick. - Honeywell HJZTP | User Manual - Page 36
HONEYWELL VCL PROTOCOL, CONTINUED 6.5 ZOOM Rotate the top of the joystick clockwise to zoom in. Rotate the top of the joystick counter-clockwise to zoom out. 6.6 FOCUS AND IRIS Press the auto key above the focus control keys to toggle the camera in and out of 'autofocus' mode, if the feature is - Honeywell HJZTP | User Manual - Page 37
HONEYWELL VCL PROTOCOL, CONTINUED 6.8 MANUAL CHANGE OVER (CHANGE OVER RAPIDDOME/ORBITER DOMES For example, to define Preset 1. 1. Move the selected dome to view the desired preset position, using the joystick, zoom, focus and iris keys. 2. Press and hold the 'preset' key. 3. Press '1'. 4. Release - Honeywell HJZTP | User Manual - Page 38
HONEYWELL VCL PROTOCOL, CONTINUED 6.9.3 To Start a Tour of Presets A RapidDome/Orbiter can store four different preset tours. After programming the tours, as detailed in the next - Honeywell HJZTP | User Manual - Page 39
HONEYWELL VCL PROTOCOL, CONTINUED 6.9.5 To Vary the Standard Speed of a Tour, Continued 7. Press '2', then press the '180°' key. (This defines 2°/sec to this preset position.) 8. Release - Honeywell HJZTP | User Manual - Page 40
HONEYWELL VCL PROTOCOL, CONTINUED 6.9.7 To Vary the Standard Speeds and Dwell Times of a key. (This will turn off the tour.) The tour will also stop if the telemetry buttons or the joystick are used to control the dome. 6.9.9 To Restart a Tour of Presets Press the 'autopan' key. (This will start the - Honeywell HJZTP | User Manual - Page 41
HONEYWELL VCL PROTOCOL, tour 1) can function they must first be defined. See section 6.1.7 for instruction on how to define the tours and presets. To turn off a home or a normal preset. Selected the required preset number by using the joystick up and down or 'F1' ('▲'), 'F2' ('▼') keys. Then press - Honeywell HJZTP | User Manual - Page 42
HONEYWELL VCL PROTOCOL, CONTINUED 6.10.3 Remote Reset Select 'RESET' in the camera setup menu, then press 'aux' to display the reset menu as shown below: AUX = S E - Honeywell HJZTP | User Manual - Page 43
HONEYWELL VCL PROTOCOL, CONTINUED 6.10.5 IR Lamps Select 'IR/LAMP' in the camera setup menu, then press 'aux' to display the IR lamps menu as shown - Honeywell HJZTP | User Manual - Page 44
Notes: Rev. 1.01 34 900.0570 8-Sept-05 - Honeywell HJZTP | User Manual - Page 45
. The following functions are available: Variable speed pan and tilt. Zoom control. Manual and automatic iris control. Manual focus control. Preshot programming and selection. Vectorscan selection. Freeze Flashback Nightshot Home position selection. Return to - Honeywell HJZTP | User Manual - Page 46
. 7.4 ZOOM Rotate the top of the joystick clockwise to zoom in. Rotate the top of the joystick counter-clockwise to zoom out. 7.5 IRIS Press the '+' (OPEN) or '-' (CLOSE) keys to manually alter the cameras iris. Press the 'auto' key above the iris control keys to put the camera in auto-iris - Honeywell HJZTP | User Manual - Page 47
HONEYWELL DIAMOND PROTOCOL, CONTINUED 7.8 PRESHOT SEEK To seek preshot 1: 1. Press key '1'. 2. Press the 'preset' key. Preshots 1 to 4 can also be selected by single key presses using - Honeywell HJZTP | User Manual - Page 48
HONEYWELL DIAMOND PROTOCOL, CONTINUED 7.12 NIGHTSHOT Press 'aux' or enter preshot 99 to toggle the camera between nightshot mode on and nightshot mode off. Note. Nightshot is only available on domes with colour / mono cameras 7.13 RETURN TO MANUAL on the dome. Use joystick left and right or 'F3 - Honeywell HJZTP | User Manual - Page 49
HONEYWELL DIAMOND PROTOCOL, CONTINUED 7.15 ON SCREEN DISPLAY (OSD) MENUS, CONTINUED Selecting 'GOTO' will display the domes 'preshot go to' menu on screen. Selecting 'PROGRAM' will - Honeywell HJZTP | User Manual - Page 50
HONEYWELL DIAMOND PROTOCOL, CONTINUED 7.15 ON SCREEN DISPLAY (OSD) MENUS, CONTINUED through the characters. Press the number keys to send numbers to the domes menu. The following keys are also used to control the OSD menus: Press the 'F1' ('▲'), 'F2' ('▼'), 'F3' ('◄') and 'F4' ('►') keys to move - Honeywell HJZTP | User Manual - Page 51
PTZ CONTROL FUNCTIONS WHEN USING HONEYWELL MAXPRO MODE (KD6/HD6) PROTOCOL 8.1 INTRODUCTION This section provides information on controlling and has a day/night camera with an IR block filter it can be controlled manually through the setup menus or by sending the scan to a preprogrammed PreShot - Honeywell HJZTP | User Manual - Page 52
as described Section 7.7 and send the KD6i/HD6i to PreShots as described in Section 7.8. The PreShots reserved for scan setup, programming, and control functions cannot be programmed and cannot be included in VectorScans. PreShot 80 PreShot 81 PreShot 82 PreShot 83 PreShot 84 PreShot 85 PreShot 86 - Honeywell HJZTP | User Manual - Page 53
distance to the next PreShot's pan and tilt coordinates. The velocity is programmable between 1° to 400° per second. 8.7.2 Stop a VectorScan Take manual control (pan, tilt, zoom, focus, or iris) of the scan. Send the scan to a PreShot. Start a PTZ tour or a different VectorScan. Execute - Honeywell HJZTP | User Manual - Page 54
tour from beginning to end. 1. Enter a PreShot 80 command on the controller to run PTZ tour 1. (Enter a PreShot 81 command to run PTZ tour 2 or PreShot 82 command to run PTZ tour 3.) 2. Stop the PTZ tour by manually controlling the scan or by sending the scan a PreShot, VectorScan, or other command - Honeywell HJZTP | User Manual - Page 55
functions controllable via HJZTP Dome functions controllable via HJZTP Dimensions WxHxD Weight (Approximate) Power Supply Provided Operating Temperature HJZTP / HJZTPX 128 / tilt via joystick Variable speed pan / tilt via joystick Zoom via twist joystick Zoom via twist joystick Focus near, - Honeywell HJZTP | User Manual - Page 56
Notes: Rev. 1.01 46 900.0570 8-Sept-05 - Honeywell HJZTP | User Manual - Page 57
APPENDIX A: MENU NAVIGATION MIMIC RECORDING DEFINE MIMIC LOCK LOCK F6 (VCL) LOCK MAIN SCREEN LOCK LOCK F6 (DIAMOND) LOCK XXXX LOCK KEYBOARD SETUP LOCK PRTCL KEYBRD DVR/MUX LOCK LOCK DOME OSD MENU SELECTION DOME PROTOCOL CAMERA / DVR/ MUX ASSIGNMENT MASTER/SLAVE SET PRES LOCK VECT - Honeywell HJZTP | User Manual - Page 58
Notes: Rev. 1.01 48 900.0570 8-Sept-05 - Honeywell HJZTP | User Manual - Page 59
AUTO CALIBRATION Pressing and holding the 'lock' key and pressing 'F1' ('▲') will calibrate the joystick centre position. It is important that the joystick is at its centre position when this is performed. B.2 KEY TEST Pressing and holding the 'lock' key and entering 2323 on the numeric keypad - Honeywell HJZTP | User Manual - Page 60
Notes: Rev. 1.01 50 900.0570 8-Sept-05 - Honeywell HJZTP | User Manual - Page 61
APPENDIX C: VCL (ORBITER/RAPIDDOME) DATA INPUT The following Honeywell VCL (Orbiter/RapidDome) commands can be input into the keyboard using an RS485 connection to the KBD port. UP DOWN LEFT RIGHT ZOOM IN ZOOM - Honeywell HJZTP | User Manual - Page 62
Notes: Rev. 1.01 52 900.0570 8-Sept-05 - Honeywell HJZTP | User Manual - Page 63
APPENDIX D: PASSWORDS The are two user passwords and a keyboard setup code: User level 1 9078 User level 2 3434 Keyboard Setup Menu 4769 Rev. 1.01 53 900.0570 8-Sept-05 - Honeywell HJZTP | User Manual - Page 64
Vajnorskà 142, 83104 Bratislava Slovakia www.olympo.sk TEL +421-2-444-54-660 Video Systems www.honeywellvideo.com 1-800-796-CCTV (North America only) © 2005 Honeywell International Inc. ALL RIGHTS RESERVED. NO PART OF THIS PUBLICATION MAY BE REPRODUCED BY ANY MEANS WITHOUT WRITTEN PERMISSION FROM
-
 1
1 -
 2
2 -
 3
3 -
 4
4 -
 5
5 -
 6
6 -
 7
7 -
8
-
9
-
10
-
11
-
12
-
13
-
14
-
15
-
16
-
17
-
18
-
19
-
20
-
21
-
22
-
23
-
24
-
25
-
26
-
27
-
28
-
29
-
30
-
31
-
32
-
33
-
34
-
35
-
36
-
37
-
38
-
39
-
40
-
41
-
42
-
43
-
44
-
45
-
46
-
47
-
48
-
49
-
50
-
51
-
52
-
53
-
54
-
55
-
56
-
57
-
58
-
59
-
60
-
61
-
62
-
63
-
64
 |
 |

900.0570 – September 2005 – Rev. 1.01
HJZTP/HJZTPX
Joystick Controller for
PTZ Cameras, DVRs, and Multiplexers
User Manual