Honeywell HJZTP User Manual - Page 23
System Setup
 |
View all Honeywell HJZTP manuals
Add to My Manuals
Save this manual to your list of manuals |
Page 23 highlights
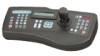
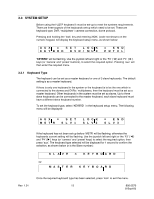
3.3 SYSTEM SETUP Before using the HJZTP keyboard it must be set-up to meet the systems requirements. There are three aspects of the keyboards set-up which need to be set. These are keyboard type, DVR / multiplexer / camera connection, dome protocol. Pressing and holding the 'lock' key and entering XXXX (code not shown) on the numeric keypad, will display the keyboard setup menu, as shown below: AUX = S E T L OCK K E Y B R D D V R / MU X = END PRT CL 'KEYBRD' will be flashing. Use the joystick left and right or the 'F3' ('◄') and 'F4' ('►') keys (or 'camera' and 'preset' buttons), to select the required option. Pressing 'aux' will then enter the required menu. 3.3.1 Keyboard Type The keyboard can be set as a master keyboard or one of 3 slave keyboards. The default setting is as a master keyboard. If there is only one keyboard in the system or the keyboard is to be the one which is connected to the domes and DVRs / multiplexers, then the keyboard must be set as a master keyboard. Other keyboards in the system must be set as slaves. Up to three slave keyboards can be connected to the master keyboard, each slave keyboard must have a different slave keyboard number. To set the keyboard type, select 'KEYBRD' in the keyboard setup menu. The following menu will be displayed: AUX = SET MS T R S L V 1 L OCK SLV2 = END SLV3 If the keyboard has not been set-up before 'MSTR' will be flashing, otherwise the keyboards current setting will be flashing. Use the joystick left and right or the 'F3' ('') and 'F4' ('') keys (or 'camera' and 'preset' keys) to select the required option, then press 'aux'. The keyboard type selected will be displayed for 1 second to confirm the selection, as shown below (n is the Slave number): S L AV E n KE Y BOARD Or: MA S T E R K E Y B OA R D Rev. 1.01 Once the required keyboard type has been selected, press 'lock' to exit the menu. 13 900.0570 8-Sept-05
-
 1
1 -
2
-
3
-
4
-
5
-
6
-
7
-
8
-
9
-
10
-
11
-
12
-
13
-
14
-
15
-
16
-
17
-
 18
18 -
 19
19 -
 20
20 -
 21
21 -
 22
22 -
 23
23 -
 24
24 -
 25
25 -
 26
26 -
 27
27 -
 28
28 -
29
-
30
-
31
-
32
-
33
-
34
-
35
-
36
-
37
-
38
-
39
-
40
-
41
-
42
-
43
-
44
-
45
-
46
-
47
-
48
-
49
-
50
-
51
-
52
-
53
-
54
-
55
-
56
-
57
-
58
-
59
-
60
-
61
-
62
-
63
-
64
 |
 |
