Hoover FH50010 Product Manual
Hoover FH50010 Manual
 |
View all Hoover FH50010 manuals
Add to My Manuals
Save this manual to your list of manuals |
Hoover FH50010 manual content summary:
- Hoover FH50010 | Product Manual - Page 1
may include small parts. Small parts can present a choking hazard. For quick reference, please record your vacuum information below. Model #: Mfg. Code: (Mfg. code located on the lower backside of cleaner) • Please read these instructions carefully before using your Shampooer. • Let us help - Hoover FH50010 | Product Manual - Page 2
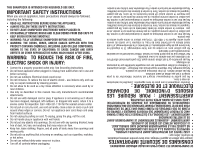
USING THE APPLIANCE. • ALWAYS FOLLOW THESE SAFETY INSTRUCTIONS. • DO NOT LEAVE SHAMPOOER UNATTENDED WHEN PLUGGED IN. • OCCASIONALLY REMOVE BRUSH AND CLEAN DEBRIS FROM END CAPS TO KEEP BRUSH ROTATING SMOOTHLY. • WARNING: FULLY ASSEMBLE SHAMPOOER BEFORE OPERATING. • WARNING: THE CORDS, WIRES, AND - Hoover FH50010 | Product Manual - Page 3
for any blockage. Empty the dirt container and clean filters. After approximately 30 minutes the motor will have cooled and the vacuum will be ready to use. NOTE: the cleaner must remain unplugged during the 30 minute cooling period. • Use extra care when cleaning on stairs. • Do not use to pick up - Hoover FH50010 | Product Manual - Page 4
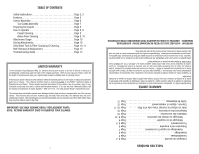
Usage Page 10 Storing Attachments Page 10 Dirty Water Tank & Filter: Emptying & Cleaning Page 10, 11 Belt: Removal & Replacement Page 12 Troubleshooting Guide Page 13 LIMITED WARRANTY To the consumer, Royal Appliance Mfg. Co. warrants this vacuum cleaner to be free of defects in material or - Hoover FH50010 | Product Manual - Page 5
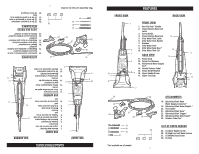
Water Supply 4 12. Quick Cord Release 11. Power Cord BACK VIEW 15 3 11 2 10. Dirty Water Tank Lid 16 9. Dirty Water Tank Door* 8. Dirty Water Tank 7. Brushes 6. Dirty Water Tank Handle 5. Dirty Water Tank Latch 4. Clean Solution Reservoir 17 3. Carry Handle Latch 18 19 20 - Hoover FH50010 | Product Manual - Page 6
6 snaps into place. cleaner and tilt back until it Place solution reservoir into 3. 3a. Stand base in upright in place, insert screw through front of midsection and tighten. NOTE: Make sure the power cord is out of the way to avoid pinching. ASSEMBLAGE OUTIL NÉCESSAIRE : TOURNEVIS CRUCIFORME - Hoover FH50010 | Product Manual - Page 7
* Not available on all models 7 ASSEMBLAGE DU SUPPORT À ACCESSOIRES* OUTIL NÉCESSAIRE : TOURNEVIS CRUCIFORME 1. 2. 2a. en appuyant dessus jusqu'à ce qu'il s'emboîte solidement dans le support situé sur la droite du support d'accessoires inférieur. *Non disponible sur tous les modéles 7 4. - Hoover FH50010 | Product Manual - Page 8
of time to dry carpet thoroughly. 4. Wipe cleaning solution from woodwork and wood to prevent any damage. 5. Try not to walk on carpet until it is completely dry. 6. After carpet is thoroughly dry, vacuum the carpet using a cleaner with a revolving brushroll. 7. Before cleaning, determine where you - Hoover FH50010 | Product Manual - Page 9
THIS INDICATES THE DIRTY WATER TANK IS FULL AND MUST BE EMPTIED. Place bottom of solution reservoir into cleaner and position until the lever snaps into place. Plug cord into electrical outlet. Step on handle release pedal, to put unit in cleaning position. Turn power switch to the "ON" position - Hoover FH50010 | Product Manual - Page 10
DÉBRANCHER AVANT TOUT ENTRETIEN. POUR VIDER LE RÉSERVOIR D'EAU SALE 1. 2. 3. DO NOT TRANSPORT THE SHAMPOOER WITH EITHER THE SOLUTION RESERVOIR OR DIRTY WATER TANK FULL. 1. Turn power switch on. While depressing solution spray trigger, push attachment forward. Release trigger and pull attachment - Hoover FH50010 | Product Manual - Page 11
until it latches. NOTE: Do not store cleaner with solution in reservoir or dirty water in dirty water tank. Mineral deposits and mildew can form which will affect the performance of your Carpet Shampooer. POUR VIDER ET NETTOYER LE RÉSERVOIR D'EAU SALE : SUITE REMISE EN PLACE DU RÉSERVOIR D'EAU - Hoover FH50010 | Product Manual - Page 12
deux (2) vis. 12 TO REMOVE BELT BELT: REMOVAL & REPLACEMENT** **ONLY FOR MODELS WITH ROTATING BRUSHROLL TOOL REQUIRED: PHILLIPS SCREWDRIVER WARNING: TO REDUCE THE RISK OF INJURY FROM MOVING PARTS - UNPLUG CLEANER BEFORE CHANGING BELT. BELT STYLE For Belt Style 7 replacements, please call 1-800 - Hoover FH50010 | Product Manual - Page 13
Dirty Water Tank in base of cleaner - Pg. 11. 3. Empty Dirty Water Tank - Pg. 10. 4. Clean Dirty Water Tank - Pg. 10. PROBLEM Shampooer won't run POSSIBLE REASON 1. Power cord not firmly plugged into outlet. 2. Blown fuse or tripped breaker. 3. Needs service. POSSIBLE SOLUTION 1. Plug unit - Hoover FH50010 | Product Manual - Page 14
MANUAL DEL PROPIETARIO Instrucciones de Funcionamiento y Servicio • Por favor lea estas instrucciones Rd. Glenwillow, Ohio 44139 ADVERTENCIA: El ensamble de la aspiradora puede incluir partes pequeñas. Las partes pequeñas pueden presentar riesgo de ahogamiento. Para tener una referencia rápida, - Hoover FH50010 | Product Manual - Page 15
de succion Se sale agua de la en la Base de la Aspiradora - Pág. E10, E11. 3. Vacíe el Tanque de Agua Sucia - Pág. E10. 4. Limpie el por el propietario. Las partes de repuesto utilizadas en • Usela sólo de la manera descrita en este manual. Utilice sólo los accesorios recomendados por el fabricante. - Hoover FH50010 | Product Manual - Page 16
Inspeccione la descarga, la entrada y los filtros por si hubiera atascos. Vacíe el recipiente de polvo y limpie los filtros. Después de aproximadamente PHILLIOPS ADVERTENCIA: PARA REDUCIR EL RIESGO DE LESIONES CAUSADAS POR LAS PARTES MÓVILES, DESCONECTE LA ASPIRADORA ANTES DE CAMBIAR LA BANDA. ESTILO - Hoover FH50010 | Product Manual - Page 17
de agua sucia, tome el mango con una mano y la boquilla con la otra y vacíe el agua en un lavabo. Enjuague el tanque de agua sucia y el filtro con asistencia en los EE.UU. y CANADÁ: 1-800-321-1134. Use solamente partes de repuesto genuinas Royal®. La garantía no incluye el desgaste anormal, daño - Hoover FH50010 | Product Manual - Page 18
de una habitación a otra, use el asa para transporte ubicada en la parte frontal de la aspiradora. *No viene en todos los modelos NO TRANSPORTE LA LAVADORA se suba e interrumpa la succión. Una vez que se activa el flotador, vacíe el tanque de agua sucia. Si el tanque de agua sucia no parece - Hoover FH50010 | Product Manual - Page 19
SUCIA. manguera en el tanque de agua sucia. E9 Conecte el conector de suministro de agua de la base en el accesorio en la parte inferior del lado izquierdo de mango que está de cara a la aspiradora. COMO ENSAMBLAR HERRAMIENTAS REQUERIDAS: DESTORNILLADOR EN CRUZ 1. 2. SECCIÓN MEDIA LENGÜETAS - Hoover FH50010 | Product Manual - Page 20
1). Incline el depósito de solución apartándolo de la aspiradora y retírelo (Diagrama 1a). Desenrosque la taza de medida que está en la parte posterior del depósito de solución. Llene con 5 tazas de medida de solución, (aproximadamente 5 oz). Llene el espacio restante del depósito con agua
-
 1
1 -
 2
2 -
 3
3 -
 4
4 -
 5
5 -
 6
6 -
 7
7 -
8
-
9
-
10
-
11
-
12
-
13
-
14
-
15
-
16
-
17
-
18
-
19
-
20
 |
 |

For quick reference, please record your
vacuum information below.
Model #:
Mfg. Code:
(Mfg. code located on the lower backside of cleaner)
Español - página E1
Español - página E1
©2005 All rights reserved
#1-113192-000
3/05
•
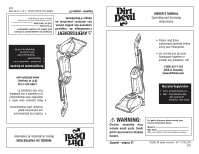
Please read these
instructions carefully before
using your Shampooer.
•
Let us help you put your
Shampooer together or
answer any questions, call:
1-800-321-1134
(USA & Canada)
www.dirtdevil.com
WARNING:
Cleaner
assembly
may
include small parts. Small
parts can present a choking
hazard.
OWNER’S MANUAL
Operating and Servicing
Instructions
Warranty Registration
•
Online at: www.dirtdevil.com
•
Mail:
Royal Appliance Mfg
7005 Cochran Rd.
Glenwillow, Ohio 44139
MANUEL DU PROPRIÉTAIRE
Notice d’utilisation et d’entretien
AVERTISSEMENT :
L’assemblage de l’appareil
comprend des petites pièces.
Ces dernières présentent un
danger d’étouffement.
Consignez les renseignements ci-dessous
pour pouvoir les consulter rapidement.
Nº de modèle :
Code de
fabrication :
(Le code de fabrication se trouve sur la partie
inférieure arrière de l’aspirateur)
©2005 Tous droits réservés
# #1-113192-000
3/05
•
Veuillez lire attentivement
ces instructions avant
d’utiliser votre shampouineur.
•
Nous pouvons vous aider à
assembler votre shampouineur
et à répondre à vos questions.
Pour cela composez le :
1-800-321-1134
(É.U. et Canada)
www.dirtdevil.com
Enregistrement en Garantie
•
Sur Internet : www.dirtdevil.com
•
Adresse postale :
Royal Appliance Mfg
7005 Cochran Rd.
Glenwillow, Ohio 44139