Hoover FH50010 Product Manual - Page 6
How To Assemble, Assemblage
 |
View all Hoover FH50010 manuals
Add to My Manuals
Save this manual to your list of manuals |
Page 6 highlights
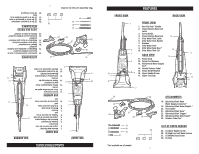
6 snaps into place. cleaner and tilt back until it Place solution reservoir into 3. 3a. Stand base in upright position. Push midsection onto base by aligning tabs on the backside of midsection and the pockets on the backside of base. Assemble the two (2) lower handle screws in the following manner: while holding nut in place, insert screw through front of midsection and tighten. NOTE: Make sure the power cord is out of the way to avoid pinching. ASSEMBLAGE OUTIL NÉCESSAIRE : TOURNEVIS CRUCIFORME 1. 2. Partie centrale Cordon Attaches Base Poignée supérieure Placer l'aspirateur en position verticale. Pousser la partie centrale de l'appareil sur la bas en alignant les attaches au dos de l'appareil et les poches au dos de la base. Placez les deux (2) vis de la poignée inférieure de la manière suivante : tout en maintenant l'écrou, insérez la vis dans la partie avant de la section médiane et serrez-la. REMARQUE : S'assurer que le cordon d'alimentation est éloigné pour éviter de se pincer. Faire glisser la poignée supérieure vers le bas sur l'appareil. Placez la vis dans le creux situé derrière la poignée supérieure et serrez. 3. 3a. Placez le réservoir de solution dans l'appareil et inclinez-le pour l'enclencher. Slide upper handle down onto unit. Place screw into recess in back of upper handle and tighten. Base Tabs Cord Upper Handle Midsection 1. 2. HOW TO ASSEMBLE TOOL REQUIRED: PHILLIPS SCREWDRIVER 6
-
 1
1 -
 2
2 -
 3
3 -
 4
4 -
 5
5 -
 6
6 -
 7
7 -
 8
8 -
 9
9 -
 10
10 -
 11
11 -
 12
12 -
13
-
14
-
15
-
16
-
17
-
18
-
19
-
20
 |
 |
