Hoover S3630 Manual - Page 3
Assembling cleaner - windtunnel canister cleaner
 |
View all Hoover S3630 manuals
Add to My Manuals
Save this manual to your list of manuals |
Page 3 highlights
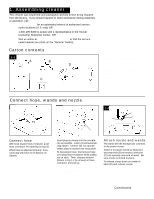
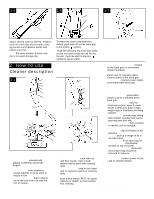
1. Assembling cleaner This cleaner was inspected and packaged carefully before being shipped from the factory. If you should happen to need assistance during assembly or operation, call 1-800-944-9200 for an automated referral of authorized service outlet locations (U.S. only) OR 1-330-499-9499 to speak with a representative in the Hoover Consumer Response Center. OR Visit us online at www.hoovercompany.com to find the service outlet nearest you (click on the "Service" button). Carton contents 1-1 A B D C Unpack cleaner from carton and identify the parts shown. Remove and dispose of cardboard packing. A. Canister cleaner B.WindTunnel™ powered nozzle C. Extra paper bag (one bag is installed in cleaner) D. Extension wands and hose Connect hose, wands and nozzle 1-2 1-3 1-4 D C B Connect hose With hose toward front of cleaner, push hose connector into opening in bag lid. When hose is attached properly, hose cord plug will reach to receptacle on cleaner. A Insert plug as deeply into the receptacle as possible. Latch (A) will automatically fasten. Cleaner will not operate unless plug is inserted into receptacle. To disconnect hose, first remove hose cord plug from receptacle while pulling out on latch. Then, depress buttons (shown in Fig.1-2 by arrows) on hose connector and pull up. Note: The flexible hose contains electrical wires for connection to the power nozzle and should not be used if damaged. The wires should not be seen through the outer skin. Attach nozzle and wands The wand with the storage clip connects to the power nozzle. Attach it to power nozzle by fitting button projection (B) on nozzle connector (C) into opening near end of wand. Be sure nozzle is locked in place. To release, press down on center of latch (D) and remove nozzle. Continued ª 3
-
 1
1 -
 2
2 -
 3
3 -
 4
4 -
 5
5 -
 6
6 -
 7
7 -
 8
8 -
 9
9 -
10
-
11
-
12
 |
 |
