Hoover S3630 Manual - Page 5
Polarized plug - bags
 |
View all Hoover S3630 manuals
Add to My Manuals
Save this manual to your list of manuals |
Page 5 highlights
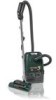
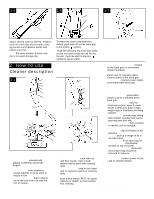
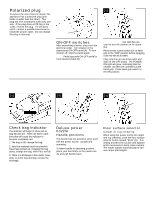
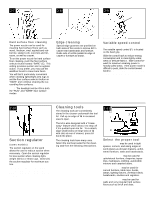
Polarized plug To reduce the risk of electric shock, this appliance has a polarized plug (one blade is wider than the other). This plug will fit in a polarized outlet only one way. If the plug does not fit fully in the outlet, reverse the plug. If it still does not fit, contact a qualified electrician to install the proper outlet. Do not change the plug in any way. 2-2 B A ON-OFF switches After assembling cleaner, plug cord into electrical outlet. Turn cleaner on by depressing ON-OFF pedal (A). To turn cleaner off, depress pedal again. Note: Pedal opposite ON-OFF pedal is Cord Rewind Pedal (B). 2 - 3 C On some models two switches are used to turn the cleaner on for operation. Press remote control switch (C) on hand grip to the "OFF" position before plugging cord into electrical outlet. Plug cord into an electrical outlet and step on ON-OFF pedal. The POWER ON light will glow, indicating that the cleaner can then be controlled at the hand grip. Press hand grip switch to the ON position. 2 - 4 2 - 5 2 - 6 D Check bag indicator The indicator will begin to show red as bag fills with dirt. There are three conditions that will cause the indicator to become completely red: 1. The bag is full; change the bag. 2. Very fine materials (such as powder) have been picked up, clogging the bag pores; change the bag, even if it is not full. 3. There is a blockage in the nozzle, hose, tools, or at the bag opening; remove the b l o c k a g e . Deluxe power nozzle Handle positions The handle has two positions when used with the power nozzle: upright and operating. To lower handle to operating position, place your foot firmly on the power nozzle and pull handle back. Floor surface selector Carpet or rug cleaning When using the power nozzle for carpet and rug cleaning, push the floor surface selector button toward "RUG" (D). This setting provides the suction and agitator action necessary to deep clean carpets. The nozzle adjusts automatically to various carpet pile heights. 5
-
 1
1 -
 2
2 -
 3
3 -
 4
4 -
 5
5 -
 6
6 -
 7
7 -
 8
8 -
 9
9 -
 10
10 -
 11
11 -
12
 |
 |
