Hoover S3630 Manual - Page 4
How to use - filter
 |
View all Hoover S3630 manuals
Add to My Manuals
Save this manual to your list of manuals |
Page 4 highlights
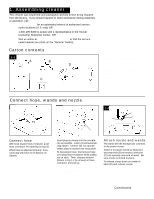
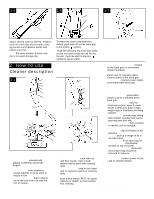
1-5 1-6 1-7 G F E H Attach second wand to the first. Position cord into cord clips (E) on wands, placing excess cord between nozzle and bottom cord clip. Note: For some models, bottom cord clip is on wand storage clip. To attach the hose to the extension wands, push latch (F) on the hand grip to the unlock symbol. Push the hand grip (G) down onto wand so that the button projection (H) fits into the slot. Push the latch to the lock symbol to secure wand. 2. How to use Cleaner description 2-1 8 9 7 10 11 6 17 5 8 9 7 10 11 6 20 21 22 23 13 12 14 19 4 24 18 3 2 25 26 16 27 15 1 The assembled cleaner will look like the drawing. 1. WindTunnel™ carpet and floor power nozzle: automatically adjusts to different carpet pile heights. 2. Headlight 3. Spring latch: locks extension wands together or locks wand to nozzle or tool. 4. Wand storage clip: place cleaner on its end and hook clip onto bottom of cleaner. 4 5. Extension wands: used with rug and floor nozzle. One or both wands may be used with cleaning tools. 6. Wand/tool latch: used to lock hand grip to extension wands or cleaning tools. 7. Floor surface selector button: push button toward "RUG" for carpet cleaning or "BARE" for hard surface floor cleaning. 8. Hand grip Push plug on power nozzle cord completely into receptacle underneath hand grip. Always disconnect cleaner from electrical outlet before attaching or removing power nozzle plug. 9. Remote ON/OFF switch*: located on the hand grip for convenient cleaner operation. 10.Remote variable speed control*: allows user to manually select cleaner speed at the hand grip. 11. Receptacle: connect power nozzle cord underneath hand grip. 12. Dusting brush 13. Crevice tool 14. Hard floor tool 15. Furniture nozzle 16. Power ON light*: glows when cleaner can be controlled at the hand grip. 17. Suction regulator*: close for maximum suction, open if power nozzle is difficult to push or light weight rugs or draperies are being cleaned. 18. L a rge wheels: provide easy towing when cleaner is pulled over carpet, area rugs and door sills. 19. Cord rewind pedal: step on pedal to rewind cord for storage. Hold plug until cord is rewound. 20. Micro filter: aids in filtration of dirt particles. 21. Tool lid: pull up on edge of lid in recessed area. 22. Bag lid latch: lift to open bag lid. 23. ON/OFF pedal: conveniently located on top of cleaner. 24. Check bag indicator: shows red when paper bag should be checked for fullness. 25. Hose connector 26. Receptacle: connect power nozzle cord to canister cleaner. 27. Carrying handle *Available on some models. This cleaner is intended for household use. Operate cleaner only at voltage specified on data plate on bottom of cleaner.
-
 1
1 -
 2
2 -
 3
3 -
 4
4 -
 5
5 -
 6
6 -
 7
7 -
 8
8 -
 9
9 -
 10
10 -
11
-
12
 |
 |
