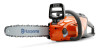
Husqvarna 120i Operation Manual - Page 16
Cutting equipment - lowes
 |
View all Husqvarna 120i manuals
Add to My Manuals
Save this manual to your list of manuals |
Page 16 highlights
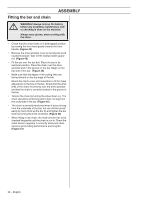
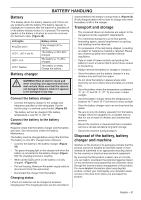
GENERAL SAFETY PRECAUTIONS • Keep all cords and extension cords away from water, oil and sharp edges. Make sure the cord is not pinched in doors, fences or the like. Otherwise it can cause the object to become live. WARNING! Do not use the battery ! charger close to corrosive or flammable materials. Do not cover the battery charger. Pull out the plug to the battery charger in the event of smoke or fire. Remember the risk of fire. Do not use: • a faulty or damaged battery charger or never use a faulty, damaged or deformed battery. Do not charge: • non-rechargeable batteries in the battery charger or use them in the machine. • the battery in the battery charger outdoors. • the battery in the rain or in wet conditions. • the battery in direct sunlight. Use the battery charger only when the surrounding temperature is between 5 °C (41 °F) and 40 °C (104 °F). Use the charger in an environment which is well ventilated, dry and free from dust. Cutting equipment This section describes how to choose and maintain your cutting equipment in order to: • Reduce the risk of kickback. • Reduce the risk of the saw chain breaking or jumping off the bar. • Obtain optimal cutting performance. • Extend the life of cutting equipment. • Avoid increasing vibration levels. General rules • Only use cutting equipment recommended by us! See instructions under the heading Technical data. • Keep the chain's cutting teeth properly sharpened! Follow our instructions and use the recommended file gauge. A damaged or badly sharpened chain increases the risk of accidents and may cause the product to go into over temperature faster. • Maintain the correct depth gauge setting! Follow our instructions and use the recommended depth gauge clearance. Too large a clearance increases the risk of kickback. (Figure 19) • Keep the chain properly tensioned! If the chain is slack it is more likely to jump off and lead to increased wear on the bar, chain and drive sprocket. (Figure 24) • Keep cutting equipment well lubricated and properly maintained! A poorly lubricated chain is more likely to break and lead to increased wear on the bar, chain and drive sprocket. Cutting equipment designed to reduce kickback WARNING! Faulty cutting equipment or ! the wrong combination of bar and saw chain increases the risk of kickback! Only use the bar/saw chain combinations we recommend, and follow the filing instructions. See instructions under the heading Technical data. The only way to avoid kickback is to make sure that the kickback zone of the bar never touches anything. By using cutting equipment with "built-in" kickback reduction and keeping the chain sharp and wellmaintained you can reduce the effects of kickback. Guide bar The smaller the tip radius the lower the chance of kickback. Saw chain A chain is made up of a number of links, which are available in standard and low-kickback versions. IMPORTANT! No saw chain design eliminates the danger of kickback. WARNING! Any contact with a rotating ! saw chain can cause extremely serious injuries. Some terms that describe the bar and chain To maintain the safety features of the cutting equipment, you should replace a worn or damaged bar or chain with a bar and chain combinations recommended by Husqvarna. See instructions under the heading Technical Data for a list of replacement bar and chain combinations we recommend. Guide bar • Length (inches/cm) (Figure 13) • Number of teeth on bar tip sprocket (T). (Figure 12) • Chain pitch (inches). The spacing between the drive links of the chain must match the spacing of the teeth on the bar tip sprocket and drive sprocket. (Figure 14) • Number of drive links. The number of drive links is determined by the length of the bar, the chain pitch and the number of teeth on the bar tip sprocket. (Figure 16) • Bar groove width (inches/mm). The groove in the bar must match the width of the chain drive links. • Chain oil hole and hole for chain tensioner. The bar must be matched to the chain saw design. (Figure 15) 16 - English
-
 1
1 -
2
-
3
-
4
-
5
-
6
-
7
-
8
-
9
-
10
-
 11
11 -
 12
12 -
 13
13 -
 14
14 -
 15
15 -
 16
16 -
 17
17 -
 18
18 -
 19
19 -
 20
20 -
 21
21 -
22
-
23
-
24
-
25
-
26
-
27
-
28
-
29
-
30
-
31
-
32
-
33
-
34
-
35
-
36
-
37
-
38
-
39
-
40
-
41
-
42
-
43
-
44
-
45
-
46
-
47
-
48
-
49
-
50
-
51
-
52
-
53
-
54
-
55
-
56
-
57
-
58
-
59
-
60
-
61
-
62
-
63
-
64
-
65
-
66
-
67
-
68
-
69
-
70
-
71
-
72
-
73
-
74
-
75
-
76
-
77
-
78
-
79
-
80
-
81
-
82
-
83
-
84
-
85
-
86
-
87
-
88
-
89
-
90
-
91
-
92
-
93
-
94
-
95
-
96
 |
 |
