Husqvarna 120i Operation Manual - Page 20
Assembly
 |
View all Husqvarna 120i manuals
Add to My Manuals
Save this manual to your list of manuals |
Page 20 highlights
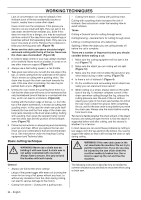
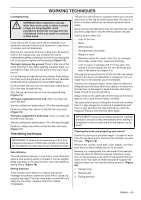
Fitting the bar and chain ASSEMBLY WARNING! Always remove the battery ! before any assembly, maintenance and/ or checking is done on the machine. Always wear gloves, when working with the chain. • Check that the chain brake is in disengaged position by moving the front hand guard towards the front handle. (Figure 42) • Remove the drive sprocket cover by turning the knob counterclockwise. Take off the transportation guard (A). (Figure 43) • Fit the bar over the bar bolt. Place the bar in its rearmost position. Place the chain over the drive sprocket and in the groove on the bar. Begin on the top side of the bar. (Figure 44) • Make sure that the edges of the cutting links are facing forward on the top edge of the bar. Mount the clutch cover and remember to fit the chain adjuster pin in the hole in the bar. Check that the drive links of the chain fit correctly over the drive sprocket and that the chain is correctly located in the groove in the bar. • Tension the chain by turning the wheel down (+). The chain should be tensioned until it does not sag from the underside of the bar. (Figure 45) • The chain is correctly tensioned when it does not sag from the underside of the bar, but can still be turned easily by hand. Hold up the bar tip and tighten the bar knob by turning the knob clockwise. (Figure 46) • When fitting a new chain, the chain tension has to be checked frequently until the chain is run-in. Check the chain tension regularly. A correctly tensioned chain ensures good cutting performance and long life. (Figure 47) 20 - English
-
 1
1 -
2
-
3
-
4
-
5
-
6
-
7
-
8
-
9
-
10
-
11
-
12
-
13
-
14
-
 15
15 -
 16
16 -
 17
17 -
 18
18 -
 19
19 -
 20
20 -
 21
21 -
 22
22 -
 23
23 -
 24
24 -
 25
25 -
26
-
27
-
28
-
29
-
30
-
31
-
32
-
33
-
34
-
35
-
36
-
37
-
38
-
39
-
40
-
41
-
42
-
43
-
44
-
45
-
46
-
47
-
48
-
49
-
50
-
51
-
52
-
53
-
54
-
55
-
56
-
57
-
58
-
59
-
60
-
61
-
62
-
63
-
64
-
65
-
66
-
67
-
68
-
69
-
70
-
71
-
72
-
73
-
74
-
75
-
76
-
77
-
78
-
79
-
80
-
81
-
82
-
83
-
84
-
85
-
86
-
87
-
88
-
89
-
90
-
91
-
92
-
93
-
94
-
95
-
96
 |
 |
