Husqvarna 120i Operation Manual - Page 28
Maintenance
 |
View all Husqvarna 120i manuals
Add to My Manuals
Save this manual to your list of manuals |
Page 28 highlights
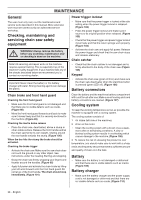
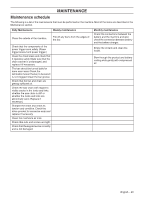
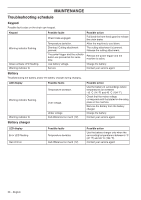
MAINTENANCE General The user must only carry out the maintenance and service work described in this manual. More extensive work must be carried out by an authorized service workshop. Checking, maintaining and servicing chain saw safety equipment WARNING! Always remove the battery ! before any assembly, maintenance and/ or checking is done on the machine. Note! All servicing and repair work on the machine requires special training. This is especially true of the machine′s safety equipment. If your machine fails any of the checks described below we recommend you to contact our servicing dealer. Important! Never clean the battery or the battery charger with water. Strong cleaning agents can damage the plastic. Chain brake and front hand guard Checking the front hand guard • Make sure the front hand guard is not damaged and that there are no visible defects such as cracks. (Figure 98) • Move the front hand guard forwards and back to make sure it moves freely and that it is securely anchored to the machine. (Figure 99) Checking the inertia brake release • Place the chain saw, deactivated, above a stump or other stable surface. Release the front handle and let the chain saw fall by its own weight, rotating around the rear handle towards the stump. (Figure 100) When the bar hits the stump the brake should be activated. Checking the brake trigger • Activate the chain saw. Make sure the saw chain does not touch the ground or any other object. See instructions under the heading Starting and stopping. • Grasp the chain saw firmly, wrapping your fingers and thumbs around the handles. (Figure 65) • Apply full power and activate the chain brake by tilting your left wrist forward onto the front hand guard. Do not let go of the front handle. The chain should stop immediately. (Figure 101) Power trigger lockout • Make sure that the power trigger is locked at the idle setting when the power trigger lockout is released. (Figure 102) • Press the power trigger lockout and make sure it returns to its original position when released. (Figure 103) • Check that the power trigger and power trigger lockout move freely and that the return springs work properly. (Figure 104) • Activate the chain saw and apply full power. Release the power trigger and check that the saw chain stops and remains stationary. Chain catcher • Check that the chain catcher is not damaged and is firmly attached to the body of the chain saw. (Figure 105) Keypad • Activate the chain saw (green LED on) and make sure the chain saw deactivates when the start/stop button is pressed (green LED off). (Figure 106) Battery connectors Clean the battery and the machines battery compartment with a soft brush after use. Make sure all cooling slots and battery connectors are cleaned. (Figure 107) Cooling system To keep the working temperature as low as possible the machine is equipped with a cooling system. The cooling system consists of: 1 Air intake (left side of the machine). 2 A fan on the motor. • Clean the cooling system with a brush once a week, more often in demanding conditions. A dirty or blocked cooling system results in overheating which causes damage to the machine. (Figure 108) 3 To reduce the risk of stressing the product to over temperature, you should make sure to work with a sharp chain and frequently secure that there is sufficient amount and quality of chain oil in the tank. Battery • Make sure the battery is not damaged or deformed and that there are no visible defects such as cracks. (Figure 109) Battery charger • Make sure the battery charger and the power supply cord is not damaged or deformed and that there are no visable defects such as cracks. (Figure 110) 28 - English
-
 1
1 -
2
-
3
-
4
-
5
-
6
-
7
-
8
-
9
-
10
-
11
-
12
-
13
-
14
-
15
-
16
-
17
-
18
-
19
-
20
-
21
-
22
-
 23
23 -
 24
24 -
 25
25 -
 26
26 -
 27
27 -
 28
28 -
 29
29 -
 30
30 -
 31
31 -
 32
32 -
 33
33 -
34
-
35
-
36
-
37
-
38
-
39
-
40
-
41
-
42
-
43
-
44
-
45
-
46
-
47
-
48
-
49
-
50
-
51
-
52
-
53
-
54
-
55
-
56
-
57
-
58
-
59
-
60
-
61
-
62
-
63
-
64
-
65
-
66
-
67
-
68
-
69
-
70
-
71
-
72
-
73
-
74
-
75
-
76
-
77
-
78
-
79
-
80
-
81
-
82
-
83
-
84
-
85
-
86
-
87
-
88
-
89
-
90
-
91
-
92
-
93
-
94
-
95
-
96
 |
 |
