Husqvarna 130L Owner Manual - Page 10
Operation
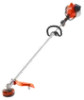 |
View all Husqvarna 130L manuals
Add to My Manuals
Save this manual to your list of manuals |
Page 10 highlights
To attach the loop handle (130L) 1. Attach the loop handle onto the shaft between the arrows. 4. Put a small screwdriver (C) in the hole to lock the shaft. L B C A A 5. Turn the trimmer head (H) counterclockwise to tighten the trimmer head to the gearbox. (Left hand threads.) H 2. Move the spacer into the slot of the loop handle. 3. Install the nut, the knob and the bolt. Do not tighten the bolt fully. 4. Adjust the product to a correct position. 5. Tighten the bolt. To attach the loop handle (130C) 1. Attach the loop handle to the shaft in compliance with the illustration and tighten. To attach the cutting attachment guard and trimmer head (curved shaft) 1. Attach the guard. Tighten the nut. 2. Make sure that the loop handle attaches between the arrows on the shaft. To attach the cutting attachment guard and the trimmer head (straight shaft) 1. Attach the cutting attachment guard (A) to the shaft with the bolt (L). 2. Attach the drive disc (B) to the output shaft. 3. Turn the output shaft until the hole in the drive disc aligns with the hole in the gear housing. 2. Attach the dust cup on the shaft. 3. Hold the dust cup with an adjustable wrench to make sure the shaft does not turn. 4. Attach the trimmer head to the shaft. Turn the trimmer head clockwise. Fuel This product has a two-stroke engine. Operation CAUTION: Incorrect type of fuel can result in engine damage. Use a mixture of gasoline and two-stroke oil. 10 1687 - 003 - 22.09.2021
-
 1
1 -
2
-
3
-
4
-
 5
5 -
 6
6 -
 7
7 -
 8
8 -
 9
9 -
 10
10 -
 11
11 -
 12
12 -
 13
13 -
 14
14 -
 15
15 -
16
-
17
-
18
-
19
-
20
-
21
-
22
-
23
-
24
-
25
-
26
-
27
-
28
-
29
-
30
-
31
-
32
-
33
-
34
-
35
-
36
-
37
-
38
-
39
-
40
-
41
-
42
-
43
-
44
-
45
-
46
-
47
-
48
-
49
-
50
-
51
-
52
-
53
-
54
-
55
-
56
-
57
-
58
-
59
-
60
-
61
-
62
-
63
-
64
-
65
-
66
-
67
-
68
-
69
-
70
-
71
-
72
 |
 |
