Insignia NS-DSC7P09 User Manual (English) - Page 4
Top, bottom and side - manual
 |
UPC - 600603118876
View all Insignia NS-DSC7P09 manuals
Add to My Manuals
Save this manual to your list of manuals |
Page 4 highlights
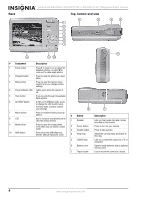
Back Insignia NS-DSC7B-09, NS-DSC7P-09, or NS-DSC7S-09 7 Megapixel Digital Camera Top, bottom and side 8 9 10 # Component Description 1 Zoom button Press T to zoom in on a subject for telephoto photos, or press W to zoom out for wide-angle photos. 2 Playback button Press to view the photos you have taken. 3 Menu button Press to open the camera menu system to let you change camera settings. 4 Power indicator LED Lights green when the camera is on. 5 Flash button Press to cycle through the available flash options. 6 SET/DISP button In REC or PLAYBACK mode, press to change the LCD monitor view. In menu mode, press to confirm your settings. 7 Macro button Press to enable shooting close-up photos. 8 LCD Use to compose your photos and to view the various menus. 9 Mode button Press to open the mode palette, from which you can select a scene mode. 10 ASM button Press to set the ASM (Aperture, Shutter, Manual Exposure) mode. # Button 1 Speaker 2 Power button 3 Shutter button 4 Strap ring 5 USB/AV jack 6 Battery cover 7 Tripod socket Description Lets you hear audio clips and memos recorded on the camera. Press to turn on your camera. Press to take a photo. Attach the carrying strap (included) to this ring. Lets you connect the camera to a TV or computer. Open to install batteries and an optional memory card. Use to mount the camera to a tripod. 4 www.insignia-products.com
-
 1
1 -
 2
2 -
 3
3 -
 4
4 -
 5
5 -
 6
6 -
 7
7 -
 8
8 -
 9
9 -
 10
10 -
11
-
12
-
13
-
14
-
15
-
16
-
17
-
18
-
19
-
20
-
21
-
22
-
23
-
24
-
25
-
26
-
27
-
28
-
29
-
30
-
31
-
32
 |
 |
