Intel DQ35JO Product Guide - Page 49
Installing the External Serial ATA Adapter Bracket
 |
UPC - 735858192194
View all Intel DQ35JO manuals
Add to My Manuals
Save this manual to your list of manuals |
Page 49 highlights
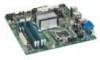
Installing and Replacing Desktop Board Components Installing the External Serial ATA Adapter Bracket If you are connecting the external Serial ATA (eSATA) adapter bracket to the Desktop Board, follow these instructions (see Figure 23): 1. Observe the precautions in "Before You Begin" on page 31. 2. Attach the connector at the end of the adapter cable to the red SATA connector (Figure 23, B) on the Desktop Board. 3. Secure the bracket to the chassis back panel with a screw (Figure 23, A). NOTE Do not use the red external SATA (eSATA) connector to connect to an internal SATA drive. Figure 23. Connecting the External Serial ATA Adapter Bracket 49
-
 1
1 -
2
-
3
-
4
-
5
-
6
-
7
-
8
-
9
-
10
-
11
-
12
-
13
-
14
-
15
-
16
-
17
-
18
-
19
-
20
-
21
-
22
-
23
-
24
-
25
-
26
-
27
-
28
-
29
-
30
-
31
-
32
-
33
-
34
-
35
-
36
-
37
-
38
-
39
-
40
-
41
-
42
-
43
-
 44
44 -
 45
45 -
 46
46 -
 47
47 -
 48
48 -
 49
49 -
 50
50 -
 51
51 -
 52
52 -
 53
53 -
 54
54 -
55
-
56
-
57
-
58
-
59
-
60
-
61
-
62
-
63
-
64
-
65
-
66
-
67
-
68
-
69
-
70
-
71
-
72
-
73
-
74
-
75
-
76
-
77
-
78
-
79
-
80
-
81
-
82
-
83
-
84
-
85
-
86
 |
 |

Installing and Replacing Desktop Board Components
49
Installing the External Serial ATA Adapter
Bracket
If you are connecting the external Serial ATA (eSATA) adapter bracket to the Desktop
Board, follow these instructions (see Figure 23):
1.
Observe the precautions in “Before You Begin” on page 31.
2.
Attach the connector at the end of the adapter cable to the red SATA connector
(Figure 23, B) on the Desktop Board.
3.
Secure the bracket to the chassis back panel with a screw (Figure 23, A).
NOTE
Do not use the red external SATA (eSATA) connector to connect to an internal
SATA drive.
Figure 23.
Connecting the External Serial ATA Adapter Bracket