Invacare TRSX5 Owners Manual - Page 32
Troubleshooting, Maintenance, Maintenance Safety Precautions
 |
View all Invacare TRSX5 manuals
Add to My Manuals
Save this manual to your list of manuals |
Page 32 highlights
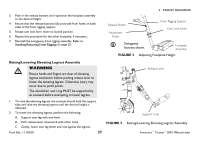
4 SAFETY INSPECTION/TROUBLESHOOTING 4.2 Troubleshooting Chair Veers Chair 3 Right/Left Wheels Sluggish Turn or Performance X X X X X X X X Casters Flutter X X X Squeaks and Rattles Looseness in Chair X X Solutions Check tires for correct and equal pressure Check for loose nuts and bolts. Check caster headtube angle. Check that rear wheels are equally spaced away from seat frame. 4.3 Maintenance Maintenance Safety Precautions ƽ WARNING After any adjustments, repair or service and before use, make sure all attaching hardware is tightened securely. Otherwise injury or damage may result. Replace any labels that are missing, worn, or torn. Refer to Label Locations on page 8 for a listing of the labels and their locations. CAUTION DO NOT overtighten hardware attaching to the frame. This could cause damage to the frame tubing. Invacare® Tracer® SX5 Wheelchair 32 Part No. 1110550
-
 1
1 -
2
-
3
-
4
-
5
-
6
-
7
-
8
-
9
-
10
-
11
-
12
-
13
-
14
-
15
-
16
-
17
-
18
-
19
-
20
-
21
-
22
-
23
-
24
-
25
-
26
-
 27
27 -
 28
28 -
 29
29 -
 30
30 -
 31
31 -
 32
32 -
 33
33 -
 34
34 -
 35
35 -
 36
36 -
 37
37 -
38
-
39
-
40
-
41
-
42
-
43
-
44
-
45
-
46
-
47
-
48
-
49
-
50
-
51
-
52
-
53
-
54
-
55
-
56
-
57
-
58
-
59
-
60
-
61
-
62
-
63
-
64
-
65
-
66
-
67
-
68
-
69
-
70
-
71
-
72
-
73
-
74
-
75
-
76
-
77
-
78
-
79
-
80
 |
 |
