Invacare TRSX5 Owners Manual - Page 43
Replacing Back Upholstery, Replacing Seat Upholstery
 |
View all Invacare TRSX5 manuals
Add to My Manuals
Save this manual to your list of manuals |
Page 43 highlights
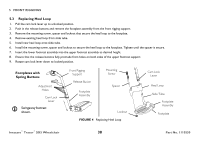
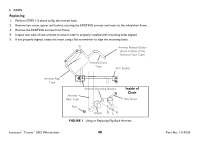
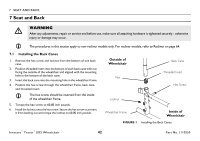
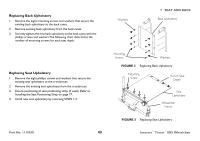
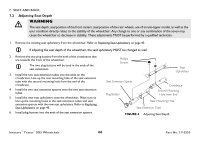
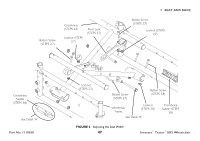
Replacing Back Upholstery 1. Remove the eight mounting screws and washers that secure the existing back upholstery to the back canes. 2. Remove existing back upholstery from the back canes. 3. Securely tighten the new back upholstery to the back canes with the phillips screws and washers.The following chart determines the number of mounting screws for each seat depth. Replacing Seat Upholstery 1. Remove the eight phillips screws and washers that secure the existing seat upholstery to the crossbraces. 2. Remove the existing seat upholstery from the crossbraces. 3. Ensure positioning of seat positioning strap (if used). Refer to Installing the Seat Positioning Strap on page 77. 4. Install new seat upholstery by reversing STEPS 1-2. Part No. 1110550 43 Washers 7 SEAT AND BACK Back Upholstery Mounting Screws Washers FIGURE 2 Replacing Back Upholstery Mounting Screw 16-inch Seat Depth Seat Upholstery Wheelchair Frame FIGURE 3 Replacing Seat Upholstery Invacare® Tracer® SX5 Wheelchair
-
 1
1 -
2
-
3
-
4
-
5
-
6
-
7
-
8
-
9
-
10
-
11
-
12
-
13
-
14
-
15
-
16
-
17
-
18
-
19
-
20
-
21
-
22
-
23
-
24
-
25
-
26
-
27
-
28
-
29
-
30
-
31
-
32
-
33
-
34
-
35
-
36
-
37
-
 38
38 -
 39
39 -
 40
40 -
 41
41 -
 42
42 -
 43
43 -
 44
44 -
 45
45 -
 46
46 -
 47
47 -
 48
48 -
49
-
50
-
51
-
52
-
53
-
54
-
55
-
56
-
57
-
58
-
59
-
60
-
61
-
62
-
63
-
64
-
65
-
66
-
67
-
68
-
69
-
70
-
71
-
72
-
73
-
74
-
75
-
76
-
77
-
78
-
79
-
80
 |
 |
