JVC GY-HMZ1U GY-HMZ1U ProHD 3D Camcorder 138-page user guide - Page 34
Manual Recording Menu, Recording, Displaying the Zebra Pattern
 |
View all JVC GY-HMZ1U manuals
Add to My Manuals
Save this manual to your list of manuals |
Page 34 highlights
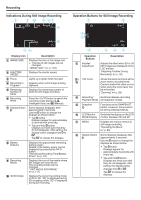
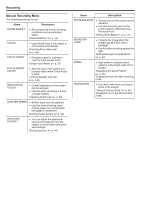
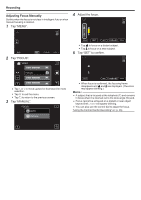
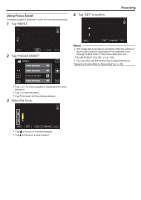
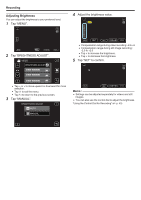
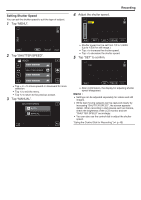
Recording Manual Recording Menu The following items can be set. Name Description SCENE SELECT 0 Recordings that suit the shooting conditions can be performed easily. "Scene Selection" (A p. 35) FOCUS 0 Use manual focus if the subject is not focused automatically. "Adjusting Focus Manually" (A p. 36) FOCUS ASSIST 0 Focused subject is outlined in color for more precise focus. "Using Focus Assist" (A p. 37) FOCUS ASSIST COLOR 0 Sets the color of the outline of a focused object when Focus Assist is used. " FOCUS ASSIST COLOR " (A p. 100) BRIGHTNESS ADJUST 0 Overall brightness on the screen can be adjusted. 0 Use this when recording in a dark or bright location. "Adjusting Brightness" (A p. 38) SHUTTER SPEED 0 Shutter speed can be adjusted. 0 Use this when shooting a fastmoving subject or to emphasize the subject's movement. "Setting Shutter Speed" (A p. 39) APERTURE PRIORITY 0 You can adjust the aperture to capture an image with only the subject in focus while blurring the surroundings. "Setting Aperture" (A p. 40) Name Description WHITE BALANCE 0 Overall color on the screen can be adjusted. 0 Use this when the color on the screen appears differently from the actual color. "Setting White Balance" (A p. 41) BACKLIGHT COMP. 0 Corrects the image when the subject appears dark due to backlight. 0 Use this when shooting against the light. "Setting Backlight Compensation" (A p. 42) ZEBRA 0 Sets whether to display zebra patterns at the bright areas of the subject. "Displaying the Zebra Pattern" (A p. 42) *Displayed only in the video recording mode. TELE MACRO 0 Use this to take close-up (macro) shots of the subject. "Taking Close-up Shots" (A p. 43) *Displayed only in the 2D recording mode. 34
-
 1
1 -
2
-
3
-
4
-
5
-
6
-
7
-
8
-
9
-
10
-
11
-
12
-
13
-
14
-
15
-
16
-
17
-
18
-
19
-
20
-
21
-
22
-
23
-
24
-
25
-
26
-
27
-
28
-
 29
29 -
 30
30 -
 31
31 -
 32
32 -
 33
33 -
 34
34 -
 35
35 -
 36
36 -
 37
37 -
 38
38 -
 39
39 -
40
-
41
-
42
-
43
-
44
-
45
-
46
-
47
-
48
-
49
-
50
-
51
-
52
-
53
-
54
-
55
-
56
-
57
-
58
-
59
-
60
-
61
-
62
-
63
-
64
-
65
-
66
-
67
-
68
-
69
-
70
-
71
-
72
-
73
-
74
-
75
-
76
-
77
-
78
-
79
-
80
-
81
-
82
-
83
-
84
-
85
-
86
-
87
-
88
-
89
-
90
-
91
-
92
-
93
-
94
-
95
-
96
-
97
-
98
-
99
-
100
-
101
-
102
-
103
-
104
-
105
-
106
-
107
-
108
-
109
-
110
-
111
-
112
-
113
-
114
-
115
-
116
-
117
-
118
-
119
-
120
-
121
-
122
-
123
-
124
-
125
-
126
-
127
-
128
-
129
-
130
-
131
-
132
-
133
-
134
-
135
-
136
-
137
-
138
 |
 |