JVC GZ MG37 Instructions - Page 45
Print Setting
 |
View all JVC GZ MG37 manuals
Add to My Manuals
Save this manual to your list of manuals |
Page 45 highlights
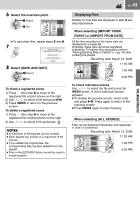
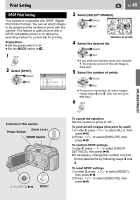
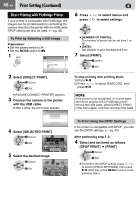
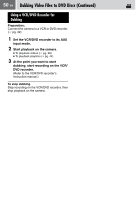
Print Setting DPOF Print Setting This camera is compatible with DPOF (Digital Print Order Format). You can set which images to be printed and the number of prints with this camera. This feature is useful to print with a DPOF-compatible printer or for taking the recording medium to a photo lab for printing. Preparation: ● Set the power switch to . ● Set the MODE switch to . 1 2 Select [DPOF]. Select Set RESET SELECT IMAGES ALL1 CHECK SETTINGS EN 45 3 Select [SELECT IMAGES]. DPOF TOTAL: 0 7/59 Select Set 00 00 00 00 00 00 00 00 00 Number of prints 4 Select the desired file. Select Set ● If you slide and hold the zoom lever towards T, the preview screen of the still image is displayed. 5 Select the number of prints. Select Set ● To set print information for other images, repeat steps 4 and 5. (You can set up to 999 files.) 6 EDITING/PRINTING Controls in this section Zoom Lever Power Switch MODE Switch / / / / 49 MENU To cancel the selection Set the number of prints to "00". To print all still images (One print for each) 1) In step 3, press / to select [ALL1], then press 49. 2) Press / to select [EXECUTE], then press 49. To confirm DPOF settings In step 3, press / to select [CHECK SETTINGS], then press 49. ● If necessary, change the number of prints for the desired file by following steps 4 and 5. To reset DPOF settings 1) In step 3, press / to select [RESET], then press 49. 2) Press / to select [EXECUTE], then press 49.
-
 1
1 -
2
-
3
-
4
-
5
-
6
-
7
-
8
-
9
-
10
-
11
-
12
-
13
-
14
-
15
-
16
-
17
-
18
-
19
-
20
-
21
-
22
-
23
-
24
-
25
-
26
-
27
-
28
-
29
-
30
-
31
-
32
-
33
-
34
-
35
-
36
-
37
-
38
-
39
-
 40
40 -
 41
41 -
 42
42 -
 43
43 -
 44
44 -
 45
45 -
 46
46 -
 47
47 -
 48
48 -
 49
49 -
 50
50 -
51
-
52
-
53
-
54
-
55
-
56
-
57
-
58
-
59
-
60
-
61
-
62
-
63
-
64
-
65
-
66
-
67
-
68
-
69
-
70
-
71
-
72
 |
 |
