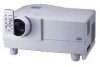
JVC L20U DLA-L20U User instruction manual (2.6MB) - Page 14
Remote Control Unit
 |
View all JVC L20U manuals
Add to My Manuals
Save this manual to your list of manuals |
Page 14 highlights
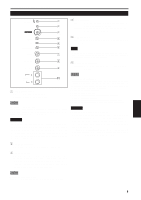
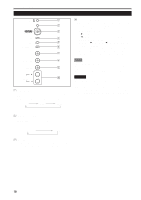
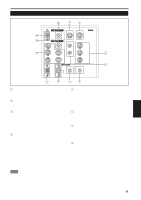
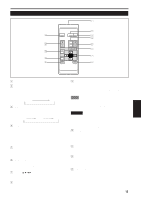
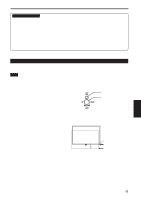
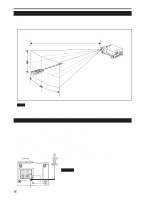
Controls and Features (Cont.) Remote Control Unit 1 e w q p 9 OPERATE COMPUTER VIDEO VOL. PAGE BACK T ZOOM W FOCUS MENU/ENTER PRESET QUICK ALIGN. AV MUTING 2 3 4 5 6 7 8 ENGLISH 1 Remote control's signal transmitter 2 COMPUTER button Use this button to select the devices connected to the projector's COMPUTER IN (computer input) -1 and -2 input terminals. Each time you press the button, the selection changes as follows: COMP 1 COMP 2 3 VIDEO button Use this button to select the devices such as a video connected to the projector's AV IN (AV input) terminal. Each time you press the button, the selection changes as follows: Y/C VIDEO YPBPR 4 ZOOM (T/W) buttons Use these buttons to adjust the screen size. (The projection lens used in this projector is a long focal-distance zoom lens (1.9 x zoom lens for 2.9:1 to 5.5:1) with manual shift function.) T : The screen size decreases. W: The screen size increases. 5 FOCUS (+/-) buttons Use these buttons to adjust the focus of the projected video. +: The focus point becomes more distant. -: The focus point becomes nearer. 6 MENU/ENTER button Use this button to display the main menu. While the main menu is displayed, pressing this button displays a details setting (submenu) for items with details settings. 7 Cursor (5/∞/2/3) buttons While the main menu is displayed, use these buttons to select an item to adjust or make adjustment. 8 AV MUTING (On/Off) button Use this button to turn off the video image and audio sound temporarily. Pressing it again makes the video image and audio sound to resume. 9 QUICK ALIGN. (Quick Alignment) button Use this button to automatically adjust TRACKING, PHASE, H. POS. and V. POS. of the projected video. During the automatic adjustment, QUICK-ALIGNMENT appears on the screen, and disappears after it is finished. Memo Quick alignment function: Does not work for video input (AV IN input terminal) signals. Works only for computer-related (COMPUTER-1 and-2 input terminals) signals. CAUTION • Automatic adjustment with the quick alignment function should be done on a bright still-picture screen. This function may not work correctly on a dark screen or motion-picture screen. If adjustment with this function is not satisfactory, adjust TRACKING, PHASE, H. POS. and V. POS. manually (see pages 32, 38 and 39). p PRESET button While making adjustment on the main or setting menu, use this button to reset the setting of the selected item to the factory-set value. This button works only for numerical settings and does not work for switching ON to OFF. q PAGE BACK button While a details setting is displayed, use this button to go back to the previous page. w VOL. (Volume) (+/-) buttons Use these buttons to adjust the sound volume: +: Increase the volume level. -: Decrease the volume level. e OPERATE button To turn on the power, press this button for one second or more. * About 30 seconds after the power has turned on, video image will appear on the screen. 13
-
 1
1 -
2
-
3
-
4
-
5
-
6
-
7
-
8
-
 9
9 -
 10
10 -
 11
11 -
 12
12 -
 13
13 -
 14
14 -
 15
15 -
 16
16 -
 17
17 -
 18
18 -
 19
19 -
20
-
21
-
22
-
23
-
24
-
25
-
26
-
27
-
28
-
29
-
30
-
31
-
32
-
33
-
34
-
35
-
36
-
37
-
38
-
39
-
40
-
41
-
42
-
43
-
44
-
45
-
46
-
47
-
48
-
49
-
50
-
51
-
52
-
53
-
54
-
55
-
56
-
57
-
58
-
59
-
60
-
61
-
62
-
63
-
64
-
65
-
66
-
67
-
68
-
69
-
70
-
71
-
72
-
73
-
74
-
75
-
76
-
77
-
78
-
79
-
80
-
81
-
82
-
83
-
84
-
85
-
86
-
87
-
88
-
89
-
90
-
91
-
92
-
93
-
94
-
95
-
96
-
97
-
98
-
99
-
100
-
101
-
102
-
103
-
104
-
105
-
106
-
107
-
108
-
109
-
110
-
111
-
112
-
113
-
114
-
115
-
116
-
117
-
118
-
119
-
120
-
121
-
122
-
123
-
124
-
125
-
126
-
127
-
128
-
129
-
130
-
131
-
132
-
133
-
134
-
135
-
136
-
137
-
138
-
139
-
140
-
141
-
142
-
143
-
144
-
145
-
146
 |
 |
