JVC L20U DLA-L20U User instruction manual (2.6MB) - Page 9
Bottom Surface
 |
View all JVC L20U manuals
Add to My Manuals
Save this manual to your list of manuals |
Page 9 highlights
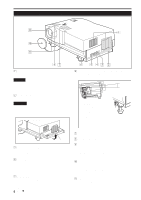
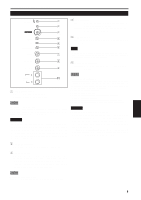
Controls and Features (Cont.) Bottom Surface y u i o y Air intake area (filter) Air is taken in through this area to cool the light-source lamp. If this area is blocked or if something that obstructs taking in or exhausting air is placed around the projector, heat may build up inside and could cause a fire. For details, refer to "Precautions for Installation" on page 15. CAUTIONS • Be careful as paper, cloth or soft cushion could be drawn in if placed nearby. Do not block the intake area, or heat may build up and could cause a fire. • Clean the filter periodically. For details, refer to "Cleaning and Replacing the Filter" on page 64. Deposition of dirt on the filter works to reduce the cooling effect, causing heat to build up inside, which could cause a fire or malfunction. u Opening for replacing the light-source lamp For replacing the light-source lamp, refer to "Replacing the Light-Source Lamp" on page 61. i Fixing foot o Position selecting screw for ceiling mounting When using the projector in an upside-down, ceilingmounted position (inverted top-to-bottom and right-to-left), the "position selecting screw for ceiling mounting" must be turned to switch to ceiling mounting. This will correct variance in color images (shading), which otherwise would occur in ceiling mounting. For more information, refer to "Setting the Position Selecting Screw for Ceiling Mounting" on page 18. CAUTION • To ceiling-mount and adjust the projector, special expertise and technique are necessary. Be sure to ask your dealer or a specialist to perform this work. 8
-
 1
1 -
2
-
3
-
 4
4 -
 5
5 -
 6
6 -
 7
7 -
 8
8 -
 9
9 -
 10
10 -
 11
11 -
 12
12 -
 13
13 -
 14
14 -
15
-
16
-
17
-
18
-
19
-
20
-
21
-
22
-
23
-
24
-
25
-
26
-
27
-
28
-
29
-
30
-
31
-
32
-
33
-
34
-
35
-
36
-
37
-
38
-
39
-
40
-
41
-
42
-
43
-
44
-
45
-
46
-
47
-
48
-
49
-
50
-
51
-
52
-
53
-
54
-
55
-
56
-
57
-
58
-
59
-
60
-
61
-
62
-
63
-
64
-
65
-
66
-
67
-
68
-
69
-
70
-
71
-
72
-
73
-
74
-
75
-
76
-
77
-
78
-
79
-
80
-
81
-
82
-
83
-
84
-
85
-
86
-
87
-
88
-
89
-
90
-
91
-
92
-
93
-
94
-
95
-
96
-
97
-
98
-
99
-
100
-
101
-
102
-
103
-
104
-
105
-
106
-
107
-
108
-
109
-
110
-
111
-
112
-
113
-
114
-
115
-
116
-
117
-
118
-
119
-
120
-
121
-
122
-
123
-
124
-
125
-
126
-
127
-
128
-
129
-
130
-
131
-
132
-
133
-
134
-
135
-
136
-
137
-
138
-
139
-
140
-
141
-
142
-
143
-
144
-
145
-
146
 |
 |
