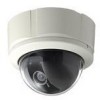
JVC TK-C215V4U Instructions - Page 12
Installation and connection, About Connection Cables, Video signal cables
 |
UPC - 046838023170
View all JVC TK-C215V4U manuals
Add to My Manuals
Save this manual to your list of manuals |
Page 12 highlights
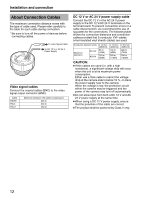
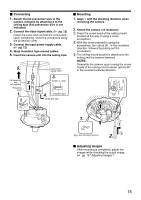
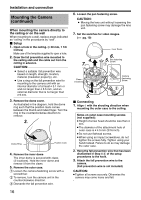
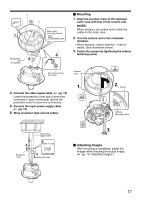
Installation and connection About Connection Cables The maximum connection distance varies with the type of cable used. Please refer carefully to the table for each cable during connection. * Be sure to turn off the power of devices before connecting cables. To video Signal Cable To DC 12 V or AC 24 V Power Supply Video signal cables Connect the coaxial cables (BNC) to the video signal output connector (BNC). Cable RG-59 RG-6 RG-11 Maximum extension (No cable compensator) 200 m 350 m 450 m DC 12 V or AC 24 V power supply cable Connect the DC 12 V or the AC 24 V power supply to the DC 12 V/AC 24 V terminals on the terminal board. To prevent connection errors or a cable disconnection, we recommend the use of lug plates for the connections. The following table shows the connection distances and connection cables provided that 2-conductor VVF cables (vinyl-insulated vinyl sheath cables) are used. Conductor diameter (mm) Maximum extension DC12V AC24V R 1.0 mm (AWG18) 50 m (160ft) 130 m (420ft) R 1.6 mm (AWG14) 140 m (450ft) 350 m (1100ft) R 2.0 mm (AWG12) 220 m (720ft) 550 m (1800ft) CAUTION: ● If thin cables are used (i.e. with a high resistance), a significant voltage drop will occur when the unit is at its maximum power consumption. Either use a thick cable to restrict the voltage drop at the camera side to below 10 %, or place the power supply near to the camera. When the voltage is low, the protection circuit within the camera may be triggered and the power of the camera may turn off automatically. ● Do not allow input from both a DC 12 V and AC 24 V power supply at the same time. ● When using a DC 12 V power supply, ensure that the polarities of the cable are correct. ● The product shall be powered by Class 2 only. 12
-
 1
1 -
2
-
3
-
4
-
5
-
6
-
 7
7 -
 8
8 -
 9
9 -
 10
10 -
 11
11 -
 12
12 -
 13
13 -
 14
14 -
 15
15 -
 16
16 -
 17
17 -
18
-
19
-
20
-
21
-
22
-
23
-
24
 |
 |
