JVC TK-C215V4U Instructions - Page 18
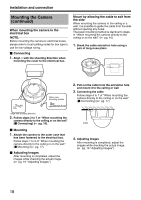
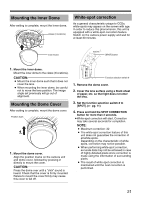
When mounting the camera to the electrical box, Mount by allowing the cable to exit from the side
 |
UPC - 046838023170
View all JVC TK-C215V4U manuals
Add to My Manuals
Save this manual to your list of manuals |
Page 18 highlights
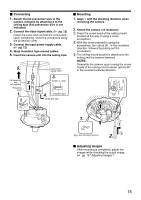
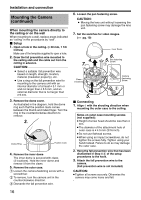
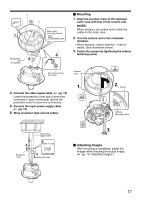
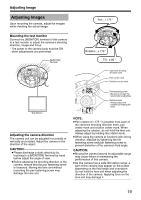
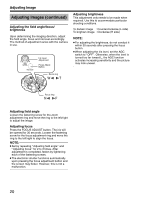
Installation and connection Mounting the Camera (continued) When mounting the camera to the electrical box NOTE: Before mounting the camera to electrical boxes, please refer to local building codes for box type to use for low-voltage wiring. Ⅵ Connecting 1. Align j with the shooting direction when mounting the cover to the electrical box. Mount by allowing the cable to exit from the side When mounting the camera to the ceiling or a wall, it is possible to guide the cable from the side without opening any holes. The basic mounting method is identical to steps in AWhen mounting the camera directly to the ceiling or on the wallB (A pg. 16). 1. Break the cable extraction hole using a pair of long-nose pliers Outer case mounting screws Less than 4 mm 2. Pull out the cable from the extraction hole and mount it to the ceiling or wall 3. Connecting the cable Follow steps 4 to 7 of AWhen mounting the camera directly to the ceiling or on the wallB (Ⅵ Connecting) (A pg. 17) UPFRONT Align with shooting direction 2. Follow steps 2 to 7 of AWhen mounting the camera directly to the ceiling or on the wallB (Ⅵ Connecting) (A pg. 16). Ⅵ Mounting 1. Attach the camera to the outer case that has been fastened to the electrical box. Follow steps 1 to 3 of AWhen mounting the camera directly to the ceiling or on the wallB (Ⅵ Mounting) (A pg. 17) Ⅵ Adjusting Images After mounting is completed, adjust the images while checking the actual image. (A pg. 19 AAdjusting ImagesB) Cable 4. Adjusting Images After mounting is completed, adjust the images while checking the actual image. (A pg. 19 AAdjusting ImagesB) 18
-
 1
1 -
2
-
3
-
4
-
5
-
6
-
7
-
8
-
9
-
10
-
11
-
12
-
 13
13 -
 14
14 -
 15
15 -
 16
16 -
 17
17 -
 18
18 -
 19
19 -
 20
20 -
 21
21 -
 22
22 -
 23
23 -
24
 |
 |
