Jensen PCD120U Owners Manual
Jensen PCD120U - Phase Linear Radio Manual
 |
View all Jensen PCD120U manuals
Add to My Manuals
Save this manual to your list of manuals |
Jensen PCD120U manual content summary:
- Jensen PCD120U | Owners Manual - Page 1
PCD120U Owner's Manual/Manual de L'Utilisateur/Manual del Usario PWR SEL/MENU MOD AM / FM / CD RECEIVER TRACK MUTE >> SCN RPT / PCD120U LOU AM/FM/CD Receiver Receptor AM/FM/CD AM/FM/CD Ampli-Syntoniseur >> - Jensen PCD120U | Owners Manual - Page 2
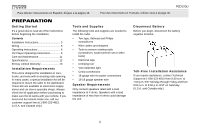
rez-vous à la page 30. PCD120U PREPARATION Getting Started It's a good idea to read all of the instructions before beginning the installation. Contents Installation Instructions 3 Wiring 5 Operating Instructions 6 CD Player Operating Instructions 9 Care and Maintenance 11 Specifications 12 - Jensen PCD120U | Owners Manual - Page 3
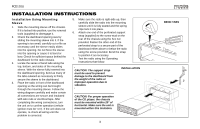
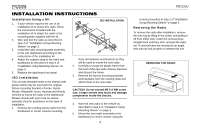
operate, re-check all wiring until the problem is corrected. 5. Instructions that follow. CAUTION: The support strap must be used to prevent damage to the dashboard from the weight of the radio or improper operation due to vibration. INSTALLATION CAUTION: For proper operation of the CD player - Jensen PCD120U | Owners Manual - Page 4
plate supplied with the kit. 2. Wire and test the radio as described in step 4 of "Installation Using Mounting Sleeve" on page 3. 3. Install the radio mounting plate assembly to the sub-dashboard according to the instructions of the installation kit. 4. Attach the support strap to the radio and - Jensen PCD120U | Owners Manual - Page 5
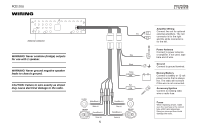
PCD120U WIRING Antenna Connector WARNING! Never combine (bridge) outputs for use with 1 speaker. WARNING! Never ground negative speaker leads to chassis ground. CAUTION: Failure to wire exactly as shown may cause electrical damage to the radio. Gray Blue Black Yellow 15A + Red 0.5A LF/AVG - Jensen PCD120U | Owners Manual - Page 6
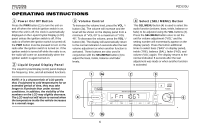
PCD120U OPERATING INSTRUCTIONS Volume Control To increase the volume level, press the VOL button (3a). The volume will increase and the level will be shown on the display panel from a minimum of "VOL 00" to a maximum of "VOL 46". To decrease the volume volume (volume, bass, volume and volume ( - Jensen PCD120U | Owners Manual - Page 7
PCD120U OPERATING INSTRUCTIONS display panel according to your selection. 6 Manual Tuning Control Turn the manual tuning (TUN) control (6) to tune upward volume from the system. "MUTE" will appear on the display panel and the volume will be muted. (If you press this button while a CD is playing, CD - Jensen PCD120U | Owners Manual - Page 8
OPERATING INSTRUCTIONS 9 Display Selector (DSP) This unit can display either the clock time or radio frequency/CD player functions. Ordinarily, the radio frequency or CD player track indication is displayed, . 3a PWR SEL/MENU MOD 3b >> PCD120U 9 AM / FM / CD RECEIVER TRACK MUTE >> SCN RPT - Jensen PCD120U | Owners Manual - Page 9
PCD120U CD PLAYER OPERATING INSTRUCTIONS 10 Disc Slot With the label surface facing up, fully insert shown on the display panel. 12 , 13 Cue/Review Functions High-speed audible search to any section of the disc can be made by the Cue and Review functions. Press and hold the forward TRACK button ( - Jensen PCD120U | Owners Manual - Page 10
PCD120U CD PLAYER OPERATING INSTRUCTIONS 14 Track Scan Select (SCN) During disc play, press the automatically, and the disc symbol will reappear on the display to show that a disc is still installed in the unit. NOTE: To prevent a disc from accidentally being damaged, always remove the disc from - Jensen PCD120U | Owners Manual - Page 11
PCD120U CARE AND MAINTENANCE Your new radio/CD player does not require any maintenance. However, proper understanding of its use and handling will help you obtain maximum enjoyment of its capabilities. We recommend that you keep this manual no user-serviceable parts installation after all wiring - Jensen PCD120U | Owners Manual - Page 12
CD-R/RWs may be incompatible with this unit. After "recording/ burning" the session must be closed. Please refer to your software's recommended procedures for closing a disc/session. Review a CD-R/RW. This unit does not support .MP3 Voltage: 14.4VDC CD Player Signal to Noise -3dB 12 PCD120U AM Tuner - Jensen PCD120U | Owners Manual - Page 13
PCD120U 90 DAY LIMITED WARRANTY AUDIOVOX or motor noise, to correction of antenna problems, to costs incurred for installation, removal, or reinstallation of the product, IN NO EVENT, SHALL THE COMPANY'S LIABILITY EXCEED THE PURCHASE PRICE PAID BY PURCHASER FOR THE PRODUCT. This Warranty is in - Jensen PCD120U | Owners Manual - Page 14
PCD120U 14 - Jensen PCD120U | Owners Manual - Page 15
PCD120U Manual del Usario - Jensen PCD120U | Owners Manual - Page 16
instructions in English, refer to page 2. PREPARACIÓN Comenzando Es buena idea leer completamente las instrucciones antes de iniciar la instalación. Contenido Instrucciones De Instalación 17 Cableado 19 Instrucciones de Operación 20 Funcionamiento Del Lector de CD y Canadá). PCD120U Para obtener - Jensen PCD120U | Owners Manual - Page 17
PCD120U INSTRUCCIONES DE INSTALACIÓN Instalación Utilizando una Manga de Montaje 1. o una inadecuada operación causada por vibraciones. INSTALACIÓN CUIDADO: Para una correcta operación del equipo de CD, el chasis debe estar montado dentro de los 20° de horizontalidad. Asegúrese de que la unidad - Jensen PCD120U | Owners Manual - Page 18
el radio como se determina en las instrucciones de Instalación Universal. 2. Instale el radio o el ensamblaje del plato de montaje al segundo tablero, de cables del nuevo radio al vehículo como se especifica en las PCD120U instrucciones de Instalación Universal. Monte el ensamblaje del nuevo radio - Jensen PCD120U | Owners Manual - Page 19
PCD120U CABLEADO Conector para la Antena ¡CUIDADO! Nunca combine (hacer puente) las salidas para utilizar sólo 1 altavoz. ¡CUIDADO! Nunca tome a tierra las puntas negativas del altavoz - Jensen PCD120U | Owners Manual - Page 20
PCD120U INSTRUCCIONES DE OPERACIÓN 1 Botón de Encendido / Apagado Presione el botón PWR (1) para encender o apagar último ajuste de volumen o cuando se active otra función. 1 3a 2 9 PWR 4 SEL/MENU MOD AM / FM / CD RECEIVER / PCD120U 6 TRACK MUTE >> SCN RPT LOU >> 7 3b 8 5 20 - Jensen PCD120U | Owners Manual - Page 21
PCD120U a su selección. 21 6 Control de Sintonía Manual Gire el control de sintonía manual (TUN, 6) para sintonizar frecuencias ascendentes en la MOD (7) le permite seleccionar entre reproducción de radio o disco. Cuando un CD se esté reproduciendo, al presionar el botón MOD volverá el equipo a - Jensen PCD120U | Owners Manual - Page 22
será exhibida por 5 segundos luego de lo cual se volverá a mostrar la función de radio o CD. La hora correcta también se puede configurar en la unidad presionando el botón DSP. Poniendo en Hora normal reanudará. 3a PWR SEL/MENU MOD 3b >> PCD120U 9 AM / FM / CD RECEIVER TRACK MUTE >> SCN RPT - Jensen PCD120U | Owners Manual - Page 23
PCD120U FUNCIONAMIENTO DEL LECTOR DE CD 10 Ranura para Disco Con el sello hacia arriba, inserte completamente un CD dentro de la ranura (10) hasta que el mecanismo lo enganche y jale hacia adentro. El símbolo de disco ( ) y "S-CDP" aparecerán en pantalla. La reproducción iniciará - Jensen PCD120U | Owners Manual - Page 24
PCD120U FUNCIONAMIENTO DEL LECTOR DE CD 14 Selector de Exploración de Pistas (SCN) Durante la ejecución de un disco, presione el botón de la unidad cuando finalice la reproducción del mismo. 16 PWR SEL/MENU MOD >> AM / FM / CD RECEIVER / PCD120U TRACK MUTE >> SCN RPT LOU 14 15 24 - Jensen PCD120U | Owners Manual - Page 25
PCD120U CUIDADOS Y MANTENIMIENTO Su nuevo reproductor de radio/CD no requiere mantenimiento. Sin embargo, el entender cómo se lo utiliza y mantiene adecuadamente le ayudará a sacar el máximo provecho de sus capacidades. Recomendamos que conserve este manual para utilizarlo como referencia sobre - Jensen PCD120U | Owners Manual - Page 26
El formato CDDA es un formato estándar de un CD "original comprado en una tienda". Cuando grabe un CD-R/RW, asegúrese de seleccionar el formato CDDA. Especificaciones 18dBf Sensibilidad de Silenciamiento Estéreo de 50dB: 20dBf 26 PCD120U Separación de Estéreo en 1kHz >30dB Frecuencia de Respuesta - Jensen PCD120U | Owners Manual - Page 27
PCD120U GARANTIA LIMITADE DE 3 MESES AUDIOVOX CORPORATION (la Compañía) garantiza al comprador minorista especiales y usted puede gozar de otros derechos que varían de un estado a otro. U.S.A : Audiovox Corporation, 150 Marcus Blvd., Hauppauge, NY 11788, 1-800-323-4815 CANADA: Llamar a 1-800-323- - Jensen PCD120U | Owners Manual - Page 28
PCD120U 28 - Jensen PCD120U | Owners Manual - Page 29
PCD120U Manual de L'Utilisateur - Jensen PCD120U | Owners Manual - Page 30
Mise en Marche C'est une bonne idée de lire toutes les instructions avant de commencer l'installation. Table des Matières Instructions d'Installation 31 Câblage 33 Instructions d'Operation 34 Opération de la Platine CD 37 Soin et Entretien 39 Specifications 40 Garantie Limitée de 3 Mois - Jensen PCD120U | Owners Manual - Page 31
PCD120U INSTRUCTIONS D'INSTALLATION Installation en Utilisant un Manchon de Montage 1. Glissez le manchon de la radio ou une opération incorrecte à cause de la vibration. INSTALLATION AVERTISSEMENT : Pour une bonne opération de la platine CD le châssis doit être monté dans un angle de 20° de - Jensen PCD120U | Owners Manual - Page 32
âssis de la nouvelle radio. Enlevez et jetez le cadre. 3. Enlevez les supports de montage et le matériel de la radio existante et attachezles à la blez la nouvelle radio au véhicule en suivant les instructions pour l'installation universelle. 32 PCD120U 5. Montez l'ensemble de la nouvelle radio à - Jensen PCD120U | Owners Manual - Page 33
PCD120U CÂBLAGE Connecteur de Antenne AVERTISSEMENT ! Ne combinez jamais des sorties (ponts) pour utilisation avec un haut parleur. AVERTISSEMENT ! Ne terrez jamais des fils de sortie né - Jensen PCD120U | Owners Manual - Page 34
PCD120U INSTRUCTIONS Volume Appuyez sur le bouton VOL (3a) pour augmenter le niveau du volume. Le volume va augmenter et le niveau de volume volume. L'affichage reviendra à l'indication normale dans 5 minutes après le dernier ajustement pour volume fonction audio (volume, basse, du volume ( le volume ( - Jensen PCD120U | Owners Manual - Page 35
PCD120U INSTRUCTIONS D'OPERATION 4 Contrôle de Basse Pour ajuster le niveau de basse, sur le bouton MUTE ( , 8) pour assourdir le volume radio du système. (Si vous appuyez sur ce bouton alors qu'un CD est en train de jouer, la reproduction du CD sera arrêtée). MUTE va apparaître sur le panneau d' - Jensen PCD120U | Owners Manual - Page 36
INSTRUCTIONS D'OPERATION 9 Sélectionneur d'Affichage (DSP) Cet appareil peut afficher soit l'heure de l'horloge ou les fonctions fréquence radio/ platine CD. D'habitude, la fréquence radio ou l'indication de piste platine CD PM au réglage désiré. 3a PCD120U Cinq secondes après le dernier ajustement - Jensen PCD120U | Owners Manual - Page 37
PCD120U OPÉRATION DE LA PLATINE CD 10 Fente du Disque Avec l'étiquette en haut, insérez un rapidement ou le bouton TRACK en arrière (13) pour reculer rapidement. 11 Sélectionneur de Reproduction CD/Faire Pause Appuyez sur le bouton reproduction/faire pause (11), alors que le disque est en train - Jensen PCD120U | Owners Manual - Page 38
PCD120U OPÉRATION DE LA PLATINE CD 14 Sélectionneur de Balayage Piste (SCN) Appuyez sur le bouton SCN (14), alors qu'un disque disque de l'appareil lorsque la reproduction du disque est terminé. 16 PWR SEL/MENU MOD >> AM / FM / CD RECEIVER / PCD120U TRACK MUTE >> SCN RPT LOU 14 15 38 - Jensen PCD120U | Owners Manual - Page 39
PCD120U SOIN ET ENTRETIEN Votre nouvelle platine CD/radio n'a pas besoin d'être entretenu. Cependant, une compréhension correcte de son utilisation et manipulation vous aidera à obtenir une jouissance maximum de ses capacités. Nous recommandons que vous gardez ce guide Après l'installation dès que - Jensen PCD120U | Owners Manual - Page 40
WAV, OGG ou autre. Le format CDDA est le format standard d'un CD " acheté dans une boutique ". Lorsque vous enregistrez un CDR/ RW assurez de syntonisation : 87.5 MHz à 107.9 MHz Sensibilité mono : 18dBf 40 PCD120U Sensibilité d'assourdissement stéréo 50dB : 20dBf Séparation stéréo @ 1kHz : >30dB - Jensen PCD120U | Owners Manual - Page 41
PCD120U GARANTIE LIMITÉE DE 3 MOIS AUDIOVOX CORPORATION (la Société) garantit à l'acheteur initial du produit ou du griffonnage des inscriptions ou de l'étiquette code à barres/ numéro de série installé en usine. SELON LES TERMES DE CETTE GARANTIE, LA RESPONSABILITE DE LA SOCIETE EST LIMITEE
-
 1
1 -
 2
2 -
 3
3 -
 4
4 -
 5
5 -
 6
6 -
 7
7 -
8
-
9
-
10
-
11
-
12
-
13
-
14
-
15
-
16
-
17
-
18
-
19
-
20
-
21
-
22
-
23
-
24
-
25
-
26
-
27
-
28
-
29
-
30
-
31
-
32
-
33
-
34
-
35
-
36
-
37
-
38
-
39
-
40
-
41
 |
 |
PCD120U
Owner's Manual/Manual de L'Utilisateur/Manual del Usario
AM/FM/CD Receiver
Receptor AM/FM/CD
AM/FM/CD Ampli-Syntoniseur
AM / FM / CD RECEIVER
/
PCD120U
PWR
LOU
RPT
SCN
TRACK
MUTE
>>
>>
SEL/MENU
MOD