Jensen VM9312 Instruction Manual - Page 5
Features, Tools and Supplies, Optional Accessories, Disconnecting the Battery - high volume
 |
UPC - 043258303707
View all Jensen VM9312 manuals
Add to My Manuals
Save this manual to your list of manuals |
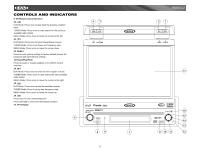
Page 5 highlights
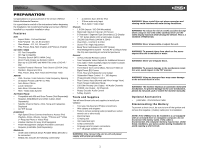
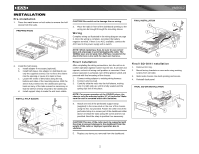
VM9312 PREPARATION Congratulations on your purchase of the Jensen VM9312 Mobile Multimedia Receiver. It's a good idea to read all of the instructions before beginning the installation. We recommend having your Jensen VM9312 installed by a reputable installation shop. Features DVD • Aspect Ratio - Full and Normal • Fast Forward - 2X, 4X, 8X and 32X • Slow Motion - 1/2, 1/4, 1/6 and 1/7 • Play, Pause, Stop, Next Chapter and Previous Chapter CD / MP3 / WMA • CD-Text Compatible • ID3 Tag Compatible • Directory Search (MP3 / WMA Only) • Direct Track Access via Remote Control • Burn up to 1500 MP3 and WMA Files onto a DVD+R / RW • Audible Forward / Reverse Track Search (CD-DA Only) • Random, Repeat and Intro • Play, Pause, Stop, Next Track and Previous Track AM-FM • USA / Europe / Latin America / Asia Frequency Spacing • 30 Station Presets (18 FM / 12 AM) • Auto Stereo / Mono • Local / Distance • Auto Store / Preview Scan • RDS - Radio Data System Sat Radio Ready • Compatible with XM and Sirius Tuners (Sold Separately) • Requires XMDJEN100 and JXMC Cables (Sold Separately) • Satellite Channel Name, Artist, Song and Categories Displayed • On TFT Screen jLinkDirect • High Speed Direct Connect Interface to Access iPod Playlists, Artists, Albums, Songs, **Photos and **Video (** Requires Photo or Video iPod) • Intuitive Interface for easy iPod Navigation • Power Management charges iPod while connected • Requires jLinkCable (Sold Separately) MediaLink • Under dash Interface allows Portable Media Devices to be connected • MediaLink1 includes the following connectivity: • jLinkDirect 8-pin DIN for iPod • 3.5mm audio only Input • RCA Audio / Video Input Chassis • 1.0 DIN (Import / ISO-DIN Mountable) • Motorized Flip-Out / Flip-Up LCD Screen • 8 Character / Segment Type Secondary LCD Display • 7" TFT Active Matrix LCD w/ Anti-Glare Coating • 336,960 Sub Pixels (1440W X 234H) • Pixel Pitch - 0.321W X 0.370H • Screen Tilt / Angle Adjustment • Beep Tone Confirmation (On-OFF Option) • Heat Management System - Forced Air Cooling to keep the chip sets operating at nominal temperatures General • 44-Key Infrared Remote Control • Two Composite Video Outputs for Additional Screens • Two Audio / Video Auxiliary Inputs for Game Console, Camcorder, Navigation, etc. • Three-Band Tone control (Bass, Mid and Treble) w/ Eight Preset EQ Curves • Front, Rear and Subwoofer Line Output • Subwoofer Phase Control - 0 ~ 180 degrees • Programmable Volume Control • Rear Camera Input (Normal and Mirror Image View) • Touch Screen Calibration Mode • 100-Ohm Preamp Line Output - All Audio Channels • 2VRMS Line Output - All Channels • Rotary Encoder Audio Control • 5-Way Joystick Tools and Supplies You will need these tools and supplies to install your VM9312: • Torx type, flat-head and Philips screwdrivers • Wire cutters and strippers • Tools to remove existing radio (screwdriver, socket wrench set or other tools) • Electrical tape • Crimping tool • Volt meter/test light • Crimp connections • 18 gauge wire for power connections • 16 - 18 gauge speaker wire WARNING! Only connect the unit to a12-volt power supply with proper grounding. WARNING! Never install this unit where operation and viewing could interfere with safe driving conditions. WARNING! To reduce the risk of a traffic accident (except when using for rear view video camera) never use the video display function while driving the vehicle. This is a violation of federal law. WARNING! Never disassemble or adjust the unit. WARNING! To prevent injury from shock or fire, never expose this unit to moisture or water. WARNING! Never use irregular discs. WARNING! To prevent damage to the mechanism inside this unit, avoid impact to the TFT monitor. WARNING! Using an improper fuse may cause damage to the unit and result in a fire. WARNING! The monitor employs an automatic motorized mechanism. To prevent damage to the core mechanism, please do not push, pull or swivel the monitor manually. Optional Accessories • jLinkCable - iPod interface Cable Disconnecting the Battery To prevent a short circuit, be sure to turn off the ignition and remove the negative (-) battery cable prior to installation. NOTE: If the VM9312 is to be installed in a car equipped with an on-board drive or navigation computer, do not disconnect the battery cable. If the cable is disconnected, the computer memory may be lost. Under these conditions, use extra caution during installation to avoid causing a short circuit. 1
-
 1
1 -
 2
2 -
 3
3 -
 4
4 -
 5
5 -
 6
6 -
 7
7 -
 8
8 -
 9
9 -
 10
10 -
 11
11 -
12
-
13
-
14
-
15
-
16
-
17
-
18
-
19
-
20
-
21
-
22
-
23
-
24
-
25
-
26
-
27
-
28
-
29
-
30
-
31
-
32
-
33
-
34
-
35
-
36
 |
 |