Kenmore 3050 Installation Instructions - Page 7
Check, Operation
 |
View all Kenmore 3050 manuals
Add to My Manuals
Save this manual to your list of manuals |
Page 7 highlights
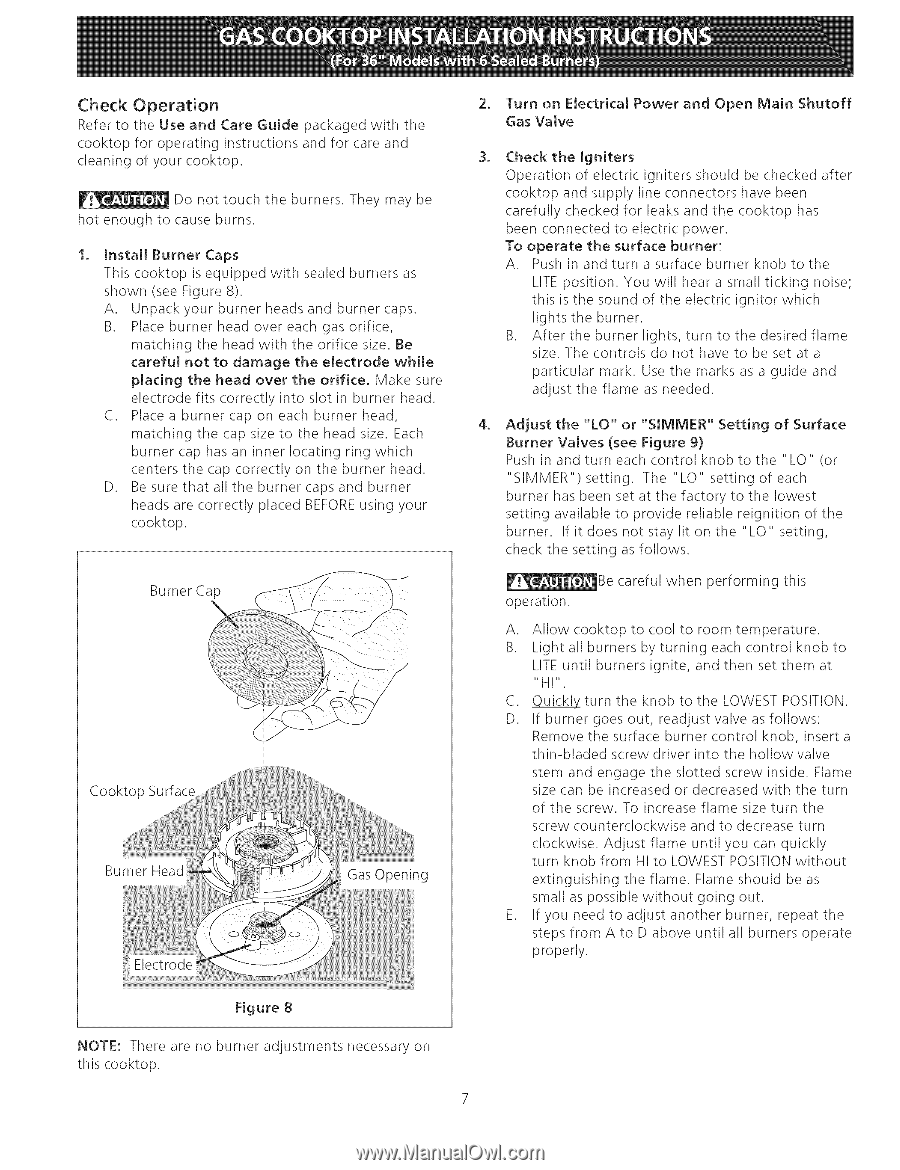
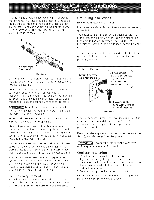
Check Operation Refer to tile Use and Care Guide packaged with the cooktop for operating instructions and for care and cleaning of your cooktop. Do not touch the burners, They may be hot enough to cause burns, tnstaI] Burner Caps This cooktop is equipped with sealed burners as shown (see Figure 8). A. Unpack your burner heads and burner caps. B. Place burner head over each gas orifice, matching the head with the orifice size. Be careful not to damage the electrode while placing the head over the orifice, Make sure electrode fits correctly into slot in burner head. C. Place a burner cap on each burner head, matching the cap size to the head size. Each burner cap has an inner locating ring which centers the cap correctly on the burner head. D. Be sure that all the burner caps and burner heads are correctly placed BEFOREusing your cooktop. Burner C_ Cooktop Burner Head S Gas Opening 2. Turn on Electrical Power and Open Main Shutoff Gas VaIve Check the Igniters Operation of electric igniters should be checked after cooktop and supply line connectors have been carefully checked for leaks and the cooktop has been connected to electric power. To operate the surface burner: A. Push in and turn a surface burner knob to the LITE position. You will hear a small ticking noise; this is the sound of the electric ignitor which lights the burner. B. After the burner lights, turn to the desired flame size. Tile controls do not have to be set at a particular mark. Use the marks as a guide and adjust tile flame as needed. 4_ Adjust the "LO" or "SIMMER" Setting of Surface Burner VaJves (see Figure 9} Push in and turn each control knob to the "LO" (or "SIMMER") setting. The "LO" setting of each burner has been set at the factory to the lowest setting available to provide reliable reignition of the burner. If it does not stay lit on the"LO" setting, check the setting as follows. _Be operation. careful when performing this A. Allow cooktop to cool to room temperature. B. Light all burners by turning each control knob to LITE until burners ignite, and then set them at "HI". C. _turn the knob to the LOWEST POSITION. D. If burner goes out, readjust valve as follows; Remove the surface burner control knob, insert a thin-bladed screw driver into the hollow valve stem and engage the slotted screw inside. Flame size can be increased or decreased with the turn of tile screw. To increase flame size turn the screw counterclockwise and to decrease turn clockwise. Adjust flame until you can quickly turn knob from HI to LOWEST POSITION without extinguishing the flame. Flame should be as small as possible without going out. E. If you need to adjust another burner, repeat tile steps from A to D above until all burners operate properly. Figure 8 NOTE: There are no burner adjustments necessary on this cooktop.
-
 1
1 -
 2
2 -
 3
3 -
 4
4 -
 5
5 -
 6
6 -
 7
7 -
 8
8 -
 9
9 -
 10
10 -
 11
11 -
 12
12 -
13
-
14
-
15
-
16
-
17
-
18
-
19
-
20
 |
 |