Kenwood TH-D75 User Manual
Kenwood TH-D75 Manual
 |
View all Kenwood TH-D75 manuals
Add to My Manuals
Save this manual to your list of manuals |
Kenwood TH-D75 manual content summary:
- Kenwood TH-D75 | User Manual - Page 1
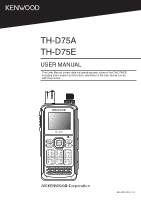
TH-D75A TH-D75E USER MANUAL This User Manual covers detailed operating instructions of the TH-D75A/E including basic operating instructions described in the User Guide comes with the product. B5A-4505-00/00 (EN) - Kenwood TH-D75 | User Manual - Page 2
9-4 SCAN AUTO BACKLIGHT 9-4 10 CTCSS/DCS/CROSS TONE 10-1 CTCSS 10-1 DCS...10-2 CROSS TONE 10-3 11 DUAL TONE MULTI-FREQUENCY(DTMF 11-1 MANUAL DIALING 11-1 AUTOMATIC DIALER 11-1 EchoLink MEMORY 11-2 12 OTHER OPERATIONS 12-1 FREQUENCY STEP SIZE 12-1 FINE TUNING 12-1 ATTENUATOR (ATT 12 - Kenwood TH-D75 | User Manual - Page 3
-1 25 WIRELESS CONTROL (TH-D75A ONLY 25-1 PREPARATION 25-1 CONTROL OPERATION 25-1 26 OPTIONS 26-1 27 MAINTENANCE 27-1 GENERAL INFORMATION 27-1 SERVICE 27-1 SERVICE NOTE 27-1 CLEANING 27-1 TROUBLESHOOTING 27-2 28 SPECIFICATIONS 28-1 Note: ¡ Display examples in this manual may not match the - Kenwood TH-D75 | User Manual - Page 4
to purchase this KENWOOD Digital transceiver. The models listed below are covered by this manual. TH-D75A: 144/220/430MHz Tribander (The Americas) TH-D75E: 144/ Manual The writing conventions described below have been followed to simplify instructions and avoid unnecessary repetition. Instruction - Kenwood TH-D75 | User Manual - Page 5
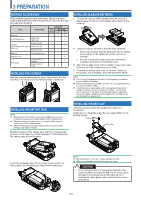
100 - 240 V, W0H-0161-XX 50/60 Hz) W0H-0162-XX Quantity THD75A TH-D75E E T 1 1 1 1 1 1 1 - - - 1 - - - 1 Belt clip 2 screws supplied 1 1 1 Warranty card User guide English/ French/ Spanish Italian/ German/ Dutch 1 1 1 1 1 1 - 1 - INSTALLING THE ANTENNA Hold the - Kenwood TH-D75 | User Manual - Page 6
INSTALLING THE HAND STRAP If desired, you can install the commercially available strap with sufficient strength using the holes of the transceiver. Note: ¡ If the strap is thick and does not pass through the holes, install the strap using the holes of the supplied belt clip. CHARGING THE BATTERY - Kenwood TH-D75 | User Manual - Page 7
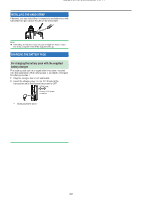
Charger Error • While charging, if a problem is detected in the battery, "Charge Error !!" appears on the display. • The following condition create charging error: Overvoltage in the battery is detected. • When a charge - Kenwood TH-D75 | User Manual - Page 8
4 GETTING ACQUAINTED KEY AND CONTROL KNOB OPERATIONS LCD Display Speaker Microphone SP/MIC Jacks microSD memory card slot USB Connector (USB Type-CTM) DC IN (External power supply) Jack [] Press and hold [ ] to turn the transceiver power ON and OFF. Press [ ] to turn the backlight ON and OFF - Kenwood TH-D75 | User Manual - Page 9
[MR] (2) Press [MR] to enter Memory Channel mode. Press [F], [MR] to move to the Memory channel store screen. [CALL] (3) Press [CALL] to select the Call channel. Press [F], [CALL] to store the displayed operating frequency to the Call channel. [MSG] (4) Press [MSG] to display the APRS Message list. - Kenwood TH-D75 | User Manual - Page 10
the Shift function is set to plus. Appears when the Shift function is set to minus. Appears when the Shift function is set to -7.6 MHz. (TH-D75E only) Appears when the Reverse function is ON. Appears when the Attenuator function is ON. Appears when the packet communication speed in APRS mode - Kenwood TH-D75 | User Manual - Page 11
Display D-STAR (DV/DR mode) Display KEY GUIDE Display Area Indicator Description Appears when the GPS memory card is mounting. Appears when Weather Alert is ON. Blinks when Weather Alert is detected. (TH-D75A only.) Appears when the key lock is ON. 18-1 19-1 24-1 12-11 Indicates the battery - Kenwood TH-D75 | User Manual - Page 12
information will be automatically set. If the GPS information cannot be received, you can manually enter the date and time. 1 Access Menu No. 950. Date & Time and do not perform acquisition using the built-in GPS receiver or manual settings, the built-in clock will return to the default date and - Kenwood TH-D75 | User Manual - Page 13
• VHF: 174 ~ 216 MHz (TH-D75A) 174 ~ 230 MHz (TH-D75E) • 220 MHz: 216 ~ 260 MHz (TH-D75A only) • 200/300 MHz: Band B 216 ~ 410 MHz (TH-D75A) 230 ~ 410 MHz (TH-D75E) • 430 MHz: 410 ~ Call Channel mode. VFO Mode VFO mode allows you to manually change the operating frequency. 1 Press [VFO] to enter - Kenwood TH-D75 | User Manual - Page 14
Call Channel mode. "C" appears on the display. 2 Press [CALL] again, and the transceiver will return to the previous frequency. • The default settings are as follows. TH-D75A Band (Mode) Call Channel Memory Name VHF (except DV/DR mode) 146.520 MHz (FM) Call VHF (FM) VHF(DV/DR mode) 144.000 MHz - Kenwood TH-D75 | User Manual - Page 15
FUNCTION SELECT MODE Press [F] to enter Function Select mode. Press [F] again to return to the previous screen. Pressing each key in the function select mode performs the operation of the second function assigned to each key. The function of each key may differ depending on the mode when [F] is - Kenwood TH-D75 | User Manual - Page 16
at the bottom of the screen. (Example: TX/RX) Software Key operation Software keys ([Back], [OK], etc.) are displayed in the key guide area of various setting screens and other screens. To select or operate the displayed functions, press the corresponding keys. Example: [Back] Press [MODE - Kenwood TH-D75 | User Manual - Page 17
1 - 2 - 10 [sec] Off/ On Off/ On Off/ On (TH-D75A only) Offset frequency Auto repeater offset CALL key function 1750 Hz TX hold Varies with the selected frequency band Off/ On CALL (TH-D75A)/ 1750Hz (TH-D75E) Off/ On VOX on/ off VOX gain level VOX delay time VOX - Kenwood TH-D75 | User Manual - Page 18
[sec] 0.01 - 9.99 [mile, km, nm] Up to 9 characters Person/ Bicycle/ Motorcycle, etc. (total 68 icons) Off Duty/ Enroute/ In Service/ Returning/ Committed/ Special/ PRIORITY/ CUSTOM0 ~ CUSTOM6/ EMERGENCY! Status text: 1 - 5 TX Rate: Off/ 1/1 - 1/4 - 1/8 Up to 42 characters Type: New-N/ Relay/ Region - Kenwood TH-D75 | User Manual - Page 19
Interval timer Decay Algorithm Prop. Pathing Speed Altitude Object name Manual/ PTT/ Auto/ SmartBeaconing 0.2/ 0.5/ 1/ 2/ 3/ 5/ [sec] Way point format Way point name length Way point output type NMEA/ MAGELLAN/ KENWOOD 6-Char/ 7-Char/ 8-Char/ 9-Char All/ Local/ Filtered Position limit Filter type - Kenwood TH-D75 | User Manual - Page 20
No. Display APRS - Others 590 PC Output 591 Network 592 Voice Alert 593 VA Frequency 594 Message Group Code 595 Bulletin Group Code Digital - RX History 600 View History Digital - TX/RX 610 My Callsign 611 TX Message 612 Direct Reply 613 Auto Reply Timing 614 Data TX End Timing 615 - Kenwood TH-D75 | User Manual - Page 21
shift 946 Secret Access Code Secret access code input 6-6 Setting Values - - - Auto/ Auto (DC-IN)/ Manual/ On 3 - 10 - 60 [sec] High/ Medium/ Low Up to 16 characters Off/ GPS(Altitude) APRS - OBJ - ATT - FINE - POS - BAND - MONI - UP - DOWN Off/ 1.0/ 1.5/ 2.0 [sec] 000 - 999 (TH-D75A only) - Kenwood TH-D75 | User Manual - Page 22
) Language Firmware version Reset Setting Values - Key Lock/ Frequency Lock Off/ On Off/ On Off/ On mi/h, mile (TH-D75A)/ km/h, km (TH-D75E)/ knots, nm feet, inch (TH-D75A)/ m, mm (TH-D75E) °F (TH-D75A)/ °C (TH-D75E) dd°mm.mm'/ dd°mm'ss.s" Maidenhead Grid/ SAR Grid (CONV)/ SAR Grid (CELL) COM+AF/IF - Kenwood TH-D75 | User Manual - Page 23
determined from your offset setting value and an offset direction depending on your selected frequency. Refer to the settings below for offset directions: TH-D75A: Under 145.100 MHz: No offset (Simplex operation) 145.100 ~ 145.499 MHz: - 600 kHz offset 145.500 ~ 145.599 MHz: No offset - Kenwood TH-D75 | User Manual - Page 24
Activating the Tone Function To turn the Tone function on: 1 Select your desired band A or B. 2 Press [TONE] to turn the Tone function On. • Each time you press [TONE], the selection changes as follows: Tone ( Tone ( ) CTCSS ( ) DCS ( : default) Off (no display). ) Cross Additionally - Kenwood TH-D75 | User Manual - Page 25
these frequencies using the Reverse function. This allows you to manually check the strength of signals you receive directly from other stations changes as follows: Simplex operation Simplex operation • If you are using a TH-D75E, when operating on the 430 MHz band, the offset direction changes as - Kenwood TH-D75 | User Manual - Page 26
type Display [0] to [999] [L 0], [U 0] to [L49], [U49] [Pri] [A 1] to [A10] [C] Type Memory channels Program scan memory Priority scan memory Weather channels (TH-D75A only) CALL channels 3 Select the channel. You can select the channel by inputting the channel number from 0 to 999 by 12 keypad - Kenwood TH-D75 | User Manual - Page 27
Storing Simplex and Standard Repeater Frequencies 1 Select the frequency, mode, etc. 2 Press [F], [MR]. Memory channel registration screen appears on the display. 3 Select the memory channel number. 4 Press [ENT]. The simplex channel is registered. Clearing a Memory Channel You can clear the - Kenwood TH-D75 | User Manual - Page 28
Memory Recall Method This menu provides you with the option to recall memory channels with stored frequencies in your current frequency band, or all memory channels: 1 Access Menu No. 202. 3 Select [Group] and press [A/B]. The memory group selection screen appears. 2 Select [All Bands] or [Current - Kenwood TH-D75 | User Manual - Page 29
CALL CHANNEL MEMORY (SIMPLEX) The CALL channel can be used to store any frequency and related data that you will recall often. You may want to dedicate the CALL channel as an emergency channel within your group. 1 Select the frequency, mode, etc. 2 Press [F], [CALL]. Note: ¡ Storing new data in the - Kenwood TH-D75 | User Manual - Page 30
3 Select [Clear Group] and press [A/B]. The clear group selection screen appears. MEMORY SHIFT Shift the contents of a memory channel or CALL channel to VFO. 4 Select the group to clear. 5 Press [ENT]. Each press adds or removes a check mark. Shifting Memory from the Frequency Screen 1 Press [MR] - Kenwood TH-D75 | User Manual - Page 31
9 SCAN Scan is a useful feature for hands-off monitoring of your favorite frequencies. Becoming comfortable with all types of Scan will increase your operating efficiency. This transceiver provides the following types of scans. Scan Type Scan Range Band Scan Scans all frequencies on the current - Kenwood TH-D75 | User Manual - Page 32
PROGRAM SCAN Program scan is to scan within the range between the lower limit frequency and upper limit frequency registered to program scan memory. There are 50 program scan memory from L0/U0 to L49/U49. Setting Scan Limits 1 Select the frequency, mode, etc. to register. 2 Press [VFO]. 3 Press [F], - Kenwood TH-D75 | User Manual - Page 33
Locking Out a Memory Channel This function allows you to skip specific memory channel by excluding it from scanning when a memory scan is performed. 1 Access Menu No. 200. The memory channel list appears. When a memory group is already linked, press [A/B] to cancel the link. 3 Press [ENT]. The - Kenwood TH-D75 | User Manual - Page 34
auto backlight function. [On]: Turns on the scan auto backlight function. Note: ¡ This function does not work when [Backlight Control] (Menu No.900) is [Manual]. ¡ The lighting duration of scan auto backlight cannot be changed. CALL SCAN Use Call Scan to monitor both the Call channel and either the - Kenwood TH-D75 | User Manual - Page 35
10 CTCSS/DCS/CROSS TONE CTCSS You may sometimes want to hear calls only from specific persons. The Continuous Tone Coded Squelch System (CTCSS) allows you to ignore (not hear) unwanted calls from other persons who are using the same frequency. To do so, select the same CTCSS tone as selected by the - Kenwood TH-D75 | User Manual - Page 36
CTCSS Frequency Scan This function scans through all CTCSS frequencies to identify the incoming CTCSS frequency on a received signal. You may find this useful when you cannot recall the CTCSS frequency that the other persons in your group are using. 1 Press [TONE] 2 times to activate the CTCSS - Kenwood TH-D75 | User Manual - Page 37
2 Press [F], press and hold [TONE]. • Scan starts and "Scanning" blinks on the display. • To quit the scan, press [ ]. • When a DCS code is identified, the identified code appears on the display and blinks. 3 Press [A/B] to program the identified code in place of the currently set DCS code. • The - Kenwood TH-D75 | User Manual - Page 38
to 16 digits. Some repeaters in the U.S.A. and Canada offer a service called Autopatch. You can access the public telephone network via such beginning to press keys when making a call. 1 Access Menu No. 162. MANUAL DIALING Manual Dialing requires only two steps to send DTMF tones. 1 Press and hold - Kenwood TH-D75 | User Manual - Page 39
5 Enter a DTMF code for the channel. When a space is entered, it becomes a "Pause" code. 6 Press [ENT]. DTMF memory channel is stored. • If you want to store another DTMF memory channel, repeat the procedure from step 2. Transmitting Stored DTMF Codes 1 Press and hold [PTT]. 2 While transmitting, - Kenwood TH-D75 | User Manual - Page 40
Transmitting EchoLink Memory 1 Press and hold [PTT]. 2 While transmitting, press [ENT]. • The last called EchoLink DTMF Memory channel name and number appears on the display. 3 While still transmitting, select EchoLink Memory channel. 4 While transmitting, press [ENT]. • The stored code scrolls - Kenwood TH-D75 | User Manual - Page 41
is essential in selecting your exact frequency. The default step size on the 144 MHz band is 5 kHz (TH-D75A) or 12.5 kHz (TH-D75E). The default on the 220 MHz band is 20 kHz (TH-D75A). The default on the 430 MHz band is 25 kHz. 1 Press [VFO] to enter VFO mode. 2 Press [A/B] to - Kenwood TH-D75 | User Manual - Page 42
PROGRAMMABLE VFO If you always check frequencies within a certain range, you can set upper and lower limits for frequencies that are selectable. For example, if you select 144 MHz for the lower limit and 145 MHz for the upper limit, the tunable range will be from 144.000 MHz to 145.995 MHz. 1 Select - Kenwood TH-D75 | User Manual - Page 43
and voice guidance sound are not output. ¡ Special PC software is required to process IF signal or detection signal. JVCKENWOOD does not provide any support regarding the procedure to connect to a PC or the PC software. FM NARROW The FM mode band can be switched between normal and narrow. 1 Press - Kenwood TH-D75 | User Manual - Page 44
High Cut 1 Press [MODE] to set SSB mode in band B. 2 Access Menu No. 120. VOX (VOICE-OPERATED TRANSMISSION) VOX eliminates the necessity of manually switching to Transmit mode each time you want to transmit. The transceiver automatically switches to Transmit mode when the VOX circuitry senses that - Kenwood TH-D75 | User Manual - Page 45
From the Menu: 1 Access Menu No. 151. VOX on Busy You can configure the transceiver to force VOX transmission even if the transceiver is receiving a signal. 1 Access Menu No. 153. 2 Select the desired VOX gain level. VOX Delay Time If the transceiver returns to reception mode too quickly after - Kenwood TH-D75 | User Manual - Page 46
the operation is same as [Auto]. When DC-IN is used, the operation is same as [On]. [Manual]: The backlight turns on and off when the [ ] key is pressed. [On]: The backlight is , if necessary. 3 Press [ENT]. Note: ¡ Using the MCP-D75 software, you can change Bitmap of the Power ON graphic. 12-6 - Kenwood TH-D75 | User Manual - Page 47
SINGLE BAND DISPLAY You can changes the displayed information during single band display. Selecting the Information to Display 1 Access Menu No. 904 [Demodulation Mode]: Displays the demodulation mode. Note: ¡ When selecting [GPS(Altitude)] or [GPS(GS)], set the built-in GPS to [ON]. 2 Select [ - Kenwood TH-D75 | User Manual - Page 48
INFORMATION BACKLIGHT Sets whether or not to turn on the backlight when APRS, D-STAR signal-receiving interrupt is displayed and when the scanning is paused or stopped. 1 Access Menu No. 907. 3 Select a level, then press [A/B]. 2 Select [Off], [LCD], or [LCD+Key]. [Off]: Notify backlight does not - Kenwood TH-D75 | User Manual - Page 49
KEY BEEP You can set the transceiver beep function to [Off] or [On]. 1 Access Menu No. 914. AUTO POWER OFF (APO) Automatic Power off is a background function that monitors whether or not any operations have been performed (keys pressed, [ENC] control turned, etc.), and turns the transceiver power - Kenwood TH-D75 | User Manual - Page 50
PROGRAMMABLE FUNCTION KEYS Transceiver PF Keys and Microphone PF keys Function name Description Recording Voice Message 1 Voice Message 2 Voice Message 3 Voice Message 4 Voice Guidance Battery Level VOX Group Name Balance GPS Track LOG SQL SHIFT STEP LOW Key Lock Lockout M>V T.SEL NEW Voice - Kenwood TH-D75 | User Manual - Page 51
KEY LOCK The Key Lock function ensures that your transceiver settings will remain unchanged if you accidentally press a key. To turn Key Lock On or Off, press and hold [F]. • When Key Lock is activated, the < > indicator will appear on the display. VOLUME LOCK This function locks the volume so that - Kenwood TH-D75 | User Manual - Page 52
Setting the Altitude, Rainfall 1 Access Menu No. 971. 2 Select [feet, inch] or [m, mm]. Setting the Temperature 1 Access Menu No. 972. OUTPUT DESTINATION INTERFACE (USB/Bluetooth) Set the interface to use for each of the following applications. Select [USB] or [Bluetooth]. • GPS data (NMEA) output - Kenwood TH-D75 | User Manual - Page 53
firmware version is displayed. You can update the TH-D75A/E firmware by connecting the TH-D75A/E to the PC by using a commercially available USB cable. The latest firmware is available for download from the following URL. https://www.kenwood.com/i/products/info/amateur/software_ download.html (This - Kenwood TH-D75 | User Manual - Page 54
TRANSCEIVER RESET There are 3 types of transceiver reset available: VFO Reset Use to initialize the VFO and accompanying settings. Partial Reset Use to initialize all settings other than the Memory channels, and the DTMF memory channels. Full Reset Use to initialize all transceiver settings that you - Kenwood TH-D75 | User Manual - Page 55
13 GPS BUILT-IN GPS FUNCTION ON/ OFF 1 Access Menu No. 400 Name entry You can enter alphanumeric characters plus special ASCII characters (up to 8 digits). 2 Select [On] or [Off]. [On]: Turns on the built-in GPS function. [Off]: Turns off the built-in GPS function. When the built-in GPS function - Kenwood TH-D75 | User Manual - Page 56
Displaying Position Information When the built-in GPS receiver is On, pressing [F], [MARK] will display "Latitude/longitude, time, altitude, heading, speed", then press [ ] to cycle the display between "Latitude/ longitude, time, altitude, heading, speed" "Target point distance, Travel direction" - Kenwood TH-D75 | User Manual - Page 57
Key operations in [GPS satellite information] Key Name Operation [] Switches to [Target point distance and Target direction] screen. [] Switches to FM radio frequency screen when FM radio mode is On. [MODE] Switches to [Target point distance and Target direction] screen. [MENU] Switches to - Kenwood TH-D75 | User Manual - Page 58
following location information up to 100 points in the Position Memory List. You can edit all information except Registration time manually. • Position name • Icon (same as APRS) • Registration time • Longitude • Latitude • Altitude Checking Registered Position Memory 1 Press [MARK]. The position - Kenwood TH-D75 | User Manual - Page 59
Editing the Position (Latitude and Longitude) 1 Select [Position] and press [A/B]. The mode changes to the latitude and longitude edit mode. Key Name [ ]/[ ] or [ENC] [ENT] [MODE] Operation Changes the item. Confirms the editing. Cancels editing and returns to the previous screen. 2 Select - Kenwood TH-D75 | User Manual - Page 60
paused. ¡ The files stored on the microSD memory card are named as Track Log started date. Example: TH-D75A:05122024_124705.nme (File for which track logging started at 12:47:05 on May 12 2024.) TH-D75E:12052024_124705.nme (File for which track logging started at 12:47:05 on 12 May 2024 - Kenwood TH-D75 | User Manual - Page 61
Selecting the Track Log Acquisition Type You can set the conditions for saving portable Track information as GPS Logger. You can change the settings for travel speed, etc. 1 Access Menu No. 412. Clearing the Track Log Clear a Track Log saved in a microSD memory card. 1 Access Menu No. 411. 2 - Kenwood TH-D75 | User Manual - Page 62
state. For other operations and settings, please read this instruction manual in detail and fully understand the contents before operation. Inappropriate (/>) Bus (/U) (/U) Railroad Engine (/=) Home (/-) Yagi@QTH (/y) KENWOOD (\K) RADIO (\Y) RV (/R) (/R) Van (/v) (/v) Jeep (/j) (/j) - Kenwood TH-D75 | User Manual - Page 63
Tent) HAM Store School Hospital Red Cross Lighthouse Speedpost (Value Singpost) WorkZone Wreck/Obstruction Sheriff Fire Sunny Gale Flags Tornado National WX Service Site WX (Weather Station) Digipeater Mic-E Repeater QSO Repeater Circle IRLP EchoLink Node GATEway DF station Dish Antenna PC User SSTV - Kenwood TH-D75 | User Manual - Page 64
for preprogramming. Storing Status Text 1 Access Menu 503. The selectable comments are listed below: [Off Duty], [Enroute], [In Service], [Returning], [Committed], [Special], [PRIORITY], [CUSTOM 0 ~ CUSTOM 6], or [EMERGENCY!] • If you select [EMERGENCY!], a confirmation message appears. Press - Kenwood TH-D75 | User Manual - Page 65
Setting APRS Data Communication ON Press [F], [LIST] to enter APRS mode. Each time a new APRS packet is received, the frequency display is interrupted to show information as below. Note: ¡ The APRS programs for PCs have entry fields for a position comment and status text. The data entered to these - Kenwood TH-D75 | User Manual - Page 66
STATION LIST This transceiver is capable of receiving and storing APRS data received from up to 100 stations in memory.You can easily recall the information of the desired station. 1 Press [LIST] to show the list of stations. Note: ¡ When data from the 101st station is received, the oldest data in - Kenwood TH-D75 | User Manual - Page 67
with MicEncoder format. Station for transmitting positional MicE-MSG information packet with MicEncoder. Object ID Status Telemetry Ccompress GRID-SQ TH-D7 TH-D72 TH-D74 TH-D75 TM-D700 TM-D710 VX-8 VX-8G FT1D FT2D FT3D FT5D FTM-100D FTM-200D FTM-300D FTM-350 FTM-400D FTM-500D - Kenwood TH-D75 | User Manual - Page 68
Cursor Control Select a cursor control setting for station list screen. 1 Press [MODE] to change the cursor control type to [Followed] or [Fixed]. [Followed]: The Callsign with the indicating cursor will be followed. On the detailed list screen, the selected Callsign continues to be displayed. Sort - Kenwood TH-D75 | User Manual - Page 69
Digipeater Stations are displayed. Only Weather Stations are displayed. Only Mobile Stations are displayed. Only Object Stations are displayed. Only KENWOOD TH-D75, TH-D74, TH-D72, TH-D7, TM-D700, TM-D710G, TM-D710, and RC-D710 Stations are displayed. Only Navitra Stations starting from $PNTS are - Kenwood TH-D75 | User Manual - Page 70
detail screen. [A/B] To move to the message screen. Meaning Message addressed to you B Bulletin message ! Report by the National Weather Service A message for which a reception acknowledgment was returned G Group message • When a duplicate message from the same station is received, the reception - Kenwood TH-D75 | User Manual - Page 71
Transmitting a Message 1 Press [MSG]. The message list appears on the display. 2 Press [MENU]. The message list Menu appears on the display. 6 Select [Send] and press [A/B] to send the message. You can select the following items other than [Send], [Reply], [Edit], and [New] in message list Menu. [ - Kenwood TH-D75 | User Manual - Page 72
PROGRAMMING A PACKET PATH Select the packet path type from [New-N], [Relay], [Region], [Others1], [Others2], or [Others3]. When you press [A/B], the < > indicator appears on the right side of the packet path type, showing the current used information. 1 Access Menu No. 504. [New-N]: This digipeat - Kenwood TH-D75 | User Manual - Page 73
2 Enter a path. DCD Sense You can also select the method for inhibiting the built-in TNC from transmitting. 1 Access Menu No. 507. • A Packet path is the digipeat route of the packet data sent from My station. For example, if you want your packet to take the [W4DJY-1] > [W6DJY-1] route, enter [ - Kenwood TH-D75 | User Manual - Page 74
are present, an APRS packet is not transmitted after the interval. After signals drop, transmitting is executed. 2 Select [Manual], [PTT], or [SmartBeaconing]. [Manual]: Each press [BCN] transmits the beacon. [PTT]: 1 Press [BCN] to switch the function ON. • < > appears and blinks. 2 Press - Kenwood TH-D75 | User Manual - Page 75
Decay Algorithm This function continuously extends the packet transmission interval in the case that there is no change of position information. 1 Access Menu No. 512. When jointly using a Decay Algorithm, if the speed is 1 knot or slower, a Decay Algorithm pattern is used for transmitting, but if - Kenwood TH-D75 | User Manual - Page 76
OBJECT FUNCTIONS Setting the Object Information. 1 Access Menu No. 516. Latitude/Longitude 2 Select [Object1], [Object2], or [Object3] and press [ENT]. • When you press [A/B], the < > indicator appears on the right side of the object item, showing the current used information. Object Name 6 Enter - Kenwood TH-D75 | User Manual - Page 77
QSY, over to the reported voice frequency to begin voice communication by the select of [Tune]. Transmitting QSY Information A properly configured functioning TH-D75 QSY station can automatically embed the voice frequency from the non-data band to the beginning of status text. This is the mechanism - Kenwood TH-D75 | User Manual - Page 78
Operation When Receiving a QSY When QSY (frequency) information is received, the station list appears with the verified frequency. 1 Select [Tune], and press [A/B]. Slow Rate Low speed transmission interval time. 1 Access Menu No. 531. • The frequency is set in the voice channel (non-data band). - Kenwood TH-D75 | User Manual - Page 79
of Way point Format that is sent. 1 Access Menu No. 540. 2 Select [NMEA], [MAGELLAN] or [KENWOOD]. NMEA]: The data using the NMEA 0183 "$GPWPL" format. [MAGELLAN]: The data using the " $PMGNWPL" format. [KENWOOD]: The data using the " $PKWDWPL" format. Way Point Length Select the length of the Way - Kenwood TH-D75 | User Manual - Page 80
:", meaning "Auto Answer message", is automatically added to the beginning of all auto-reply messages. This has been added, based on the recommendations of "APRS SPEC Addendum 1.1". Refer to http://aprs.org/ aprs11.html for details. 14-19 - Kenwood TH-D75 | User Manual - Page 81
immediately following an acknowledged received message. Reply Message Text 1 Access Menu No. 564. TX Beep When your beacon is transmitted in a manner other than manually, you can select whether or not it emits a beep sound. 1 Access Menu No. 571. 2 Select [Off] or [On]. [Off]: A beep does not sound - Kenwood TH-D75 | User Manual - Page 82
SETTING DISPLAY Display Area Selects the Display area. 1 Access Menu No. 573. SETTING DIGIPEATER The transceiver works as a standalone digipeater. Digipeat (My Call) Sets whether to run Digipeat (MyCall) when the transceiver is used as a digipeater. If the receiver packet path contains My - Kenwood TH-D75 | User Manual - Page 83
UIdigipeat Sets whether to run UI digipeat when the transceiver is used as a digipeater. If the received UI frame contains one of the entered aliases (e.g., "WIDE1-1" for one-hop fill-in digi) of the beginning part of the packet path that has not yet been digipeated, the alias is replaced to My - Kenwood TH-D75 | User Manual - Page 84
2 Select [APRS] or [Altnet]. [APRS]: (Use this setting for normal use: default setting) When transmitting messages and meteorological data using the TH-D75, "APK005" is added to the packet, following your station Callsign. There are no restrictions on received packets. [Altnet]: When it is necessary - Kenwood TH-D75 | User Manual - Page 85
VOICE ALERT This function will notify another station as to whether or not they are within communications range by emitting beacon tones. When a Mobile Station is mobile with the Voice Alert function turned ON, other stations also with Voice Alert turned ON will hear the beacon sound of the Mobile - Kenwood TH-D75 | User Manual - Page 86
still remain in the buffer. Note: ¡ The built-in TNC does not support Command mode or Converse mode. ¡ The built-in TNC has 4k byte KISS Download the virtual COM port driver from the URL listed below. https://www.kenwood.com/i/products/info/amateur/ software_download.html Note: ¡ Do not connect the - Kenwood TH-D75 | User Manual - Page 87
. STEP 2: Register your Callsign to a gateway repeater. Refer to the User Guide in detail. MY CALLSIGN Set your Callsign to the transceiver in DV/DR mode display RX History. Note: ¡ The basic operations in DR mode are not supported in DV mode. ¡ The transceiver has a Time-Out Timer function for - Kenwood TH-D75 | User Manual - Page 88
DIGITAL FUNCTION MENU This menu switches the functions to use for operation in digital mode. How to Use the Digital Function Menu 1 Press [MODE] to enter DR mode. 2 Press [F], [MODE]. The Digital Function Menu appears. (DV mode) (DR Mode) 3 Select an item in the Digital Function Menu and press - Kenwood TH-D75 | User Manual - Page 89
LOCAL AREA CALL A local area call (local CQ) is the output of a CQ through only one repeater. A call can be made by setting a local CQ to "TO" and pressing [PTT]. Setting the Access Repeater (FROM) 1 Press [MODE] to enter DR mode. 2 Press and hold [ ]. The FROM selection screen appears. 3 Select [ - Kenwood TH-D75 | User Manual - Page 90
transmission by the other station is finished. ¡ In stable communication condition, you can also make a reply by Direct Reply function without manually setting the destination Callsign. 2 Press [A/B]. The Callsign list editing screen appears. 3 Select the item and press [ENT]. The editing screen - Kenwood TH-D75 | User Manual - Page 91
Sorting the Callsign You can sort the Callsign list. 1 Press [MODE] in the Callsign list selection screen. The move position selection screen appears. 2 Select a move position and press [A/B]. When you move an item to the end of the list, select [Move to End] and press [A/B]. AUTO REPLY FUNCTION - Kenwood TH-D75 | User Manual - Page 92
Displaying the RX History 1 Access Menu No. 600. 4 Select a number for registration and press [ENT]. The TX messages is selected Each press of [PTT] transmits the selected message. 2 Select a list and press [A/B]. The RX history details screen appears. 3 Press [A/B]. The RX history GPS screen - Kenwood TH-D75 | User Manual - Page 93
Setting the Destination Repeater (TO) 1 Press and hold [ ]. The destination selection screen appears. This screen also appears when selecting [Destination Select] in the Digital Function Menu. 2 Select [Individual] and press [ENT]. The repeater list appears. 3 Select the Callsign from the Callsign - Kenwood TH-D75 | User Manual - Page 94
Setting by Local CQ 1 Press and hold [ ]. The destination selection screen appears. This screen also appears when selecting [Destination Select] in the Digital Function Menu. 2 Select [Local CQ] and press [ENT]. CQCQCQ is set to [TO]. Setting by Gateway CQ 1 Press and hold [ ]. The destination - Kenwood TH-D75 | User Manual - Page 95
Operation When performing data communication operation, refer to the instruction manual of the communication software. 1 Set the Callsign of easily send the EMR signal, please note that you will cause to give trouble to the other station. ¡ Setting the other station Callsign or CQ are - Kenwood TH-D75 | User Manual - Page 96
RX AFC This function is to correct a slight frequency offset of the received signal to achieve frequency stability. 1 Access Menu No. 616. 2 Select [Off] or [On]. [Off]: Turns off the RX AFC. [On]: Turns on the RX AFC. Note: ¡ This function does not work with the TX frequency. BK (BREAK) CALL BK ( - Kenwood TH-D75 | User Manual - Page 97
mode). ¡ The D-STAR [APRS Sentence] is transmitted in APRS standard format (uncompressed), not in MicEncoder format. Therefore Position Comments such as "In Service" are not transmitted. GPS Auto TX This function is to transmit the positioned GPS data at regular intervals. You can set the interval - Kenwood TH-D75 | User Manual - Page 98
RX BREAK-IN DISPLAY This function is to display information received from other station in a Break-In screen. Received information is displayed in a Break-In screen in the operation band. RX Break-In Display Method This function is to set the method to display a Break-In screen (display a Break-In - Kenwood TH-D75 | User Manual - Page 99
character input procedure, refer to page No.6-1. RPT1 Configuration Sets RPT1 used for DV Gateway mode. 1 Access Menu No. 652. Note: ¡ For specific instructions on how to operate DV Gateway communication, please refer to the description of the third-party application to be used. JVCKENWOOD does not - Kenwood TH-D75 | User Manual - Page 100
Device Information Confirm the device-name used in DV Gateway mode. 1 Access Menu No. 654. DR SCAN This function scans the stations in the repeater list or hotspot list in DR mode. 1 Press and hold [VFO], or select [DR Scan] in the Digital Function Menu. DR Scan screen appears. DV Gateway Mode - Kenwood TH-D75 | User Manual - Page 101
Group selection screen appears 4 Select a group to be skipped and press [A/B]. The lockout icon < >appears. 5 Press [PTT] to return to the frequency screen. Individual Lockout Setting You can lock out the specific repeaters in a repeater group. 1 Access Menu No. 210. World Region selection screen - Kenwood TH-D75 | User Manual - Page 102
Clearing the Repeater List You can clear the specific repeater in the repeater list. 1 Select the repeater in the repeater list selection screen. 2 Press [MENU]. Repeater list menu screen appears. 3 Select [Clear] and press [A/B]. The confirmation screen appears. 4 Press [A/B]. The repeater is - Kenwood TH-D75 | User Manual - Page 103
2 Press [MENU] . Hotspot list menu screen appears. Clearing the Hotspot List Clear hotspot from the hotspot list. 1 Select the hotspot you want to clear on the hotspot selection screen. 3 Select [Edit] and press [A/B]. Hotspot list editing screen appears. 2 Press [MENU] on the hotspot selection - Kenwood TH-D75 | User Manual - Page 104
Download the memory control program MCP-D75 and virtual COM port driver from the following URL. https://www.kenwood.com/i/products/info/amateur/software_ download. virtual COM port driver, the wrong driver that does not support the transceiver will be installed and communicating correctly with the - Kenwood TH-D75 | User Manual - Page 105
as the sub device. The transceiver supports the following profiles. HSP (Headset Profile away from any nearby equipment. The communication problem may also be resolved by moving the For how to enable the pairing mode, refer to the instruction manual of the headset (device to be connected). 4 Access - Kenwood TH-D75 | User Manual - Page 106
PIN code depending on the device to be connected. When Requested to Enter the PIN Code The PIN code input screen appears. Refer to the instruction manual of the device to be connected and enter the PIN code using the number keys and press [A/B]. If you press [ ] when the PIN code input - Kenwood TH-D75 | User Manual - Page 107
with a Bluetooth compatible adapter and a PC, refer to the instruction manual of the PC and adapter. Pairing between the transceiver and PC the memory control program MCP-D75 and use a normal communication port. ¡ When using with a PC or USB adapter which supports Bluetooth version 2.0 or earlier, - Kenwood TH-D75 | User Manual - Page 108
No. 936. 2 Select [On] or [Off]. [On]: Turns ON the auto connect function. [Off]: Turns OFF the auto connect function. Note: ¡ This function does not support automatic connection with a PC. 18-4 - Kenwood TH-D75 | User Manual - Page 109
MEMORY CARD Supported microSD Memory For precautions regarding the microSD memory card, refer to the instruction manual of the microSD memory card. ¡ The file system is FAT32 memory card becomes as shown in the following diagram. KENWOOD TH-D75 CAPTURE: Stores Capture images. GPS LOG: Stores GPS - Kenwood TH-D75 | User Manual - Page 110
Removing (Unmounting) a microSD Memory Card When removing a microSD memory card, be sure to perform the operation to safely remove (unmount) it. Note: ¡ Removing a microSD memory card without unmounting it correctly may damage it. 1 Access Menu No. 820. The microSD memory card is unmounted. When - Kenwood TH-D75 | User Manual - Page 111
clear confirmation screen appears. 2 Select [Data For TH-D75A], [Data For TH-D75E], or [Data For TH-D75] and press [A/B]. [Data For TH-D75A]: Repeater lists mainly used in North America. [Data For TH-D75E]: Repeater lists mainly used in Europe. [Data For TH-D75]: Repeater lists mainly used in Japan - Kenwood TH-D75 | User Manual - Page 112
2 Select [On]. Recording begins when PTT is pressed. [Off]: Does not record the communication history. [On]: Recording the communication history. Stored files are named as follows. • YYYYMMDD_HHMMSS.csv Example: 20240512_125303.CSV (Communication history from 12:53:03 on May 12, 2024) The following - Kenwood TH-D75 | User Manual - Page 113
follows. Example: 04202024_132051.wav (TH-D75A) 20042024_132051.wav (TH-D75E) (File for which recording OFF. Note: ¡ The transceiver only supports recording to a microSD memory card. ¡ file list does not appear. ¡ If there is a problem with the format of an audio file, the error screen - Kenwood TH-D75 | User Manual - Page 114
Clearing Audio Files 1 Access Menu No. 300. The recording file list appears. 2 Select the file. 3 Press [MENU]. The recording file list menu appears. 4 Select [Clear] and press [A/B]. The recording file clear confirmation screen appears. 5 Press [A/B]. The file is cleared and the recording file list - Kenwood TH-D75 | User Manual - Page 115
21 FM RADIO The transceiver can receive FM radio broadcasts. You can listen to FM radio while simultaneously monitoring two signals as well as while waiting for a CQ or a call from an acquaintance, or waiting for an APRS call. When the band A or B receives a signal (call from another party) and - Kenwood TH-D75 | User Manual - Page 116
3 Select the channel and press [ENT]. The FM radio station is registered and the FM radio memory channel list appears. 4 Select [Clear Memory] and press [A/B]. The FM radio memory clear confirmation screen appears. 4 Press [ ]. The frequency screen reappears. Selecting a FM Radio Station Select a - Kenwood TH-D75 | User Manual - Page 117
Memory Shift Copy the frequency of a broadcast station from the FM radio memory channel list to VF0. 1 Access Menu No. 710. The FM radio memory channel list appears. 5 Enter characters. 6 Press [ENT]. The broadcast station name is registered. 2 Select the Channel. Select from FM0 to FM9. 3 Press - Kenwood TH-D75 | User Manual - Page 118
FM Radio Auto Mute Return Time When a signal is received or transmitted in band A or B while listening to a radio broadcast in FM radio mode, the reception sound of the radio broadcast is muted. When a signal is no longer received in band A or B or after transmission is completed, the transceiver - Kenwood TH-D75 | User Manual - Page 119
microphone and Bluetooth headset in addition to the built-in microphone. ¡ The transceiver only supports recording a voice message to the internal memory. Recording to a microSD card is not supported. RECORDING VOICE MESSAGES Record the voice from the microphone to the voice message memory channels - Kenwood TH-D75 | User Manual - Page 120
SENDING VOICE MESSAGES Send the message of a recorded voice message channel. 1 Access Menu No. 310. The voice message list appears. 2 Select the channel to send. 3 Press [A/B]. Playing and sending begins. Pressing [PTT] stops playback and returns to the frequency screen. When playing and sending - Kenwood TH-D75 | User Manual - Page 121
CLEARING VOICE MESSAGES 1 Access Menu No. 310. The voice message list appears. 2 Select the channel to clear. 3 Press [MENU]. The voice message list menu appears. 4 Select [Clear] and press [A/B]. The voice message clear confirmation screen appears. 5 Press [A/B]. The voice message is cleared. The - Kenwood TH-D75 | User Manual - Page 122
the voice guidance reading out speed. The default is [Speed 1]. 1 Access Menu No. 918. 2 Select [Off], [Manual], [Auto1], or [Auto2]. [Off]: Turn off the voice guidance function. [Manual]: Reads out the current status when pressing [ ]. [Auto1]: Reads out the status or displayed information changed - Kenwood TH-D75 | User Manual - Page 123
Callsign Announce This function is to announce the Callsign when a D-STAR signal is received. It enables you to know the Callsign without looking at the screen. 1 Access Menu No. 644. • Please refer to page No.16-12 "CALLSIGN ANNOUNCE" for details. Note: ¡ When [Kerchunk], [My Station], or [All] is - Kenwood TH-D75 | User Manual - Page 124
24 WEATHER ALERT (TH-D75A ONLY) The Weather Alert is available only in the USA and Canada. When activated, this function will check for a received NOAA 1050 Hz tone. When - Kenwood TH-D75 | User Manual - Page 125
us assume the VHF band of the mobile transceiver will be controlled. On the TH-D75A: 1 Access Menu No. 946. The current secret access code number appears. instruction manual for the mobile transceiver. If it is not described, consult your authorized KENWOOD dealer, customer service, or service - Kenwood TH-D75 | User Manual - Page 126
. Model Name KNB-75LA KSC-25LS KBP-9 KMC-45D EMC-11 EMC-12 EMC-3A HMC-3 KHS-21 KHS-35F PG-2W PG-3J MCP-D75 ARFC-D75 Name Li-ion Battery Pack(STD, 7.4 V, 1820 mAh) Rapid Charger Battery Case Speaker Microphone Clip Microphone with Earphone Clip Microphone with Earphone Clip Microphone - Kenwood TH-D75 | User Manual - Page 127
return accessory items unless you feel they are directly related to the service problem. You may return this product for service to the authorized KENWOOD dealer from whom you purchased it, or any authorized KENWOOD service center. Please do not send subassemblies or printed circuit boards; send the - Kenwood TH-D75 | User Manual - Page 128
TROUBLESHOOTING The problems described in this table are commonly encountered operational malfunctions and are usually not caused by circuit failure. Problem Power is not turned on when using Li-ion battery pack or AAA alkaline batteries. Power is not turned on when using regulated DC power - Kenwood TH-D75 | User Manual - Page 129
Problem +AF/IF Output". Data saved on the microSD memory Data format is not supported. card cannot be read. The voice of receiving party is cut off Bad is incorrect. Set the correct access repeater to "FROM". The manually entered repeater frequency is incorrect (or shift setting is incorrect). - Kenwood TH-D75 | User Manual - Page 130
Consumption (TYP.) Battery Life Dimensions (W x H x D) Weight (net) Band A TX: 144 - 148 (TH-D75A), 144 - 146 (TH-D75E), 222 - 225 (TH-D75A), 430 - 450 (TH-D75A), 430 - 440 (TH-D75E) MHz RX: 136 - 174, 216 - 260 (TH-D75A only), 410 - 470 MHz Band B RX: 0.1 - 76, 76 - 108 MHz (WFM) 108 - 524 - Kenwood TH-D75 | User Manual - Page 131
IF J3E, A3E, A1A FM 12dB SINAD FM/ NFM 144 MHz FM/ NFM FM/ NFM 220 MHz (TH-D75A only) 430 MHz DV PN9/GMSK 4.8kbps, BER 1% 144 MHz (TH-D75A) 144 MHz (TH-D75E) 220 MHz (TH-D75A only) 430 MHz Except above Amateur Band FM BC Band SSB 10 dB S/N AM 10 dB S/N AM 10 - Kenwood TH-D75 | User Manual - Page 132
TH-D75A/ TH-D75E SPECIFICATIONS Bluetooth Version, Class Output Power Modulation Characteristics Initial Carrier Frequency Carrier Frequency Drift Version 3.0, Class 2 -6 ≺ Pav ≺ 4 dBm 140 ≦ ⊿f 1avg ≦ 175 kHz -75 ≦ fo ≦ + - Kenwood TH-D75 | User Manual - Page 133
© 2024
-
 1
1 -
 2
2 -
 3
3 -
 4
4 -
 5
5 -
 6
6 -
 7
7 -
8
-
9
-
10
-
11
-
12
-
13
-
14
-
15
-
16
-
17
-
18
-
19
-
20
-
21
-
22
-
23
-
24
-
25
-
26
-
27
-
28
-
29
-
30
-
31
-
32
-
33
-
34
-
35
-
36
-
37
-
38
-
39
-
40
-
41
-
42
-
43
-
44
-
45
-
46
-
47
-
48
-
49
-
50
-
51
-
52
-
53
-
54
-
55
-
56
-
57
-
58
-
59
-
60
-
61
-
62
-
63
-
64
-
65
-
66
-
67
-
68
-
69
-
70
-
71
-
72
-
73
-
74
-
75
-
76
-
77
-
78
-
79
-
80
-
81
-
82
-
83
-
84
-
85
-
86
-
87
-
88
-
89
-
90
-
91
-
92
-
93
-
94
-
95
-
96
-
97
-
98
-
99
-
100
-
101
-
102
-
103
-
104
-
105
-
106
-
107
-
108
-
109
-
110
-
111
-
112
-
113
-
114
-
115
-
116
-
117
-
118
-
119
-
120
-
121
-
122
-
123
-
124
-
125
-
126
-
127
-
128
-
129
-
130
-
131
-
132
-
133
 |
 |

B5A-4505-00/00 (EN)
USER MANUAL
This User Manual covers detailed operating instructions of the TH-D75A/E
including basic operating instructions described in the User Guide comes
with the product.
TH-D75A
TH-D75E