KitchenAid KBNU487VSS Use & Care Guide - Page 14
Installation Instructions - weight
 |
View all KitchenAid KBNU487VSS manuals
Add to My Manuals
Save this manual to your list of manuals |
Page 14 highlights
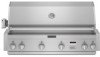
INSTALLATION INSTRUCTIONS Built-in Outdoor Grill Installation WARNING Excessive Weight Hazard Use two or more people to move and install grill. Failure to do so can result in back or other injury. Install Tank Tray for 20 lb LP Gas Fuel Tank For Models Equipped for Use with a 20 lb LP Tank 1. Position the tank tray for 20 lb LP gas fuel tank in the island cabinet and determine the dimension for your grill size from the chart. ■ Unpack grill. Remove all packaging materials and remove grill from carton. ■ Place grill into outdoor enclosure, but leave enough room in back to connect to gas supply and electrical single prong plug-in. ■ Open the hood. Remove Packaging Material Inside the Grill 1. Cut the tiedowns holding the grates together. 2. Remove warming shelf and grill grates from inside the grill and remove packaging material. 3. Remove foam block and wrap from inside the grill. 20⁵⁄₈" (52.4 cm) 2¹⁄₄" (5.7 cm) A 18³⁄₈" (46.7 cm) B A B A. Foam block B. Foam wrap 4. Replace the grill grates. 5. Place warming shelf on brackets as shown. B A A A. Warming shelf brackets B. Warming shelf 6. Dispose of/recycle all packaging material. Built-In Grill Size 27" (68.6 cm) 36" (91.4 cm) 48" (121.9 cm) Dimension A 3³⁄₈" (8.6 cm) 4" (10.2 cm) 4" (10.2 cm) Dimension B 25¹⁄₈" (63.8 cm) 34¹⁄₈" (86.7 cm) 46¹⁄₈" (117.2 cm) 2. Square the tank tray mounting brackets and mark the mounting hole locations in the island base. 3. Remove the top nuts (4) from the tank tray assembly and lift the tank tray off of the mounting brackets. A B C D E A. Top nut B. Tank tray C. Bottom nut D. Bolt E. Mounting bracket 14
-
 1
1 -
2
-
3
-
4
-
5
-
6
-
7
-
8
-
 9
9 -
 10
10 -
 11
11 -
 12
12 -
 13
13 -
 14
14 -
 15
15 -
 16
16 -
 17
17 -
 18
18 -
 19
19 -
20
-
21
-
22
-
23
-
24
-
25
-
26
-
27
-
28
-
29
-
30
-
31
-
32
-
33
-
34
-
35
-
36
-
37
-
38
-
39
-
40
-
41
-
42
-
43
-
44
-
45
-
46
-
47
-
48
-
49
-
50
-
51
-
52
-
53
-
54
-
55
-
56
-
57
-
58
-
59
-
60
-
61
-
62
-
63
-
64
-
65
-
66
-
67
-
68
-
69
-
70
-
71
-
72
-
73
-
74
-
75
-
76
-
77
-
78
-
79
-
80
 |
 |
