KitchenAid KBNU487VSS Use & Care Guide - Page 21
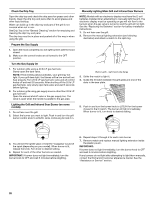
Change the Rotisserie-infrared burner orifices, Change the Sear burner orifices
 |
View all KitchenAid KBNU487VSS manuals
Add to My Manuals
Save this manual to your list of manuals |
Page 21 highlights
3. Use 6 mm socket and wrench or 6 mm nut driver to remove the brass orifices from the end of the gas valves. A Change the Rotisserie-infrared burner orifice(s) 1. Remove the access cover and screw at the back of the grill hood with a Phillips screwdriver. A. Grill burner orifice 4. Install new 2.34 mm orifices supplied with this kit to the end of the gas valve. Use 6 mm socket and wrench or 6 mm nut driver to tighten. NOTE: The number 2.34 is stamped on the orifice for identification. 2. Use Phillips screwdriver to remove 2 screws holding the spider guard to the burner. A B A A. Grill burner orifice 5. Replace burner by sliding the middle tube (venturi) over the orifice. A B A. Burner/orifice connection B. Burner 6. Reattach gas burner using 2 screws. A A. Two screws 7. Repeat the procedure for each grill burner. A. Spider guard B. Two screws 3. Use 10 mm wrench to remove the brass orifice located at the end of the supply pipe. 4. For models with 1 rotisserie burner: Install 1.9 mm orifice supplied with this kit to the end of the supply pipe. Use 10 mm wrench to tighten. For models with 2 rotisserie burners: Install 1.55 mm orifice supplied with the kit to the end of the supply pipe. Use 10 mm wrench to tighten. NOTE: The number 1.9 mm or 1.55 mm is stamped on the orifice for identification. 5. Replace the spider guard and secure with the 2 screws removed in Step 2. 6. Repeat the procedure for each rear burner. Change the Sear burner orifices (for models equipped with sear burner) 1. Remove the sear burner cover screws. Set the screws and cover aside. A A A. Sear burner cover screws 2. Remove the burner igniter mounting screws. 21
-
 1
1 -
2
-
3
-
4
-
5
-
6
-
7
-
8
-
9
-
10
-
11
-
12
-
13
-
14
-
15
-
 16
16 -
 17
17 -
 18
18 -
 19
19 -
 20
20 -
 21
21 -
 22
22 -
 23
23 -
 24
24 -
 25
25 -
 26
26 -
27
-
28
-
29
-
30
-
31
-
32
-
33
-
34
-
35
-
36
-
37
-
38
-
39
-
40
-
41
-
42
-
43
-
44
-
45
-
46
-
47
-
48
-
49
-
50
-
51
-
52
-
53
-
54
-
55
-
56
-
57
-
58
-
59
-
60
-
61
-
62
-
63
-
64
-
65
-
66
-
67
-
68
-
69
-
70
-
71
-
72
-
73
-
74
-
75
-
76
-
77
-
78
-
79
-
80
 |
 |
