KitchenAid KUID508HPS Installation Instructions - Page 5
Door Reversal, Electrical Shock Hazard
 |
View all KitchenAid KUID508HPS manuals
Add to My Manuals
Save this manual to your list of manuals |
Page 5 highlights
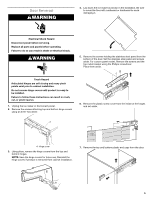
Door Reversal WARNING 4. Lay down the ice maker as shown in the illustration. Be sure to cover the floor with cardboard or hardboard to avoid damaging it. Electrical Shock Hazard Disconnect power before servicing. Replace all parts and panels before operating. Failure to do so can result in death or electrical shock. WARNING 5. Remove the screws holding the stainless steel panel from the bottom of the door. Set the stainless steel panel and screws aside. For custom panel model, Remove the screws and the top metal bracket using the Phillips screwdriver. Place them aside. Crush Hazard Articulated hinges are self closing and many pinch points exist prior to cabinet installation. Do not remove hinge covers until product is ready to be installed. Failure to follow these instructions can result in crush, cut, or pinch injuries. 1. Unplug the ice maker or disconnect power. 2. Remove the screws attaching top and bottom hinge covers using an 3/16" hex driver. 6. Remove the plastic screw cover from the inside of the hinges and set aside. A A. Hinge cover 3. Using pliers, remove the hinge covers from the top and bottom hinges. NOTE: Save the hinge covers for future use. Reinstall the hinge covers if product is removed from cabinet installation. 7. Remove the top and bottom plastic end caps from the door. 5
-
 1
1 -
 2
2 -
 3
3 -
 4
4 -
 5
5 -
 6
6 -
 7
7 -
 8
8 -
 9
9 -
 10
10 -
 11
11 -
12
-
13
-
14
-
15
-
16
-
17
-
18
-
19
-
20
-
21
-
22
-
23
-
24
-
25
-
26
-
27
-
28
-
29
-
30
-
31
-
32
-
33
-
34
-
35
-
36
-
37
-
38
-
39
-
40
-
41
-
42
-
43
-
44
-
45
-
46
-
47
-
48
-
49
-
50
-
51
-
52
-
53
-
54
-
55
-
56
 |
 |
